 by
by 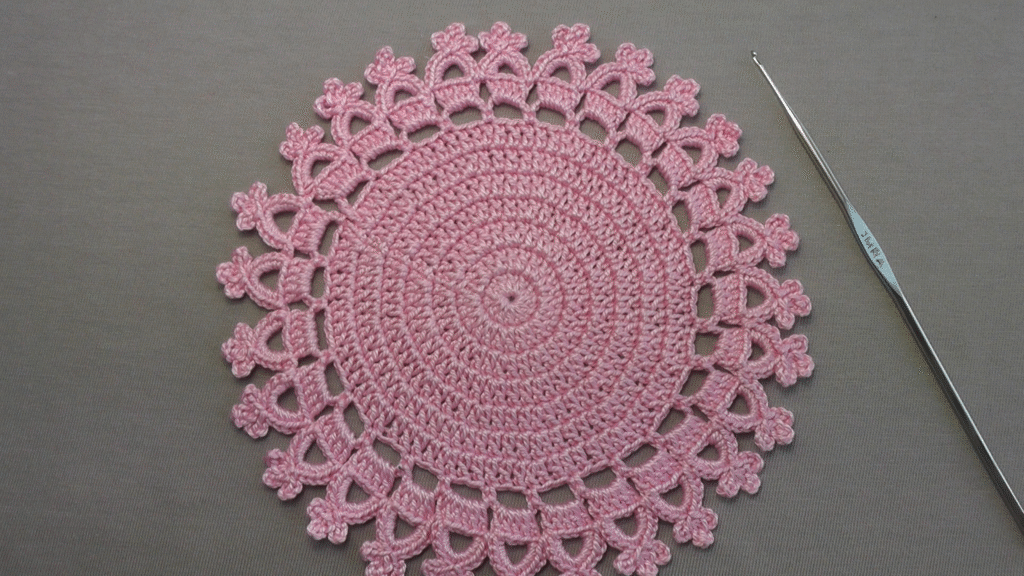
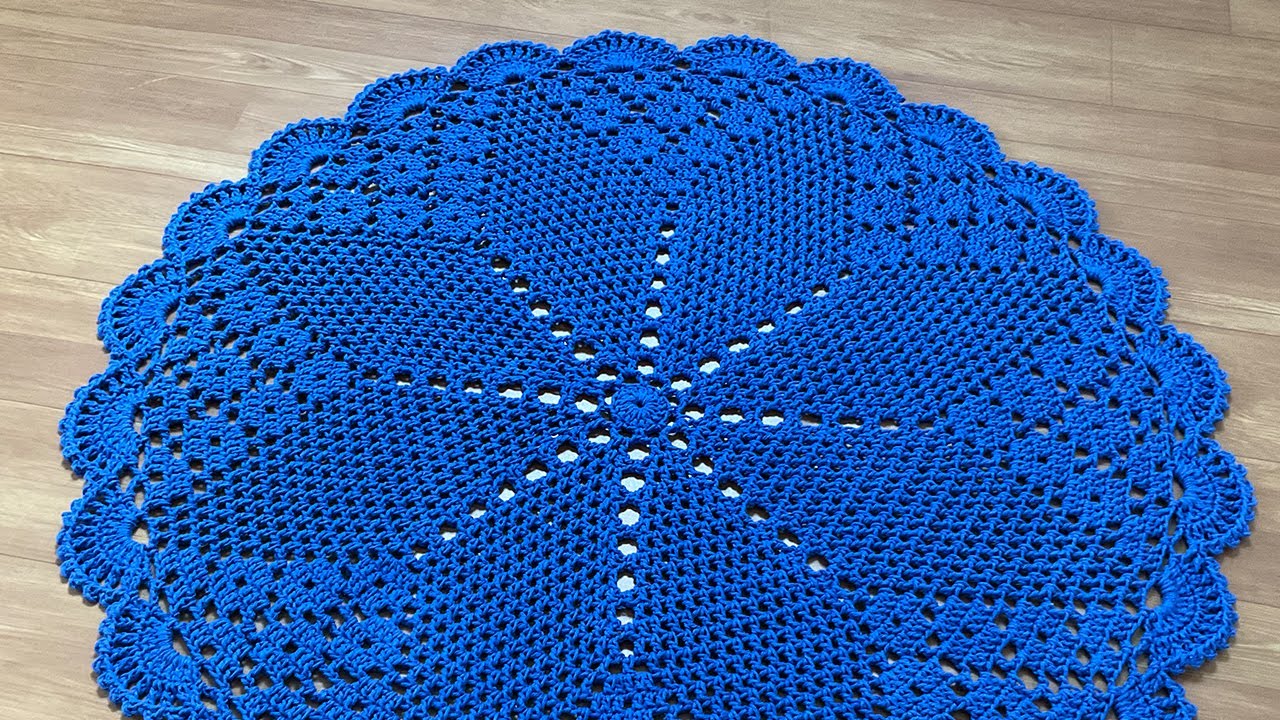
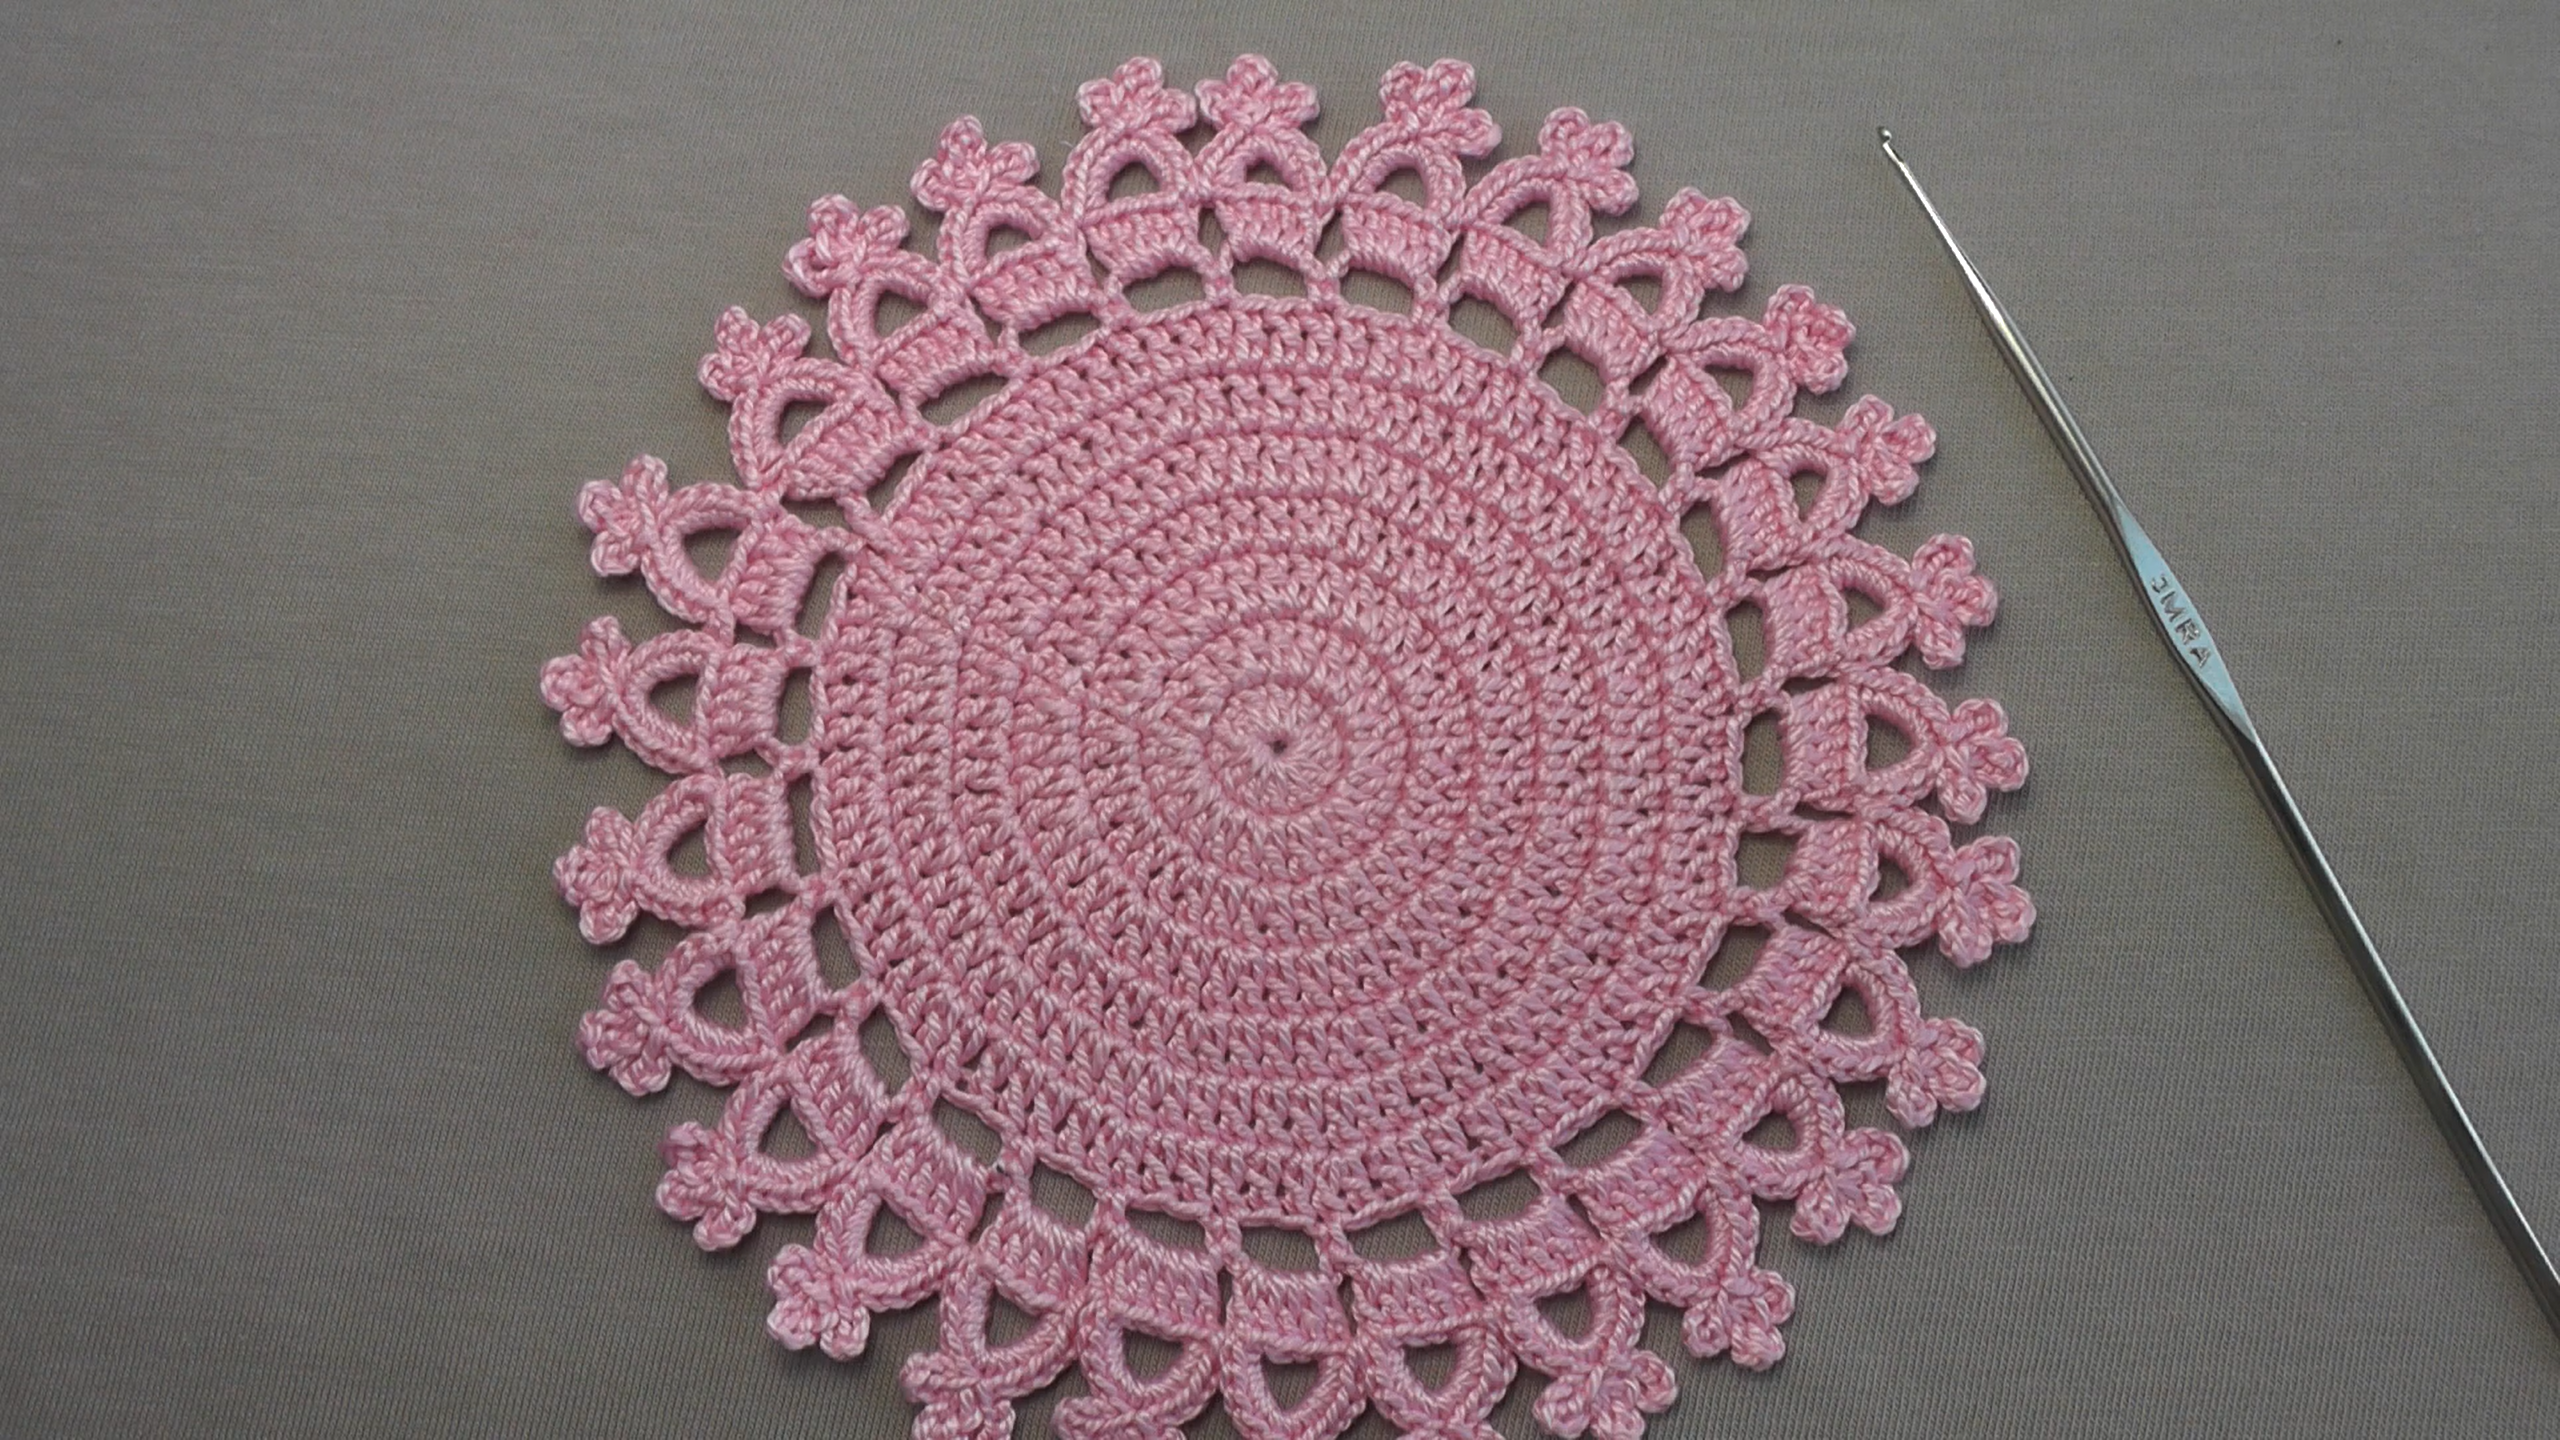
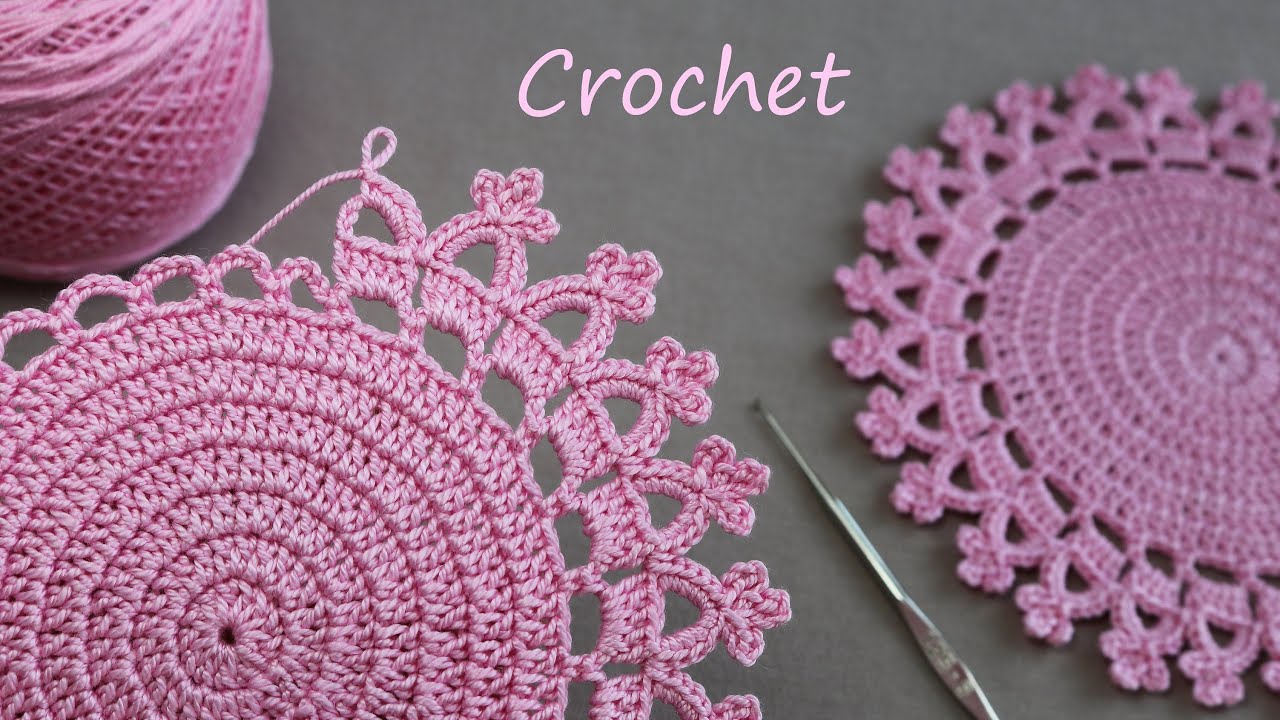
Add a touch of delicate charm to your home decor with this beautiful round doily! Perfect as a placemat, a centerpiece for your coffee table, or a thoughtful handmade gift, this design features a solid center surrounded by an exquisite lacy border with unique scallop details. The soft pink yarn in the example gives it a lovely, classic feel, but imagine it in any color to brighten your space!
This pattern is designed for intermediate crocheters who are comfortable with basic stitches and working in continuous rounds. Adventurous beginners can also give this a try and learn some new techniques!

What You’ll Need:
- Yarn: A fine crochet thread or lace weight yarn. The example uses a lovely soft pink. (e.g., mercerized cotton crochet thread, size 10 or similar)
- Crochet Hook: A hook appropriate for your chosen yarn. For fine thread, this might be a 1.5mm – 2.25mm (US steel hook size 7-1). A smaller hook will yield a more delicate, intricate result.
- Scissors
- Tapestry Needle (for weaving in ends)
Understanding the Doily:
This doily is a classic round design, working outwards from a tight center. It progresses from a solid circle to an open, lacy border that features distinctive scalloped elements, giving it a unique floral or crown-like edge.
Key features we’ll be aiming for:
- A solid, tight central circle.
- Gradual increase in stitches to keep the circle flat.
- An intricate lace border with patterned openwork.
- A decorative, multi-lobed scalloped outer edge.
Getting Started: The Solid Center
The doily begins with a solid, flat circle. Consistency in tension here is key for a beautiful outcome.


Instructions for the Solid Center:
- Magic Ring (or Chain 4, join with sl st to form a ring): This creates a neat, tight center for your doily.
- Round 1: Chain 3 (counts as 1 dc), then work [number] double crochet stitches into the ring. Join with a slip stitch to the top of the initial Ch 3.
- Round 2: Chain 3 (counts as 1 dc), 1 dc in same stitch. 2 dc in each double crochet around. Join with a slip stitch to the top of the initial Ch 3. (Total stitches: [number] dc).
- Round 3 and Beyond (Building the Solid Circle): Continue increasing stitches evenly in each round to keep the circle flat. Typically, you’ll increase the number of stitches between increases in each subsequent round (e.g., dc in next stitch, 2 dc in next stitch, then dc in next 2 stitches, 2 dc in next stitch, etc.). Continue until your solid center reaches the desired diameter, or until you’re ready to start the lace border.
- Tip: Ensure your stitch count is divisible by the number of repeats you want for your lace border for a symmetrical design. The image suggests a good number of scallops, so plan accordingly.

Creating the Lacy Border and Scallops:
Once your solid center is complete, it’s time to transition to the beautiful openwork and distinctive scalloped edge.
- Next Round (Transition to Lace): This round will start establishing the openwork structure. You’ll likely introduce chain spaces and fewer stitches to create gaps.
- Example Idea: [Ch X, skip Y stitches, sc in next stitch], repeat around. Or, work groups of dc separated by large chain spaces.
- Subsequent Rounds (Developing Lace Pattern): Continue building the lace pattern, working into chain spaces and creating new patterns of openwork. The image shows a very intricate design with multiple layers of chains and possibly taller stitches (like treble crochet) creating loops and points.
- Consider: How are the small “loops” or “arches” created? Are they ch-loops that are then worked into in the next round?
- Final Round(s) (Scalloped Edge): This is where you’ll create the beautiful, defined scallops around the edge. These are typically formed by working multiple stitches (e.g., double crochets, treble crochets, or even longer stitches) into a single stitch or chain space, often combined with picots or small chain loops for texture.
- Example Idea: In each designated space, work a fan stitch like ([number] dc, ch 1, [number] dc) or a more elaborate cluster of stitches and chains to form the distinct “leaf” or “crown” shapes seen in the photo. The outer points appear to have smaller loops on top.
Video tutorial
Finishing Touches:
- Weave in all ends: This is crucial for a clean and professional finish.
- Blocking: For lace crochet, blocking is essential. It opens up the stitches, evens out your work, and truly showcases the delicate design of the lace and the crispness of the scallops. Wet your doily, gently squeeze out excess water, pin it to shape on a blocking mat or towel, ensuring all scallops are perfectly fanned out, and let it dry completely.
Share Your Berry Mousse Doily!
I can’t wait to see your own beautiful crocheted round doilies! Once you’ve made one, share it on social media and tag me! What color will you choose for your next one?
Happy Crocheting!