by
by 
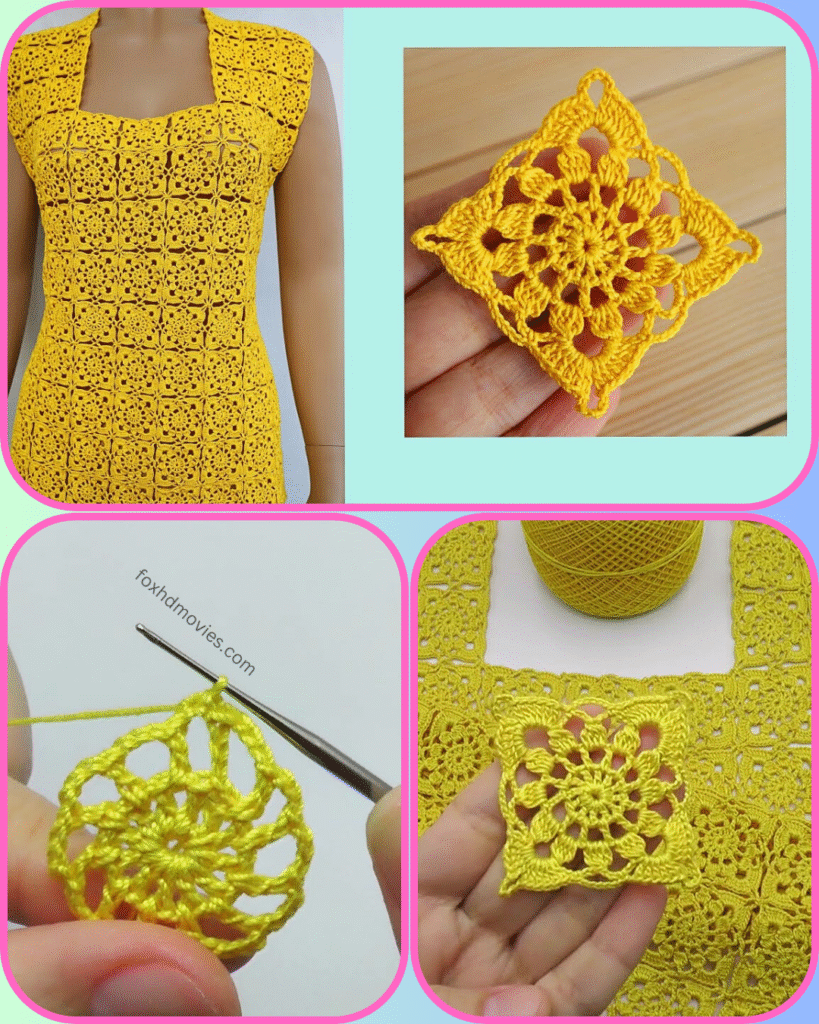
Embrace the vibrant charm of summer with this stunning crocheted top! Made from individual floral square motifs, this design is both stylish and versatile. The beautiful yellow yarn in the example makes it truly pop, perfect for a sunny day or a cheerful addition to your wardrobe. Imagine the possibilities in other colors too!
This pattern is designed for intermediate crocheters who are comfortable with basic stitches, working in rounds, and reading patterns. While the motif itself might be approachable, assembling a garment requires a bit more planning and patience.
What You’ll Need:
- Yarn: A sport weight (Category 2) or DK weight (Category 3) cotton or cotton blend yarn. The example uses a bright yellow. (e.g., mercerized cotton, cotton blend)
- Crochet Hook: A hook appropriate for your chosen yarn. For sport/DK weight, this might be a 3.0mm – 4.0mm (US hook sizes C/2 – G/6). Use the hook size that gives you good stitch definition and drape for your chosen yarn.
- Scissors
- Tapestry Needle (for weaving in ends and seaming)
- Stitch Markers (helpful for garment assembly)
- Measuring Tape
Understanding the Motif:
The heart of this top is the individual square motif. Looking closely at the image, it’s a square with a central floral element and a lacy, almost picot-like border that gives it a delicate, slightly scalloped edge. These motifs are then joined together to form the fabric of the top.
Key features we’ll be aiming for:
- A central floral or mandala-like design.
- A “squared off” outer edge with a decorative, possibly scalloped or picot, finish.
- Clear connection points for joining motifs.
Part 1: Crocheting the Floral Square Motif
We’ll start by mastering the individual motif, which you’ll be making many of!

Instructions for the Central Floral Square Motif:
- Magic Ring (or Chain 4, join with sl st to form a ring): This creates a tight, neat center for your flower.
- Round 1 (Flower Base): Chain 3 (counts as 1 dc), then work [number] double crochet stitches into the ring. Join with a slip stitch to the top of the initial Ch 3.
- Tip: This forms the very core from which the petals will emerge.
- Round 2 (First Petal Layer): This round will start forming the distinct petals of the flower. You’ll likely use a combination of chains and taller stitches (like double crochet clusters, puff stitches, or groups of treble crochets) to create the volume and shape of the petals.
- Example Idea: [Ch X, work (Y stitches, ch Z, Y stitches) into next stitch/space, Ch X], repeat around. Or, work petal groups like (dc, ch 2, dc) into specific stitches.
- Round 3 & Beyond (Developing Petals & Inner Lace): Continue building out the petals, possibly creating a second layer, or adding chain spaces that will form the inner lacework and start to define the square shape.
- Consider: How many petals does the main flower have? It appears to have 8 points radiating from the center.
Squaring Off and Adding the Decorative Edge:
Once your central flower is formed, the next step is to create the square shape and the beautiful outer edge.

- Next Round (Squaring Off): This round will be crucial for defining the square corners. You’ll typically use specific stitch combinations (e.g., (dc, ch 2, dc) or (trc, ch 3, trc)) in the corner points, while continuing the pattern along the sides.
- Example Idea: [Work X stitches along side, (Y stitches, Ch Z, Y stitches) in corner space/stitch], repeat 4 times.
- Final Round(s) of the Motif: Complete the outer border, adding any final picots or decorative elements to create the scalloped edge seen in the example. Ensure your stitch count allows for easy joining to other motifs.
Part 2: Assembling Your Motif Top
Once you’ve made a sufficient number of motifs, it’s time to bring your top to life! The top in the image is essentially a grid of joined squares.
Calculating Motifs Needed:
This is the most crucial step for a garment!
- Gauge Swatch: Make one finished and blocked motif. Measure its size accurately (e.g., 4 inches x 4 inches).
- Measure Yourself:
- Bust/Chest Circumference: Measure around the fullest part of your bust/chest.
- Desired Length: Measure from your shoulder to where you want the top to end.
- Estimate Motifs:
- Width: Divide your bust circumference by 2 (for front and back). Then divide this by the width of one motif. Round up to the nearest whole number. This gives you the number of motifs across for the front/back. (e.g., if bust is 36″, front is 18″. If motif is 4″, then 18/4 = 4.5, so you’d need 5 motifs across).
- Length: Divide your desired length by the height of one motif. Round up. This gives you the number of motifs down.
- Total: (Motifs across) x (Motifs down) x 2 (for front and back panels) + any extra for shoulders/shaping. You’ll likely need many more than you think!

Joining Your Motifs:
There are several methods for joining motifs. For a garment, the “Join-As-You-Go” (JAYG) method is highly recommended as it creates a seamless fabric and avoids a lot of seaming at the end.
- Join-As-You-Go (JAYG): As you work the final round of your second (and subsequent) motif, you’ll slip stitch or single crochet into the corresponding chains or stitches of the previously completed motif. This creates a continuous fabric.
- Whip Stitch or Slip Stitch Joining: You can complete all your motifs first, then use a tapestry needle and yarn to whip stitch them together, or use your crochet hook to slip stitch them together.
Garment Assembly Strategy (General Guidance):
- Front Panel: Lay out your calculated number of motifs in a rectangle for the front panel. Join them according to your chosen method. Pay attention to the neckline shape (the image shows a square neckline). You might need to leave some motifs unjoined at the top center, or create partial motifs for shaping.
- Back Panel: Repeat the process for the back panel.
- Shoulders: Join the top edges of the front and back panels at the shoulders, leaving a neck opening.
- Sides: Join the side edges of the front and back panels, leaving armholes.
- Edging: Once the main body of the top is assembled, you might want to add a simple edging (e.g., a few rows of single crochet or a shell stitch border) around the neckline, armholes, and bottom hem for a clean finish.
Video tutorial
Finishing Touches:
- Weave in all ends: This is crucial for a clean and professional finish, especially for a garment.
- Blocking: Blocking your finished motifs (before joining if using a separate joining method) and/or the entire garment is essential. It helps to even out your stitches, define the lace pattern, and ensure the garment drapes beautifully. Wet your piece, gently squeeze out excess water, pin it to shape on a blocking mat, and let it dry completely.
Share Your Sunshine Creations!
I can’t wait to see your own beautiful crocheted motif tops! Once you’ve completed yours, share it on social media and tag me! What color will you choose for your next one?
Happy Crocheting and Happy Wearing!