by
by 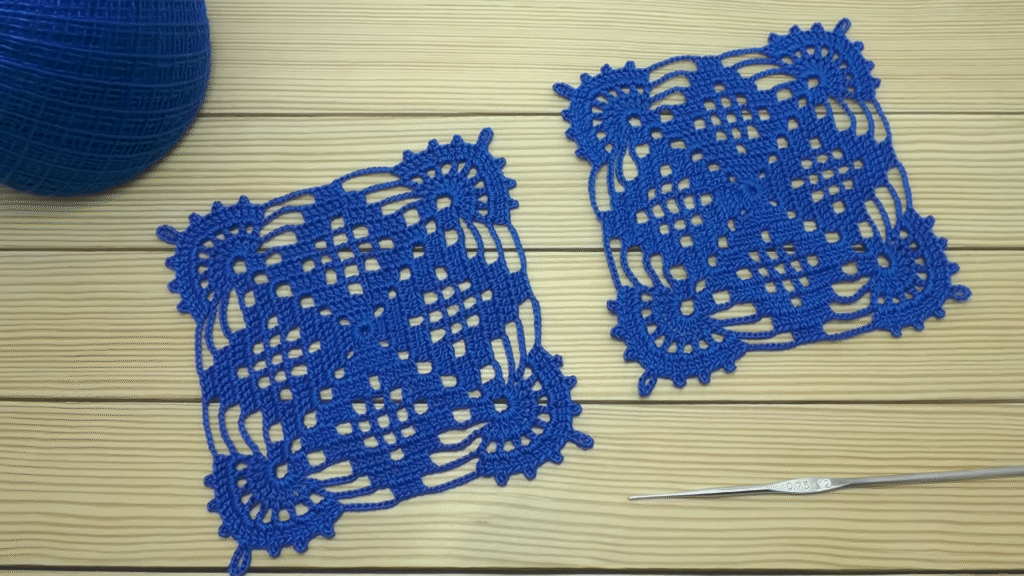
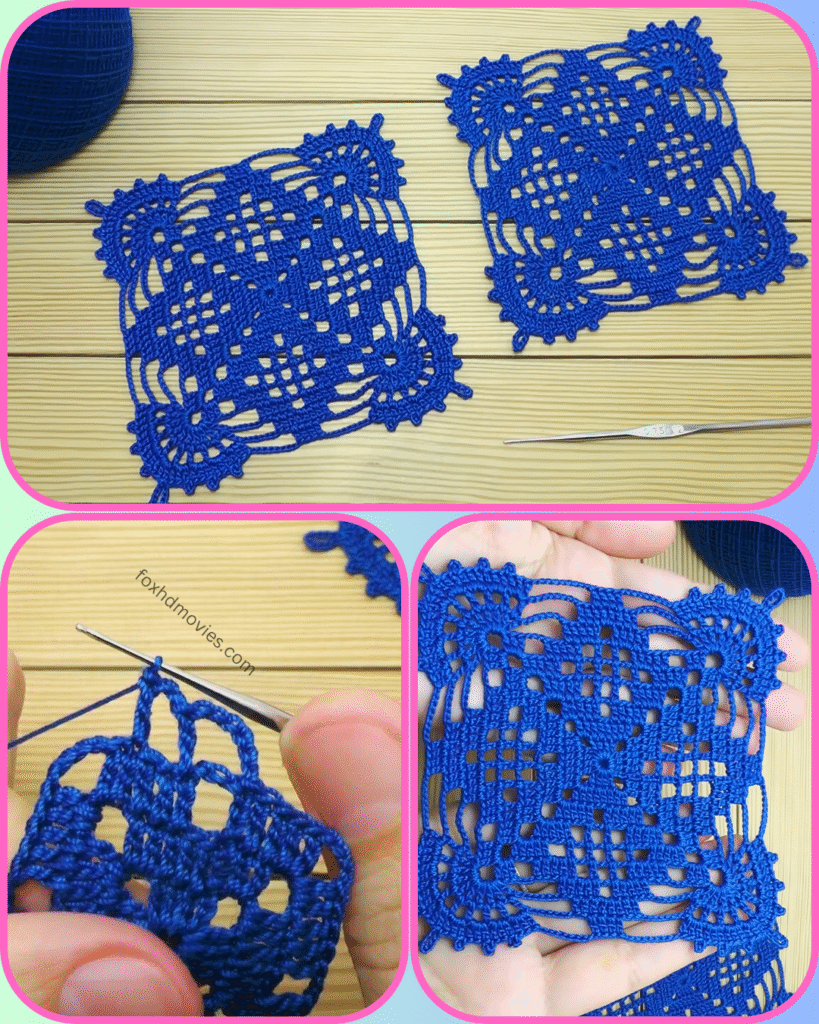
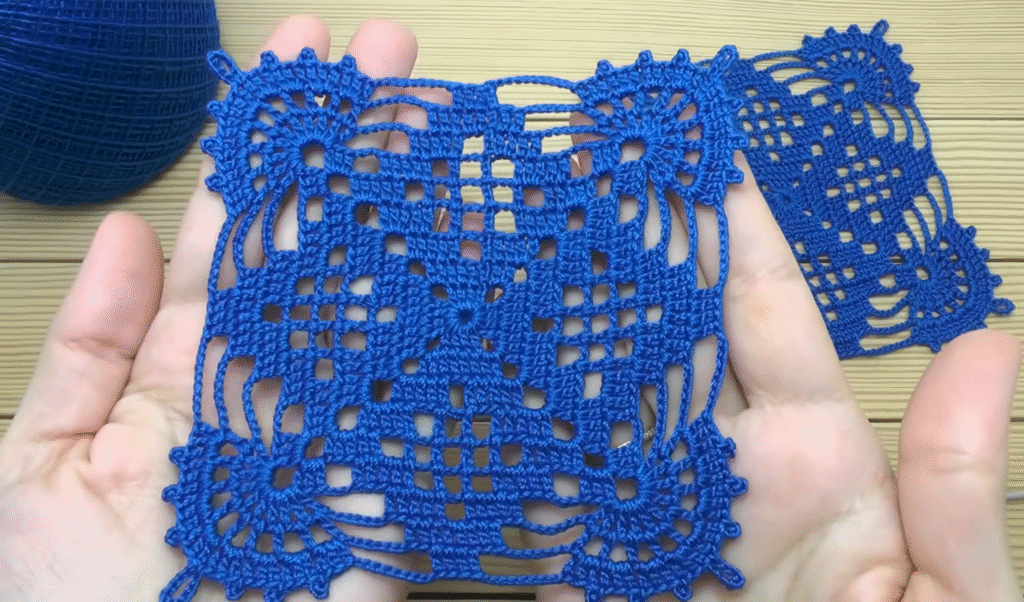
Ready to add a splash of beautiful blue and intricate design to your next project? These stunning lace square motifs are perfect for creating delicate doilies, throws, or even joining into larger garments. The rich blue yarn truly highlights the openwork and detailed corners, making these squares a joy to behold!
This pattern is designed for intermediate crocheters who are comfortable with basic stitches and reading patterns. Don’t worry if you’re a beginner, though – with a little patience and a willingness to learn, you can definitely tackle this!
What You’ll Need:
- Yarn: A fine crochet thread or lace weight yarn. The example uses a beautiful royal blue, but choose a color that inspires you! (e.g., mercerized cotton crochet thread, size 10 or similar)
- Crochet Hook: A hook appropriate for your chosen yarn. For fine thread, this might be a 1.5mm – 2.25mm (US steel hook size 7-1). A smaller hook will result in a more delicate, intricate look.
- Scissors
- Tapestry Needle (for weaving in ends)
Understanding the Motif:
Looking closely at the image, these motifs are clearly square in shape, with a fascinating openwork center that seems to be composed of a grid-like pattern, possibly made with chains and single or double crochet stitches. The corners are particularly distinctive, featuring a fan or shell-like design that adds a beautiful scalloped edge.
Key features we’ll be aiming for:
- A central grid or lattice pattern.
- Distinctive, possibly fan or shell-like corners that give the square its shape and decorative edge.
- An overall open, lacy appearance.
Getting Started: The Square Foundation
We’ll typically begin from the center of the square and work our way outwards, establishing the initial grid or lattice.

Instructions for the Central Grid/Lattice:
- Foundation Chain or Magic Ring: Start with a foundation chain (e.g., Chain 4, join with sl st to form a ring, or a longer chain that forms the initial center square). Alternatively, a magic ring could be used for a tighter center.
- Round 1: This round will likely establish the first set of “bars” or spaces for your grid. You might be working a combination of chain stitches and basic stitches (like single crochet or double crochet) around your foundation.
- Example Idea: Ch 1, [sc, ch X, sc], repeat around, or groups of dc separated by chains.
- Round 2 & Beyond (Building the Grid): Continue building the openwork grid pattern. This often involves working into chain spaces from the previous round, creating a crisscross or square mesh effect. You’ll likely use a repeating pattern of chain stitches and stitches (like dc or trc) to achieve the open spaces.
- Consider: How many “squares” or “windows” are in the central grid before it expands to the corners? It looks like 9 central squares (3×3).
Creating the Distinctive Corners:
Once your central grid is established, the next crucial step is to form those unique, decorative corners that give the motif its defined square shape and beautiful edge.

- Next Round (Establishing Corner Arches): This round will be pivotal in shaping the square. You’ll likely use larger chain spaces and groups of stitches in specific points to create the “corners” of your square.
- Example Idea: [Work X stitches, (Y stitches, Ch Z, Y stitches) in corner space/stitch, X stitches along side], repeat 4 times.
- Next Round (Developing the Corner Shells/Fans): This is where you’ll create the detailed fan or shell elements. These are typically multiple stitches (like double crochets, treble crochets, or even longer stitches) worked into one stitch or chain space, often combined with picots or small chain loops for texture.
- Example Idea: In each corner space, work ([number] dc, ch 1, [number] dc), or a series of (trc, ch 1, trc) to create the fan shape. You might also add picots (ch 3, sl st into 3rd ch from hook) for a decorative touch.
- Final Round(s) of the Motif: Complete the outer border of your motif, connecting the corners and finishing any decorative edging. Ensure your stitch count allows for easy joining to other motifs if you plan to create a larger piece.

Joining Your Motifs:
If you’re making a larger piece like a doily or blanket, you’ll need to join your finished motifs. The image implies they would be joined edge-to-edge.
Common methods for joining crochet motifs include:
- Join-as-you-go (JAYG): This is often preferred for lace motifs as it creates a seamless look and avoids a lot of seaming at the end. As you work the final round of your second (and subsequent) motif, you’ll slip stitch or single crochet into the corresponding chains or stitches of the previously completed motif.
- Whip Stitch or Slip Stitch Joining: You can complete all your motifs first, and then use a tapestry needle and a length of yarn to whip stitch them together, or use your crochet hook to slip stitch them together.

Finishing Touches:
- Weave in all ends: This is crucial for a clean and professional finish.
- Blocking: For lace crochet, blocking is essential. It opens up the stitches, evens out your work, and truly showcases the delicate design of the grid and the intricate corners. Wet your motifs, gently squeeze out excess water, pin them to shape on a blocking mat or towel, and let them dry completely.
Video tutorial
Share Your Creations!
I can’t wait to see your own beautiful crocheted lace square motifs! Once you’ve made them, share them on social media and tag me! What will you create with yours – a stunning doily, a unique placemat, or perhaps a beautiful throw?
Happy Crocheting!