by
by Hey fellow makers!
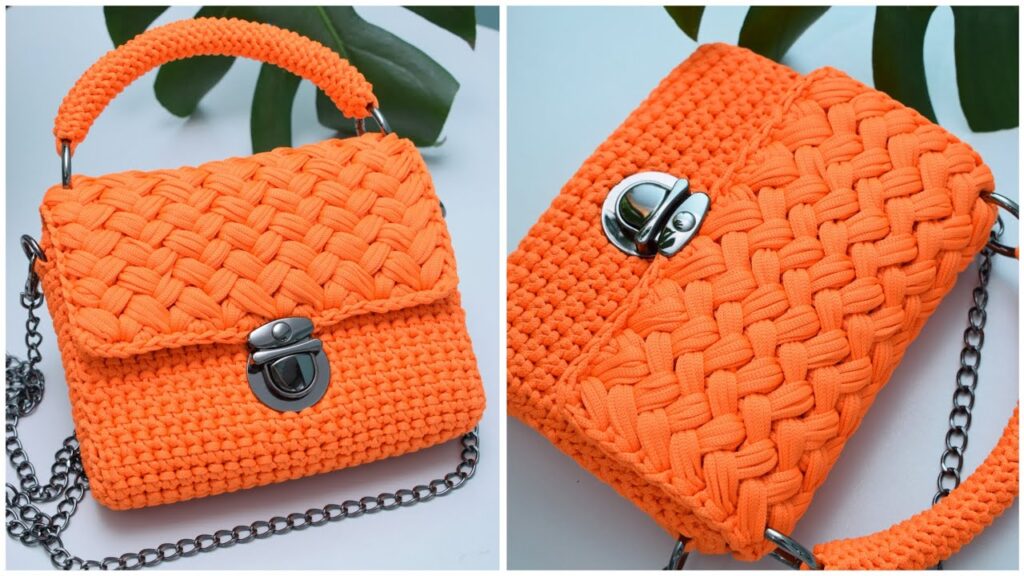
Are you ready to add a pop of vibrant color and sophisticated style to your wardrobe? Today, we’re diving into a project that’s as rewarding as it is beautiful: crafting an elegant crochet handbag just like the stunning orange one you see in the picture!
This bag features a lovely textured stitch, a sturdy handle, and a classic flap closure, making it perfect for both everyday use and special occasions. The bright orange is definitely a showstopper, but imagine this in a classic black, a serene blue, or even a sophisticated neutral!

Before we begin, here are a few things to note:
- Skill Level: Intermediate. This pattern involves working with a specific stitch pattern and assembling different components.
- Yarn Choice: For a structured bag like this, I highly recommend using a sturdy yarn such as cotton cord, t-shirt yarn, or a similar durable material. This will help your bag maintain its shape. The bag in the picture looks like it uses a cord or t-shirt yarn due to its defined stitch definition and firmness.
- Hook Size: This will depend on your chosen yarn. Always check your yarn label for a recommended hook size, and then make a swatch to ensure you achieve a firm, dense fabric that will hold up well. For the type of yarn shown, you might be looking at a 4mm-6mm hook.
- Hardware: You’ll need a clasp for the front flap and a chain strap (or materials to crochet your own strap). The bag in the picture uses a turn-lock clasp and a metal chain.
Let’s Get Crocheting!
This pattern will be broken down into sections: the Base, the Body, the Flap, the Handle, and Assembly.
Materials You’ll Need:
- Approx. 200-300 grams of sturdy yarn (e.g., cotton cord, t-shirt yarn) in your desired color
- Crochet hook (size appropriate for your yarn, e.g., 4mm-6mm)
- Stitch markers
- Yarn needle
- Scissors
- 1 turn-lock clasp (or similar bag clasp)
- 1 metal chain strap (approx. 100-120cm, or desired length) OR yarn to crochet a strap
- Optional: Fabric lining and sewing thread/needle for a more polished finish (highly recommended!)
Abbreviations:
- ch: chain
- st(s): stitch(es)
- sc: single crochet
- sl st: slip stitch
- RS: right side
- WS: wrong side
- BLO: back loop only
The Stitch Pattern (Basketweave-like Texture):
The bag in the image appears to use a variation of a basketweave or interwoven stitch. It looks like it might be achieved by alternating rows of front-post and back-post stitches, or possibly by working into specific loops to create that textured effect. Without seeing the back of the fabric, it’s hard to be 100% certain, but here’s a common way to achieve a similar textured look that works well for bags:
Option 1: Modified Half Double Crochet Ribbing (creates vertical texture)
This option gives a ribbed, woven look.
- Work in rows. Each row will start with a ch 2 (counts as hdc).
- Row 1: hdc in each st across.
- Row 2: Work 1 hdc in the third loop of the previous row’s hdc (this is the loop behind the front and back loops). Repeat across.
- Repeat Row 2 for the entire body of the bag.
Option 2: Alternating Front and Back Post Single Crochet (creates a more pronounced weave)
This is more complex but gives a very strong woven look.
- Work in rows. Each row will start with a ch 1 (does not count as sc).
- Row 1 (RS): sc in each st across.
- Row 2 (WS): ch 1, fpdc (front post double crochet) around the next sc, bpdc (back post double crochet) around the next sc. Repeat across. (This is a simplified example; a true basketweave would involve groups of stitches).
- Simplified textured sc (closer to the image):
- Row 1 (RS): sc in each st across.
- Row 2 (WS): ch 1, sc in BLO of the next st, then sc in the front loop of the next st. Repeat across. This creates a more subtle but effective texture.

For simplicity and to get closer to the visual in the picture, let’s assume a textured single crochet for the body.
Pattern Instructions:
1. The Base (Bottom of the Bag)
- Ch: Chain a length that will be the desired width of your bag’s base. For a bag of this size, start with ch 25-30 (adjust as needed for your desired bag width).
- Row 1: Sc in the 2nd ch from hook, sc in each ch across. In the last ch, work 3 sc (this turns the corner). Continue working on the opposite side of the starting chain: sc in each st across. In the last st, work 2 sc (to complete the turn). Join with a sl st to the first sc. (You should now have an oval shape).
- Rounds 2-4 (or until desired base depth): Ch 1, sc in each st around, working 2 sc into the corners to maintain the oval shape and increase the base. Join with a sl st.
- Tip: Use stitch markers to mark your corner stitches in each round to help with increases.

2. The Body of the Bag
Now we’ll work upwards to create the walls of the bag. This is where we’ll introduce the textured stitch.
- Round 1 (Texture Set-up): Ch 1, sc in the back loop only (BLO) of each st around. Join with a sl st to the first sc. This creates a ridge that defines the base from the body.
- Rounds 2-X (Textured Body): The texture in the image looks like it’s achieved by working into alternating front and back loops of the previous row, or possibly by working a variation of a half-double crochet or single crochet. Let’s go with a simple yet effective textured single crochet that gives a similar look.
- Ch 1 (does not count as st).
- Work 1 sc into the front loop of the next st, then 1 sc into the back loop of the next st.
- Repeat this sequence (sc in FL, sc in BLO) around the entire bag. Join with a sl st.
- Important: In the next round, you will continue this pattern, ensuring that you are consistently working into the opposite loop of what you worked into in the previous round. For example, if your previous stitch was FL, your current stitch over that will be BLO, and vice-versa. This creates the woven effect.
- Continue working in this textured pattern until the bag reaches your desired height (excluding the flap).
- For a bag similar to the picture, this could be 15-20 rounds after the base.
- Fasten off.
3. The Flap
The flap is worked flat.
- Ch: Measure the width of your bag’s opening. Chain a number of stitches slightly less than this width (e.g., if your bag is 25 sts wide, ch 20-22). This will allow the flap to sit nicely without being too wide.
- Row 1 (RS): Sc in the 2nd ch from hook, sc in each ch across. Ch 1, turn.
- Rows 2-X (Textured Flap): Continue with the same textured stitch pattern you used for the body of the bag (alternating FL/BLO single crochets). Work until the flap is long enough to cover about half to two-thirds of the front of the bag when closed.
- Tip: Hold it up to your bag frequently to check the length.
- Edging (Optional but Recommended): Once the flap is the desired length, you can add a round of single crochet around the entire edge of the flap to give it a neat finish. Work 3 sc in each corner.
- Fasten off, leaving a long tail for sewing.

4. The Handle
The handle appears to be a separate crocheted piece, possibly a tube or a thick flat strap.
- Option A (Crocheted Tube/Strap – most likely):
- Ch: Chain enough stitches for the desired length of your handle (e.g., ch 30-40).
- Row 1: Sc in the 2nd ch from hook, sc in each ch across. Ch 1, turn.
- Rows 2-3 (or until desired thickness): Sc in BLO of each st across. Ch 1, turn.
- Fold the strap in half lengthwise and sl st or sc the edges together to form a tube, or simply leave it as a thick flat strap.
- Alternatively, you can make a cord using an I-cord technique or by crocheting around a core yarn for extra sturdiness.
- Option B (Pre-made Bag Handle): If you prefer, you can purchase a pre-made bag handle and attach it.
5. Assembly
This is where your bag truly comes to life!
- Attach the Flap:
- Center the flap at the back of your bag’s opening.
- Using your yarn needle and the long tail, securely whip stitch or slip stitch the flap to the back edge of the bag. Make sure it’s firmly attached and lays flat.
- Attach the Clasp:
- Position the turn-lock clasp on the front of the bag and the flap. Mark the exact placement.
- Carefully attach the clasp according to its manufacturer’s instructions. This usually involves pressing prongs through the fabric and bending them, or sewing it on.
- Attach the Handle:
- Determine where you want the handle to sit on the top sides of your bag.
- If using D-rings or connectors, attach those first.
- Sew the ends of your crocheted handle securely to the top sides of the bag. Ensure it’s balanced and strong enough to hold the bag’s weight.
- Attach the Chain Strap:
- The chain strap is usually attached with clasps to rings on the sides of the bag. You’ll need to either crochet small loops on the sides of your bag, or sew D-rings onto the side seams of the bag to clip the chain to.
- Lining (Highly Recommended!):
- Measure and cut a piece of fabric to fit the inside of your bag, allowing for seam allowances.
- Sew the fabric into a bag shape, ensuring it fits snugly inside your crocheted bag.
- Hand-stitch or machine-stitch the lining to the top edge of your crocheted bag, just inside the opening. This will give your bag a professional finish and prevent stretching.
Video tutorial
Congratulations!
You’ve just created a stunning, elegant crochet handbag! Take a moment to admire your handiwork. This bag is not just a functional accessory, but a statement piece that showcases your incredible talent.
Don’t forget to share your finished bag with me! I’d love to see your color choices and how you’ve personalized your creation. Tag me on social media or send me a picture!
Happy crocheting!