by
by Hey there, fellow yarn lovers!
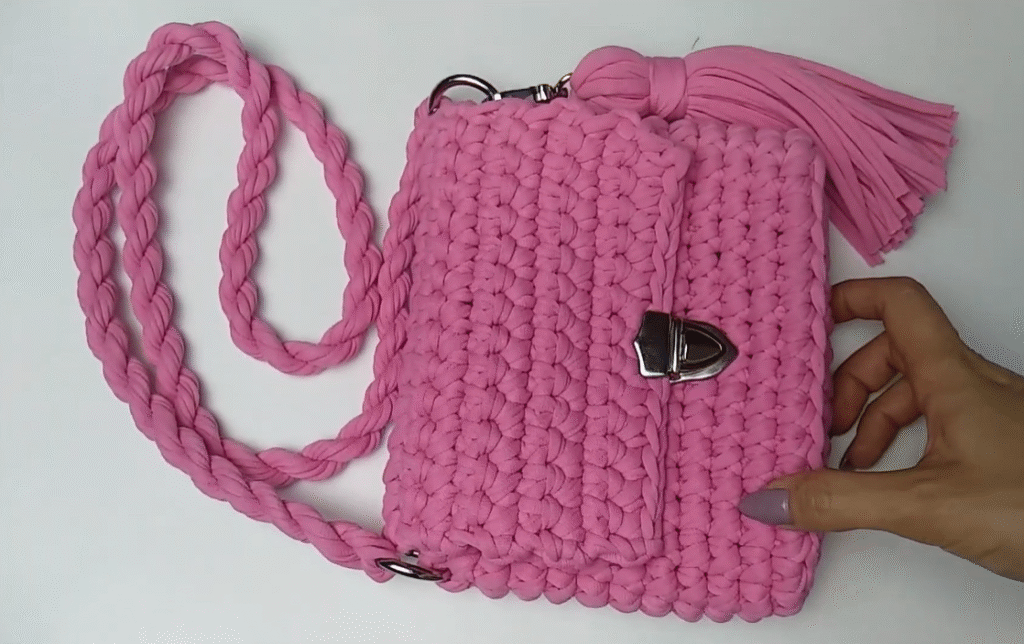
Ever wanted a stylish, compact bag that perfectly holds your phone, keys, and lip balm? Look no further! Today, we’re going to crochet this adorable mini crossbody bag, complete with a charming tassel and a sleek metal clasp, just like the lovely pink one you see here.
This little gem is quick to make, incredibly versatile, and adds a pop of handmade charm to any outfit. It’s the perfect project for gifting or for treating yourself!

Before we grab our hooks, let’s get organized:
- Skill Level: Beginner to Intermediate. If you can do a single crochet, you can make this!
- Yarn Choice: For a bag with this kind of structure and stitch definition, t-shirt yarn or a sturdy cotton cord (like a 5mm-7mm) is your best friend. These materials give the bag its shape and durability.
- Hook Size: This will depend on your yarn’s thickness. Aim for a hook size that creates a dense, tight fabric with no gaps. For t-shirt yarn, this is often a 6mm-9mm hook. For cotton cord, 4mm-6mm.
- Hardware: You’ll need a turn-lock clasp, two D-rings or O-rings for the strap, and a small swivel clasp for the tassel.
Let’s Gather Our Supplies!
Materials You’ll Need:
- Approx. 150-250 grams of t-shirt yarn or sturdy cotton cord (choose your favorite color!)
- Crochet hook (size appropriate for your yarn, e.g., 6mm-8mm for t-shirt yarn, 4.5mm-6mm for cord)
- Stitch markers
- Yarn needle (large eye to accommodate thick yarn)
- Scissors
- 1 turn-lock clasp (like the one pictured)
- 2 small D-rings or O-rings (to attach your strap)
- 1 small swivel clasp (for the tassel)
- Optional: Fabric lining and sewing thread/needle for a more polished finish.
Crochet Language Decoder (Abbreviations):
- ch: chain
- st(s): stitch(es)
- sc: single crochet
- sl st: slip stitch
- rnd(s): round(s)
- BLO: back loop only
- FLO: front loop only
Let’s Get Crocheting!
We’ll work this bag in sections: the Base, the Body, the Flap, the Strap, the Tassel, and then Assembly.
1. The Base (Bottom of the Bag)
We’ll create a sturdy oval base for your bag.
- Ch: Start with a chain of ch 16 (this will be the length of your bag. Adjust for a longer/shorter bag).
- Rnd 1: Sc in the 2nd ch from hook. Sc in each ch across until you reach the last chain. In the last chain, work 3 sc (this forms your first curve). Now, continue working along the opposite side of your starting chain: sc in each stitch across. In the very last stitch (the one where you started your first sc), work 2 sc (to complete the curve). Join with a sl st to the first sc of the round. (You should now have an oval).
- Tip: Place stitch markers in the middle stitch of each 3-sc group on the ends – these are your corner stitches for increasing.
- Rnd 2: Ch 1 (does not count as st). Sc in each st around, working 2 sc into each of the 3 marked corner stitches on both ends of the oval (total of 6 increases per round). Join with a sl st.
- Rnd 3 (Optional, for wider base): Ch 1. Sc in each st around, working 2 sc into the single sc stitch between your increases on the ends (this subtly shapes the oval). Join with a sl st.
- For a mini bag, 2-3 rounds for the base should be perfect.

2. The Body of the Bag (Working Upwards)
Now we’ll build the walls of the bag.
- Rnd 1 (Transition Round): Ch 1. Sc in the back loop only (BLO) of each stitch around. Join with a sl st.
- This creates a defined ridge between the base and the body, making the bag stand up nicely.
- Rnds 2-X (Main Body): Ch 1. Sc in each stitch around. Join with a sl st.
- Continue working in simple single crochet until the bag reaches your desired height (excluding the flap).
- For a mini crossbody bag, this could be 12-18 rounds, depending on your yarn and desired height.
- Fasten off, leaving a small tail to weave in.
3. The Flap
The flap is worked flat and has a lovely subtle texture.
- Row 1 (Set up): Count the stitches across the back of your bag’s opening. This will be the starting chain length for your flap. For example, if your bag opening is 20 stitches wide, ch 20.
- Row 2: Sc in the 2nd ch from hook, sc in each ch across. Ch 1, turn.
- Row 3 (Textured Row): Sc in the back loop only (BLO) of each stitch across. Ch 1, turn.
- Row 4 (Regular Row): Sc in each stitch across. Ch 1, turn.
- Rows 5-X: Repeat Rows 3 and 4 alternately until the flap is long enough to cover about two-thirds of the front of your bag when closed.
- Tip: Hold it up to your bag frequently to check the length.
- Edging (Optional but Recommended): Once the flap is the desired length, you can add a round of single crochet around the entire edge of the flap to give it a neat finish. Work 3 sc in each corner.
- Fasten off, leaving a long tail for sewing.

4. The Strap (Braided/Twisted Look)
The strap in the photo looks like a simple crocheted cord that’s been twisted or braided.
- Method 1 (Simple Twisted Cord):
- Ch a very long chain – twice the length of your desired strap. (e.g., if you want a 100cm strap, ch 200cm).
- Sl st in the 2nd ch from hook and each ch across. This creates a dense cord.
- Carefully twist the entire cord tightly, then fold it in half. It should naturally twist around itself, creating the braided look. Secure the ends together.
- Method 2 (I-cord): This creates a round, dense cord. (Requires more explanation, search “crochet I-cord tutorial” for detailed steps).
- Method 3 (Flat Strap):
- Ch 5 (or desired width).
- Sc in 2nd ch from hook, sc in next 3 ch. Ch 1, turn.
- Sc in BLO of each st across. Ch 1, turn.
- Repeat the last row until your strap reaches the desired length.
- Fasten off, leaving long tails for sewing.
5. The Tassel
A fun, fluffy addition!
- Wrap your yarn around something sturdy like a book, a piece of cardboard, or even your fingers (depending on how long you want the tassel). Wrap many times to make it thick and full.
- Carefully slide the yarn off.
- Take a separate small piece of yarn and tie it tightly around the top of the bundle to secure it.
- Take another piece of yarn (approx. 6-8 inches) and wrap it tightly around the top of the tassel, about 1 inch from the top, creating a “head.” Weave in the ends.
- Cut through all the loops at the bottom of the tassel to free the strands.
- Trim the ends evenly.
- Attach your small swivel clasp to the top loop of the tassel.

6. Assembly
Time to bring it all together!
- Attach the Flap:
- Center the flap on the back opening of your bag.
- Using your yarn needle and the long tail, securely whip stitch or slip stitch the flap to the back edge of the bag. Make sure it’s firmly attached and lays flat.
- Install the Turn-Lock Clasp:
- Position the bottom part of the clasp on the front of the bag, making sure it’s centered and at the correct height for the flap to close. Mark the prongs. Carefully cut small slits in the yarn where the prongs will go. Insert the prongs and bend them back with pliers if needed to secure the clasp.
- Position the top part of the clasp on the flap, aligning it perfectly with the bottom part. Mark the prongs and secure it similarly.
- Attach D-Rings:
- Using a yarn needle, securely sew one D-ring to each side of your bag, near the top edge, just below the flap. Reinforce the stitches well, as these will hold the weight of the bag.
- Attach the Strap:
- Securely sew each end of your braided/twisted strap (or flat strap) to a D-ring. For braided straps, you might need to unravel the ends slightly to sew them.
- Attach the Tassel:
- Clip the swivel clasp of your tassel to one of the D-rings where the strap is attached, or to a corner of the bag’s flap.
- Optional Lining:
- For a super polished look and added durability, measure and cut fabric to create a simple fabric lining for the inside of your bag. Sew it by hand to the inside top edge of your crocheted bag.
Video tutorial
Voilà! Your Stylish Mini Crossbody is Ready!
Take a moment to admire your beautiful creation! This bag is not just a chic accessory but a testament to your crafty hands. It’s perfect for carrying your essentials with flair.
Don’t forget to share your finished bag! I’d love to see what colors and variations you come up with. Tag me on social media or send a picture!
Happy crocheting!