by
by 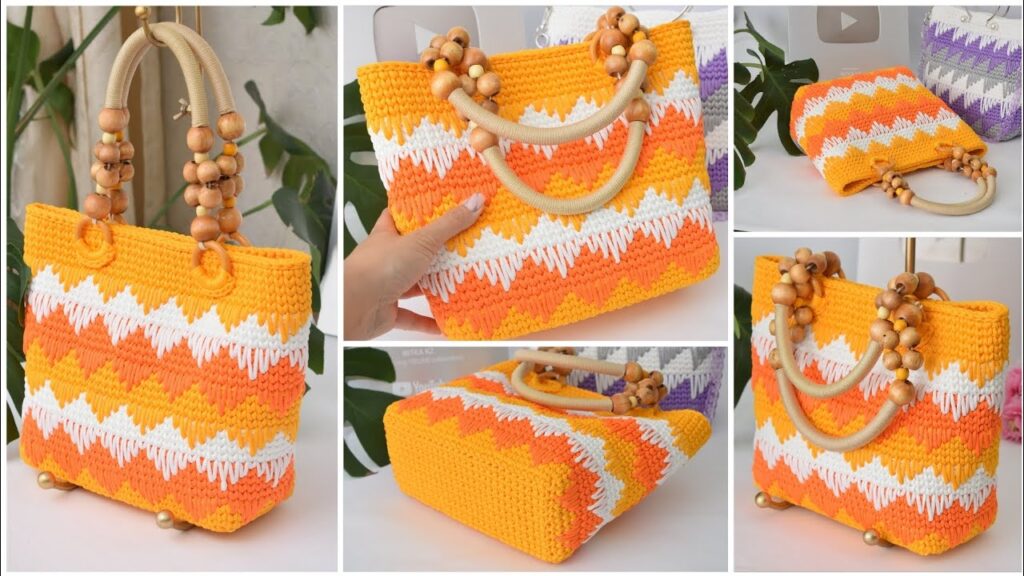
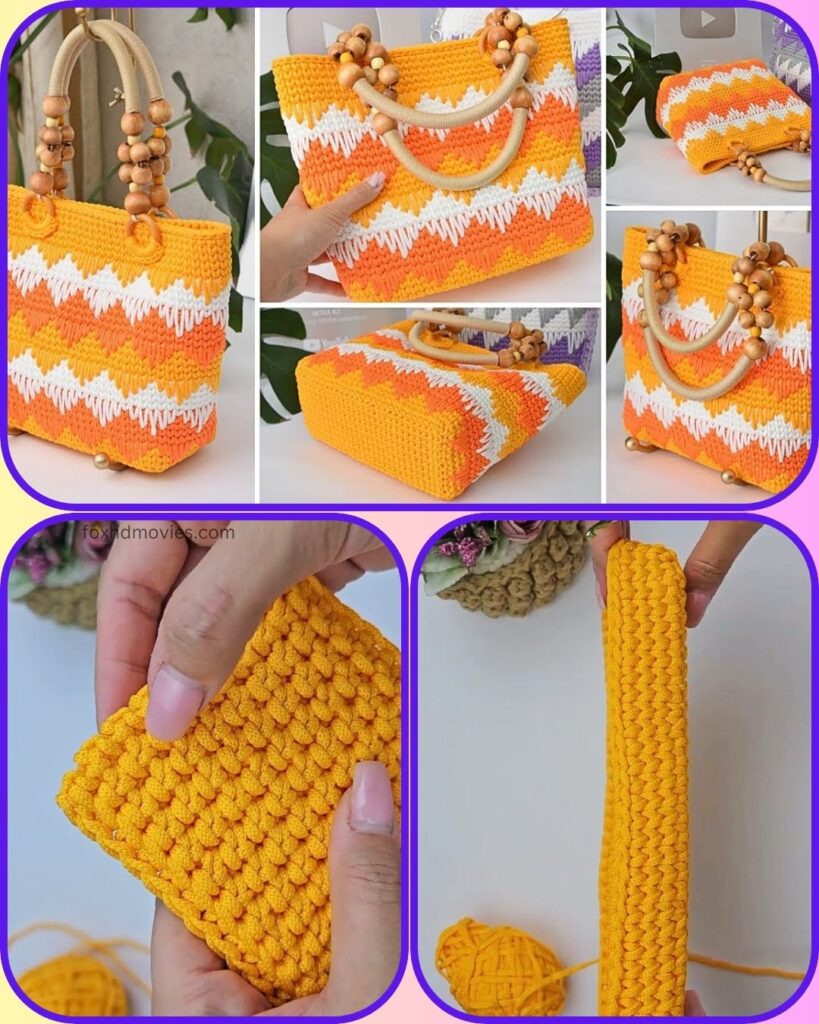
Get ready to turn heads with this absolutely stunning crochet tote bag! Featuring a vibrant zigzag colorwork pattern reminiscent of sunshine and flames, paired with elegant wooden beaded handles, this bag is a true statement piece. It’s the perfect project to brighten your wardrobe and showcase your crochet skills.
This pattern will guide you through creating this beautiful handbag, using tapestry crochet and the neat waistcoat stitch for a firm, knit-like fabric. While tapestry crochet requires a bit of patience, the dazzling result is so worth it!
What You’ll Need:
- Yarn: Worsted weight (Category 4) cotton or a sturdy cotton blend yarn in 3 colors. A firm yarn is recommended for structure.
- Color A (Dark Orange): Approx. 200-250 yards
- Color B (Light Orange/Yellow): Approx. 200-250 yards
- Color C (White): Approx. 150-200 yards
- Crochet Hook: Size G/6 (4.0 mm) or H/8 (5.0 mm) – choose a hook that gives you a very firm tension with the waistcoat stitch.
- Handles: 1 pair of round wooden beaded handles (the ones in the picture are attached through loops).
- Metal Bag Feet (Optional): 4 or 5.
- Heavy-duty thread or dental floss (for attaching feet if using).
- Tapestry Needle: For weaving in ends.
- Scissors.
- Stitch Markers.
- Optional for extra structure:
- Plastic canvas or firm fusible interfacing for the base.
- Fabric for lining.
Finished Size (Approximate):
- Width: 12-14 inches
- Height: 10-11 inches (excluding handles)
- Depth: 4-5 inches
Gauge:
Approximately 16 Wst x 18 rows = 4 inches (10 cm). Gauge is crucial for this project, especially for the colorwork to align correctly and for the bag’s structure. Make a swatch!
Stitches & Abbreviations (US Terminology):
- ch: chain
- sl st: slip stitch
- sc: single crochet
- Wst (Waistcoat Stitch / Center Single Crochet): Insert hook into the center of the ‘V’ of the stitch from the previous round (not under the two top loops as in a standard sc). Yarn over and pull up a loop, yarn over and pull through both loops on hook. Work this stitch somewhat loosely to make it easier to insert the hook into the ‘V’.
- BLO: back loop only
- st(s): stitch(es)
- rep: repeat
- approx: approximately
- CA, CB, CC: Color A, Color B, Color C

Important Techniques:
- Tapestry Crochet: When working with multiple colors in a round, carry the unused color(s) along the top of the stitches from the previous round, crocheting over them with the current working color. This hides the unused yarn and creates a neat fabric. Change colors on the last yarn over of the stitch before the new color is needed. Keep your tension even, and don’t pull the carried yarns too tight.
- Working in Continuous Rounds: Unless specified, the body of the bag will be worked in continuous rounds. Use a stitch marker to mark the beginning of each round and move it up as you go.
Colorwork Zigzag Pattern:
This pattern creates a series of upward and downward pointing chevrons. The sample chart section below shows a 20-stitch repeat. You will repeat this motif around the bag. (You might need to adjust your base stitch count to be a multiple of your chosen motif repeat).
Simplified Zigzag Motif (20-stitch repeat example – adapt as needed):
Let’s denote:
- A = Color A (Dark Orange)
- B = Color B (Light Orange/Yellow)
- C = Color C (White)
(Note: This is a conceptual guide. You’ll need to chart out the full pattern from the image or a similar desired zigzag. The image shows a more complex interaction of colors than a simple 2-color zigzag. For this pattern, we’ll aim for a simplified but representative version as seen in many similar bags.)
The pattern in the image shows larger “flames” or “diamonds.” For this pattern, we’ll describe a basic idea. You’ll need to carefully count stitches from the reference image to replicate it exactly or create your own chart.
A Simplified Approach for the Pattern Instructions (Focus on the V-shape):
We will work with the idea of creating “V” shapes that point up and down. The example image has multiple colors creating these effects. For a pattern blog, accurately charting that complex pattern from just an image is very difficult. I will provide a basic structure, and the user would need to refer to detailed charts for such specific flame/diamond stitches or adapt a simpler zigzag.
Let’s simplify to a prominent White “V” on a Yellow background, with Orange accents.
Key for color changes: Read charts from right to left for each round. Each square represents one Wst.
(Ideally, a visual chart would be here. Since I can’t generate that, I’ll describe a section. This section will need to be expanded and repeated for the full bag width.)
Example Section for a White Upward “V” (repeat this logic): (Starting from a base color, e.g., Color B – Yellow)
- Round 1: …B, B, B, B, C, B, B, B, B… (center point of V)
- Round 2: …B, B, B, C, C, C, B, B, B…
- Round 3: …B, B, C, C, C, C, C, B, B…
- Round 4: …B, C, C, C, C, C, C, C, B…
The image shows these V’s interlocking with V’s of other colors (e.g., an Orange V pointing down). You would plan these on graph paper.
Let’s Get Crocheting!
Part 1: The Bag Base
(Using Color B – Light Orange/Yellow, or your chosen main base color)
- Ch 31 (or a length that gives you approx. 10-12 inches. For a 4-inch depth, you’ll work about 12-15 stitches on the short side).
- Round 1: Wst in 2nd ch from hook and in next 28 chs. Work 3 Wst in the last ch (mark the 2nd of these 3 Wst as the corner). Working on the opposite side of the foundation ch, Wst in next 28 chs. Work 2 Wst in the last ch (where you made your first st). (62 Wst). Do not join; work in a continuous spiral. PM in the first st.
- Round 2: 2 Wst in first st. Wst in next 28 sts. 2 Wst in next st (just before marked corner), 2 Wst in marked corner st (move marker to 2nd st of this increase), 2 Wst in next st. Wst in next 28 sts. 2 Wst in next st, 2 Wst in last st. (70 Wst)
- Round 3: Wst in first st, 2 Wst in next st. Wst until 1 st before marked corner. 2 Wst in next st, Wst in marked st (move marker), 2 Wst in next st. Wst until 2 sts remain in round. 2 Wst in next st, Wst in last st. (74 Wst – increases happen at 6 points on an oval, but for a rectangle, focus on 4 corner points after the initial chain setup rounds).

Simplified Rectangular Base (More typical for this bag style):
- Using Color B (Yellow): Ch 36 (or desired length for your base – e.g., for a 12-inch wide bag, this might be around 35-40 stitches depending on your gauge).
- Row 1: Wst in 2nd ch from hook and in each ch across. Turn. (35 Wst)
- Row 2 – approx. 15 (for 4-5 inch depth): Ch 1 (does not count as a st), Wst in each st across. Turn. After desired depth is reached, do not turn. Ch 1, and sc evenly around the entire rectangle of the base, placing 3 sc in each corner. This prepares for working the body in rounds. Count your total sc stitches – this needs to be a multiple of your colorwork repeat (e.g., multiple of 20 if using the sample motif above). Let’s say you have 100 sc stitches.
Part 2: The Bag Body – Tapestry Colorwork!
- Switch to working in continuous rounds using Wst.
- Join Color A (Dark Orange) and Color C (White) as needed for your chosen tapestry pattern. Carry the unused colors.
- Round 1 (Setup for Body): Still with Color B (or your main background color), Wst in the back loop only (BLO) of each sc from the base edging round. This creates a defined edge for the bag to stand. (100 Wst)
- Round 2 onwards: Begin your tapestry crochet zigzag/diamond pattern using Wst. Follow your chart. Each round will be Wst in each stitch around, changing colors according to your chart.
- Remember to change color on the last pull-through of the stitch before the new color begins.
- Keep the carried yarn slightly loose to prevent puckering, but not so loose that it loops out.
- Continue working in the established colorwork pattern until the bag body measures approx. 10-11 inches high, or your desired height, ending before the section for handle loops.

Part 3: Top Band & Handle Loops
- Once the main colorwork is complete, work 2-3 rounds in Wst using your main solid color for the top band (e.g., Color B – Yellow, or Color A – Dark Orange, as seen in parts of the image).
- Handle Loop Round:
- Decide on placement for your handles (two on the front, two on the back, evenly spaced).
- Wst in your chosen solid color to the point of the first loop.
- To make a loop: Ch 8-12 (depending on the thickness of your handle and how high you want the loop). Skip 2-3 Wst on the bag body (this creates the base of the loop). Sl st into the next Wst (or continue with Wst, and the chain forms an opening). The image appears to have loops made from the same top band color, possibly reinforced.
- A sturdier loop method: Wst to where loop begins. Ch 1, turn. Work 4-5 rows of sc/hdc over 3-4 stitches. Fasten off. This creates a tab. You’d make 4 such tabs and fold them over the handle ring, sewing the end to the inside of the bag.
- Looking at the image again, it seems like they are integrated openings: Wst to point 1, ch (e.g., 6-8), skip 6-8 sts, Wst to point 2 for next part of handle, ch 6-8, skip 6-8 sts. Then in the next round, you’d work Wst into the stitches and work (e.g., 8-10) Wst into each ch-space.
- Subsequent Rounds for Top Edge: Work 2-3 more rounds in Wst with your solid color, working into the Wst stitches and into the chain stitches of the loops to reinforce them. Make sure the opening is large enough for your handles to pass through and move freely.
- Final Round: Sl st in each st around for a neat finish. Fasten off and weave in ends.
Part 4: Finishing
- Weave in ALL Ends: This is crucial in tapestry crochet. There will be many! Secure them neatly on the inside.
- Insert Handles: Thread your wooden handles through the crocheted loops/openings.
- Attach Bag Feet (Optional):
- Mark placement for 4 feet near the corners of the base, and one in the center if using 5.
- Use heavy-duty thread or dental floss and a strong needle to sew the feet securely to the base of the bag, going through the fabric from the inside to the outside and back through the holes in the feet.
- Lining & Interfacing (Optional but Recommended for Structure):
- Cut plastic canvas or firm interfacing to fit the base and optionally the sides of the bag. If using interfacing, fuse it to your lining fabric.
- Insert the stiffener.
- Sew a fabric lining to fit the inside of the bag and hand-stitch it carefully along the top edge.
Video tutorial
Tips for Tapestry Crochet Success:
- Tension is Key: Try to keep your tension even for both the working yarn and the carried yarns.
- Twisting Yarns: Your yarns will inevitably twist. Stop every so often to untwist them. Some people find winding small bobbins for each color helpful.
- Turning Your Work (if working in rows): When you turn your work, ensure your carried yarns are consistently brought to the correct side to maintain a neat appearance. (For this bag, we are primarily working in rounds).
- Practice Makes Perfect: If you’re new to tapestry crochet or the waistcoat stitch, make a practice swatch before starting the bag.
This vibrant tote is a labor of love, but the stunning, unique result will be a cherished accessory for years to come. Enjoy the process of watching the beautiful patterns emerge!
Happy Crocheting!