by
by 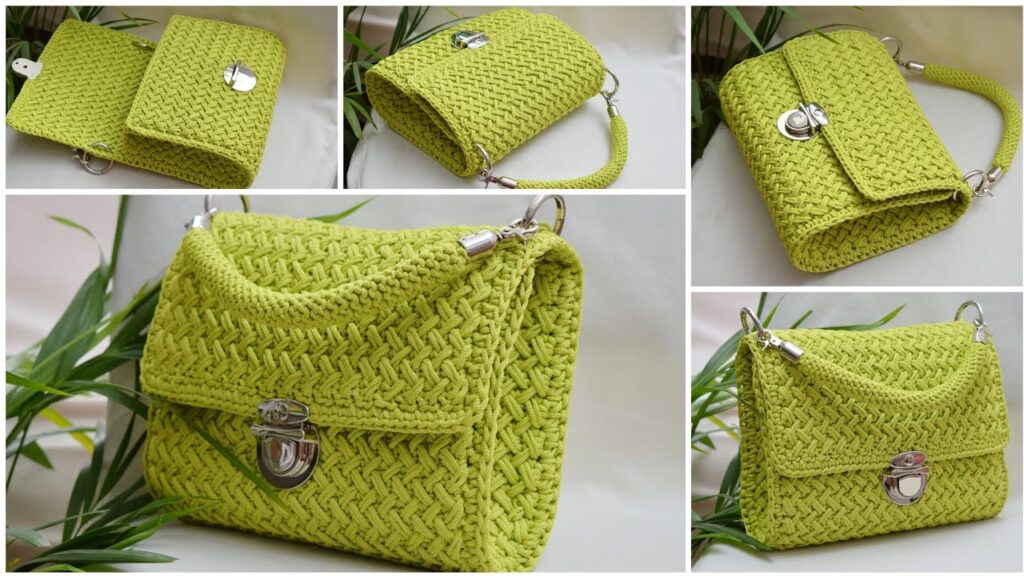
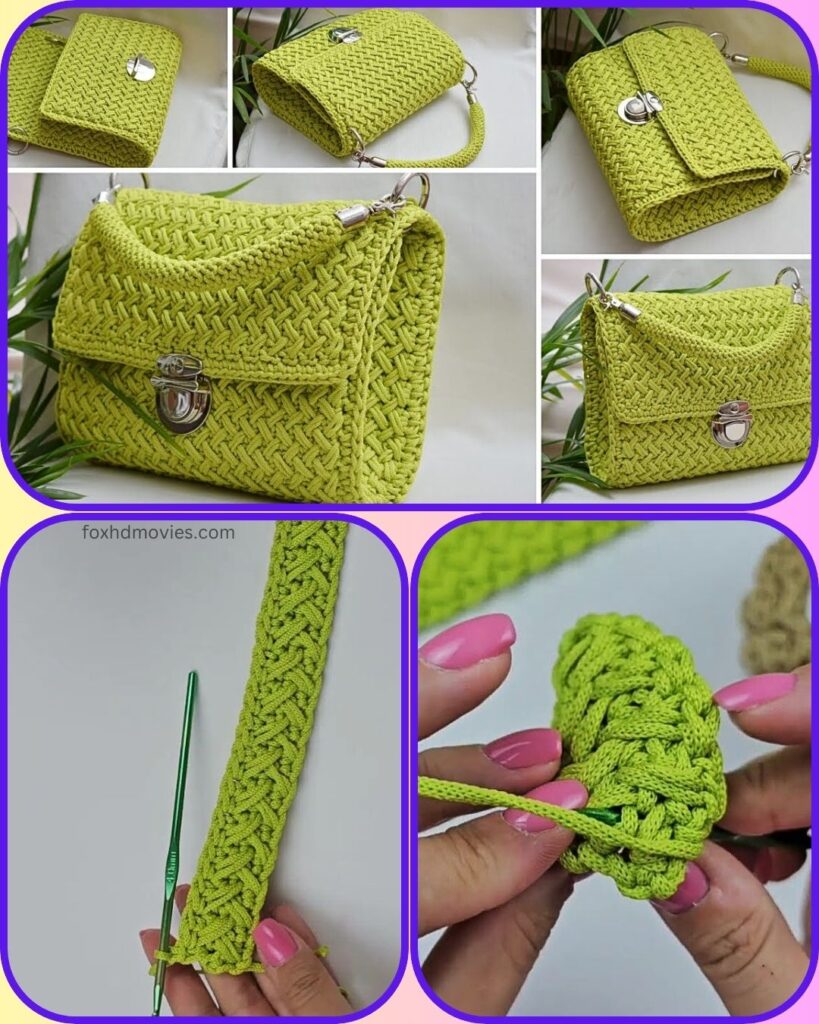
Elevate your accessory game with this stunning crochet crossbody bag! Featuring a sophisticated textured stitch, elegant hardware, and a practical design, this bag is perfect for everyday elegance or special occasions. The beautiful woven-look fabric created by the Alpine stitch gives this bag a unique, high-end feel that’s sure to turn heads.
This pattern blog will guide you step-by-step through creating this beautiful and functional piece. While it involves some intermediate techniques and hardware attachment, the result is a truly rewarding and professional-looking bag.
What You’ll Need:
- Yarn: Approx. 300-400 yards of DK weight (Category 3) or light Worsted weight (Category 4) cotton or a cotton blend yarn. A smooth yarn will showcase the stitch definition best. The bag in the picture uses a lovely lime green.
- Crochet Hook: Size E/4 (3.5mm) or G/6 (4.0mm), or size appropriate for your chosen yarn to achieve a firm fabric.
- Hardware:
- 1 x Turn-lock closure
- 2 x D-rings (approx. 0.75 inch or 20mm)
- 2 x Swivel clasps (to fit your D-rings and strap)
- Scissors
- Yarn Needle
- Stitch Markers (optional)
- Measuring Tape
- Optional:
- Fabric for lining (approx. 0.5 yard)
- Lightweight fusible interfacing (if you want extra structure for the lining or bag)
- Pliers (may be helpful for attaching some hardware)
Stitches & Abbreviations (US Terminology):
- ch: chain
- sl st: slip stitch
- sc: single crochet
- hdc: half double crochet
- dc: double crochet
- FPdc (Front Post Double Crochet): Yarn over, insert hook from front to back to front around the post of the indicated stitch from the row below, yarn over and pull up a loop, (yarn over and pull through 2 loops) twice.
- st(s): stitch(es)
- rep: repeat
- RS: Right Side
- WS: Wrong Side
Special Stitch: Alpine Stitch
The Alpine Stitch creates a beautiful, dense, and textured fabric. It’s typically worked over a two-row repeat:
- Row A (Foundation/Setup for texture): Typically a row of dc stitches.
- Row B (Texture Row): Alternating dc (or hdc/sc depending on preference for height between textured posts) and FPdc. The FPdc is worked around the post of a dc from Row A (or the dc row two rows below if alternating with sc/hdc rows).
- Row C (Plain Row): Typically a row of sc or hdc stitches worked into the stitches of Row B.
For this pattern, we will use a variation suitable for a sturdy bag fabric:
- Alpine Stitch Row 1 (RS): Ch 1 (does not count as st here and throughout), sc in each st across. Turn.
- Alpine Stitch Row 2 (WS): Ch 2 (counts as first dc here and throughout), dc in each st across. Turn.
- Alpine Stitch Row 3 (RS): Ch 1, sc in each st across. Turn.
- Alpine Stitch Row 4 (WS): Ch 2, *dc in next st, FPdc around the dc post of the stitch directly below the next st (from Row 2, skipping Row 3)*; rep from * to last st, dc in last st. Turn.
Repeat Alpine Stitch Rows 1-4 for the pattern. Ensure FPdc stitches are stacked vertically by working them around the dc posts from two rows below.

Gauge:
Approximately 16-18 sts and 12-14 rows in Alpine Stitch pattern = 4 inches (10 cm). Achieving the correct gauge is important for the final size and structure of the bag. Make a swatch before you begin.
Bag Dimensions (Approximate, based on image):
- Width: 9-10 inches
- Height: 6-7 inches
- Depth: 2-3 inches
Let’s Get Crocheting!
Part 1: Main Bag Panel (Forms Back, Base, and Front)
This panel is worked flat in rows using the Alpine Stitch.
- Foundation Chain: Ch 37 (or a multiple of 2 + 1 if you adjust the width. This will give approx. 9 inches width. For 10 inches, try Ch 41 or 43).
- Setup Row 1 (WS): Dc in 3rd ch from hook (skipped 2 ch count as first dc) and in each ch across. Turn. (35 dc, or your initial ch count minus 1)
- Setup Row 2 (RS): Ch 1, sc in each st across. Turn. (35 sc)
- Begin Alpine Stitch:
- Next Row (WS – corresponds to Alpine Stitch Row 4 if considering Setup Row 1 as a dc base): Ch 2 (counts as first dc), *dc in next st, FPdc around the dc post of the stitch directly below the next st (from Setup Row 1)*; rep from * to last st, dc in last st. Turn.
- Next Row (RS – corresponds to Alpine Stitch Row 1): Ch 1, sc in each st across. Turn.
- Next Row (WS – corresponds to Alpine Stitch Row 2): Ch 2, dc in each st across. Turn.
- Next Row (RS – corresponds to Alpine Stitch Row 3): Ch 1, sc in each st across. Turn.
- Next Row (WS – corresponds to Alpine Stitch Row 4): Ch 2, *dc in next st, FPdc around the dc post of the stitch directly below the next st (from the dc row 2 rows below)*; rep from * to last st, dc in last st. Turn.
- Continue repeating Alpine Stitch Rows 1-4 until the panel measures approximately 15-17 inches (or your desired (Height x 2) + Depth). For example, (6.5″ Height x 2) + 2.5″ Depth = 15.5 inches. End with an Alpine Stitch Row 1 (sc row) on the RS. Do not fasten off if you are continuing directly with the flap. If making flap separately, fasten off here.

Part 2: The Flap
- Option A: Continuous Flap (Recommended)
- With the RS of the Main Panel facing you (after ending with an sc row), continue working in the Alpine Stitch pattern (starting with Alpine Stitch Row 2 – the dc row) for another 6-7 inches, or until the flap is long enough to cover the front of your bag and accommodate the closure.
- End with an Alpine Stitch Row 1 (sc row) or a row of sc for a neat edge.
- Fasten off, leaving a short tail.
- Option B: Separate Flap
- Ch the same number as your Main Panel foundation chain (e.g., Ch 37).
- Work the Alpine Stitch pattern as for the Main Panel until the flap measures 6-7 inches.
- End with an Alpine Stitch Row 1 (sc row) or a row of sc.
- Fasten off, leaving a long tail for sewing. Sew to the top back edge of the Main Panel later.
Part 3: Side Panels (Make 2)
- Foundation Chain: Determine the depth of your bag (e.g., 2.5 inches). Ch a number to achieve this width plus 1 (e.g., if 10 sc = 2.5 inches, ch 11).
- Setup Row 1 (WS): Dc in 3rd ch from hook and in each ch across. Turn. (e.g., 9 dc)
- Setup Row 2 (RS): Ch 1, sc in each st across. Turn.
- Begin Alpine Stitch: Work as for the Main Panel, starting with the equivalent of Alpine Stitch Row 4 (WS texture row).
- Continue in Alpine Stitch pattern until the side panel is the same height as the front/back section of your bag (e.g., 6-7 inches). End with an Alpine Stitch Row 1 (sc row).
- Fasten off, leaving a long tail for sewing.

Part 4: Assembly
- Attach Side Panels:
- Lay the Main Panel flat, RS up. Identify the section for the base (e.g., central 2.5 inches of the 15.5-inch length).
- Fold up the front and back sections of the Main Panel to form the bag shape.
- With RS facing out, align one Side Panel with the raw edges of the front, base, and back sections on one side of the bag. Using the long tail and a yarn needle, neatly whip stitch or mattress stitch the Side Panel in place. Ensure the textured pattern aligns as best as possible.
- Repeat for the second Side Panel on the other side.
- Attach D-Rings:
- Cut two small tabs from your yarn (or crochet a small rectangle of sc, about 1 inch wide and 1.5-2 inches long).
- Fold a tab through a D-ring and securely sew the ends of the tab to the top outer edge of each Side Panel, or near the top corners of the back panel. (See image for placement).
- Attach Turn-Lock Closure:
- Follow the manufacturer’s instructions for your specific turn-lock.
- The “male” part (with the turn piece) is usually attached to the center front of the bag body, about 0.5-1 inch below the top edge.
- The “female” part (the opening) is attached to the flap, ensuring it aligns perfectly when the flap is closed. You may need to create small reinforced holes or sew carefully around the prongs. Small felt or leather scraps can be used on the inside to reinforce the attachment points.
Part 5: The Strap
- Foundation: Ch 7-9 (for a strap width of about 1-1.5 inches), or desired width.
- Row 1: Hdc in 3rd ch from hook (or sc in 2nd ch from hook for a flatter strap) and in each ch across. Turn.
- Row 2 onwards: Ch 1 or 2 (counts as first st), hdc (or sc) in each st across. Turn.
- Continue until your strap reaches the desired length (e.g., 40-50 inches for a crossbody).
- Fasten off, leaving tails if you need to sew it to swivel clasps, or work the last row attaching directly to the clasps.
- Attach swivel clasps to each end of the strap. Clip the clasps to the D-rings on the bag.
Video tutorial
Finishing Touches:
- Weave in all remaining loose ends securely.
- Lining (Highly Recommended for a Professional Finish):
- Create a fabric lining by measuring your finished bag (front, back, base, sides, and flap).
- Cut fabric pieces, adding seam allowance. Sew them together to form a lining insert.
- You can add pockets to your lining before inserting it.
- Hand-sew the lining carefully inside the bag, just below the top edge and along the flap edge. Interfacing the fabric pieces before sewing can add more structure.
And there you have it! Your very own beautifully textured and incredibly chic crossbody bag. This project takes patience, but the stunning result is well worth the effort!
Happy Crocheting!