 by
by 
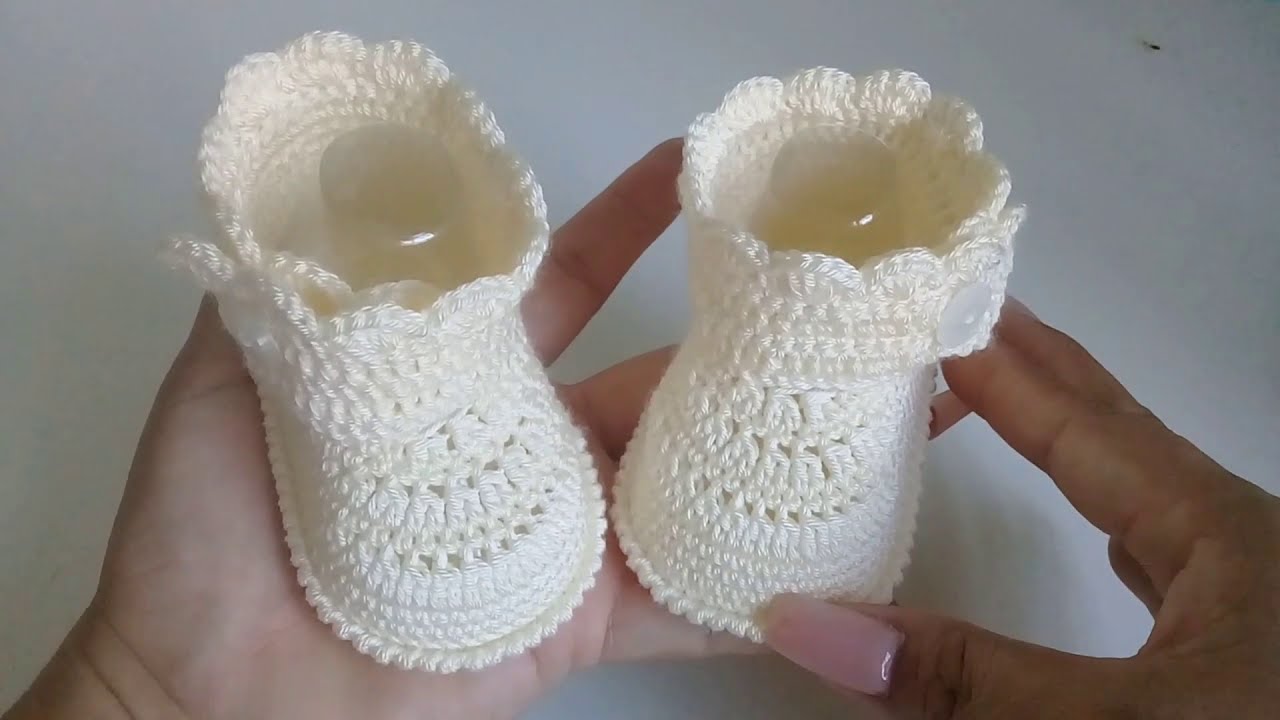
Give tiny feet a touch of classic elegance with these adorable crochet baby booties! Inspired by the sweet cream-colored pair in the picture, this pattern features a clean, simple body with a beautiful, delicate scalloped edge around the ankle, and a small button detail. They’re quick to make and perfect for a thoughtful baby shower gift or a treasured keepsake.
Skill Level: Easy (Familiarity with basic stitches and working in rounds is all you need!).

Materials:
- Yarn: DK (Light Worsted) weight yarn. A soft baby acrylic, cotton, or blend is highly recommended for comfort and softness.
- Main Color (MC): Cream/Off-White (or your chosen primary color) – approx. 40-60 yards per pair.
- Crochet Hook: Size G/6 (4.0 mm) or size needed to obtain gauge.
- Yarn Needle: For weaving in ends and attaching the button.
- Scissors
- Stitch Markers: Very helpful for marking the start of rounds and increase points on the sole.
- Small Buttons: 2 (approx. 8-10mm), one for each bootie.
Gauge (Crucial for Sizing!):
Achieving the correct sole length is paramount for these booties to fit properly.
- Sole Gauge: After completing the sole section, measure its length. Adjust your hook size or initial chain/increase rounds to reach the desired length from the sizing chart below.
- Example: For 0-3 months, your finished sole should measure around 3.5 inches.
Sizing Chart (Approximate Finished Sole Length):
| Size | Approx. Sole Length (inches) | Approx. Sole Length (cm) | Initial Chain (suggested) |
|---|---|---|---|
| 0-3 Months | 3.5 | 9 | Ch 10 |
| 3-6 Months | 4 | 10.5 | Ch 12 |
| 6-9 Months | 4.5 | 11.5 | Ch 14 |
- Note: If you want a larger size, increase your initial chain length by 2 stitches per size increment, and you may need to add an extra round to the sole and/or upper sections.
Abbreviations (US Crochet Terms):
- ch: chain
- sl st: slip stitch
- sc: single crochet
- hdc: half double crochet
- dc: double crochet
- sc2tog: single crochet 2 together (decrease)
- hdc2tog: half double crochet 2 together (decrease)
- BLO: back loop only
- FLO: front loop only
- st(s): stitch(es)
- sp: space
- inc: increase (work 2 sts in the same st)
- MC: Main Color
- ( ): repeat instructions in parentheses a specified number of times
- [ ]: total stitches at the end of the round
Pattern for Delicate Scallop Edge Baby Booties (Make 2)
Part 1: The Sole (Make 2 per pair)
Work in continuous rounds, using a stitch marker to mark the first stitch of each round.

Using Main Color (MC – Cream/Off-White):
Round 1: Ch (refer to Sizing Chart for initial chain). Hdc in 3rd ch from hook. Hdc in next (initial chain – 3) stitches. In the last ch, work 3 hdc (this turns the corner). Now working down the other side of the chain, hdc in next (initial chain – 3) stitches. In the very last ch (where you worked your first hdc), work 2 hdc. [Total stitches will vary based on initial chain]. Place stitch marker in the first hdc of the next round.
Round 2: 2 hdc in the first st (inc). Hdc in each st along the side of the sole until you reach the 3 hdc you worked in the last chain. (2 hdc in next st) 3 times (inc for the toe end). Hdc in each st along the other side until you reach the 2 hdc at the heel end. (2 hdc in next st) 2 times (inc for the heel end). Move stitch marker to the first st of the current round.
Round 3 (Optional for larger sizes, or if you need a wider sole): (2 hdc in next st) 2 times (inc). Hdc in each st along the side. (2 hdc in next st, hdc in next st) 3 times (inc for the toe end). Hdc in each st along the other side. (2 hdc in next st, hdc in next st) 2 times (inc for the heel end). Move stitch marker to the first st of the current round.
Check your sole length against the Sizing Chart. Adjust hook size or add/remove initial chains/rounds if needed.
Sl st to the first hdc of your last sole round to join. Fasten off and weave in ends for one sole. For the second sole, do not fasten off; you’ll continue with the upper.
Part 2: Building the Bootie Body
Using Main Color (MC – Cream/Off-White), continuing from the second sole:

Round 1 (Creating the “Wall”): Ch 1. Sc in the BLO of each st around. Sl st to the first sc to join. This round creates a nice, defined edge that makes the bootie stand up.
Round 2 (Solid Body Round): Ch 2 (counts as hdc). Hdc in each st around. Sl st to the first hdc to join.
Round 3 (Toe Shaping – First Decrease Round): Ch 2. Hdc in the first (approx. 10-12) stitches (for the heel/instep area; adjust based on your sole size). Mark the center toe stitch. You’ll be working decreases symmetrically around this point. Now, for the toe decreases: (hdc2tog) 5-6 times across the front of the bootie. Hdc in the remaining stitches around the heel/instep. Sl st to the first hdc to join. This round begins to pull the toe inwards.
Round 4 (Further Toe Shaping & Opening): Ch 2. Hdc in the first (approx. 8-10) stitches (slightly fewer as the front has narrowed). (hdc2tog) 3-4 times across the front of the bootie (over the previously decreased section). Hdc in the remaining stitches around the heel/instep. Sl st to the first hdc to join. The opening for the foot should now be well-defined.
Round 5: Ch 2. Hdc in each st around the entire opening of the bootie (including the decreased toe section). Sl st to the first hdc to join. This round creates a smooth base for the cuff.
Part 3: The Scallop Edge Cuff
The picture shows a lovely, delicate scalloped edge around the ankle.

Using Main Color (MC – Cream/Off-White):
Round 1 (Scallop Edge): Ch 1. *Sk 1 st, (dc 3, sl st) in next st.* Repeat from * to * around the ankle opening. You may need to adjust the very last repeat to fit evenly. Sl st to the first sl st to join. Fasten off MC.
Part 4: Finishing
- Weave in all remaining yarn ends securely.
- Make sure both booties are as identical as possible.
- Attach Button: Sew one small button onto the side of each bootie, near the scalloped edge, as seen in the picture. Ensure it’s very securely attached for baby safety.
- Optional: For added grip, apply non-slip puffy paint or sew on non-slip pads to the bottom of the soles if the baby will be walking.
Video Tutorial
Congratulations! You’ve just created a lovely pair of delicate scallop edge baby booties. These are sure to be a comfortable and adorable addition to any baby’s outfit!