 by
by 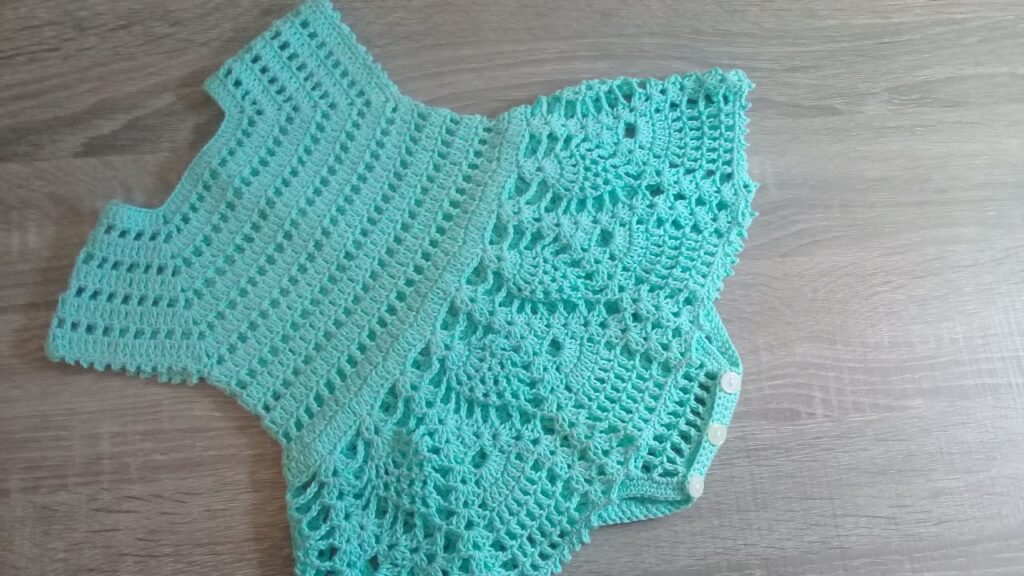
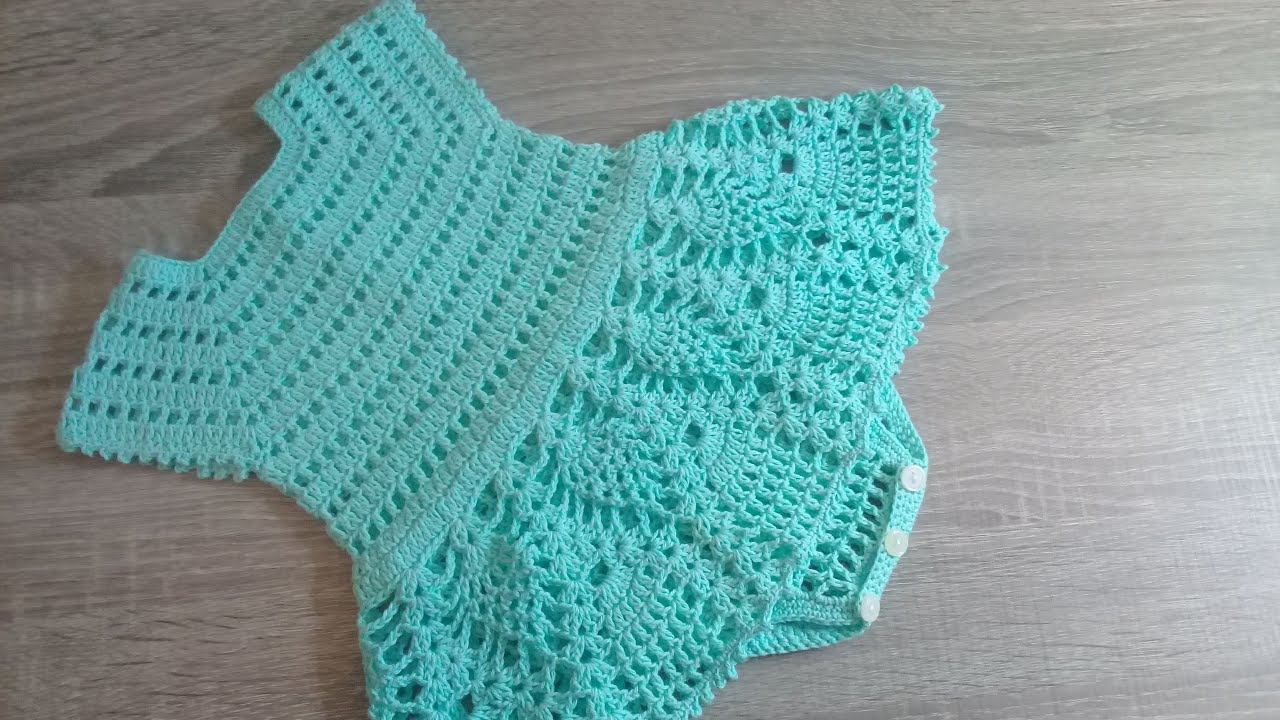
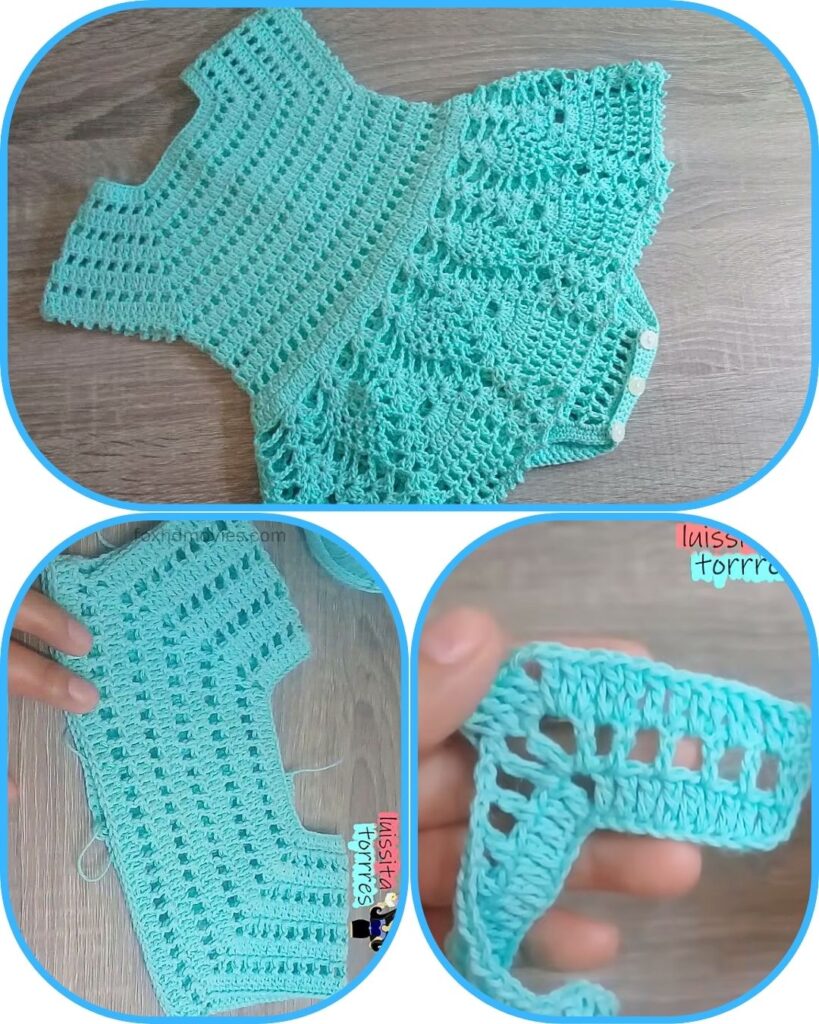
Get ready to create the cutest outfit for your little one with this charming crochet baby romper! Inspired by the lovely design in the picture, this pattern features a comfortable, solid yoke with short sleeves, transitioning into a delightful lacy body that’s perfect for warmer days. With easy button closure at the bottom, this romper is as practical as it is adorable.
Skill Level: Intermediate (familiarity with basic stitches, working top-down, joining in the round, and understanding basic lace/shell patterns is helpful).
Materials:
- Yarn: DK (Light Worsted) weight yarn. A soft cotton or cotton blend is highly recommended for baby comfort and drape.
- Main Color (MC): Turquoise/Aqua (or your chosen primary color) – approx. 200-350 yards, depending on size.
- Crochet Hook: Size G/6 (4.0 mm) or size needed to obtain gauge.
- Yarn Needle: For weaving in ends and attaching buttons.
- Scissors
- Stitch Markers: Very helpful for marking increase points, armholes, and the beginning of rounds.
- Small Buttons: 3-5, for the bottom closure.
Gauge (Crucial!):
Achieving the correct gauge is essential for the romper to fit properly.
- Yoke Gauge: 4 rows of hdc should measure approximately 1 inch.
- Lace/Shell Stitch Gauge: A 4-stitch pattern repeat should measure approximately 1 inch.
- Adjust your hook size if necessary to meet these gauges.
Finished Size (Approximate, 6-12 Months):
- Chest Circumference: 19-20 inches
- Yoke Depth (from neckline to underarm): 4-5 inches
- Length (Shoulder to Crotch): 14-16 inches
- Adjustments for other sizes: Guidance will be provided.
Abbreviations (US Crochet Terms):
- ch: chain
- sl st: slip stitch
- sc: single crochet
- hdc: half double crochet
- dc: double crochet
- sk: skip
- sp: space
- st(s): stitch(es)
- beg: beginning
- rep: repeat
- inc: increase (work 2 sts in the same st)
- dec: decrease (work 2 sts together)
- Shell: (dc 2, ch 1, dc 2) in same st/sp (adjust for desired density)
- ( ): repeat instructions in parentheses a specified number of times
- [ ]: total stitches in a round/row
Pattern for Sweet & Lacy Baby Romper
This romper is worked from the top down, starting with the yoke, then dividing for sleeves and body.
Part 1: The Yoke (Top Down, Worked in Rows)
Initial Chain: Ch 76 (for 6-12 months). This chain count should allow for 4 even sections and enough room for increases.
Row 1 (Foundation): Hdc in 3rd ch from hook and in each ch across. [74 hdc] Do NOT join. You’ll work in rows for the back opening. Ch 2 (counts as hdc), turn.
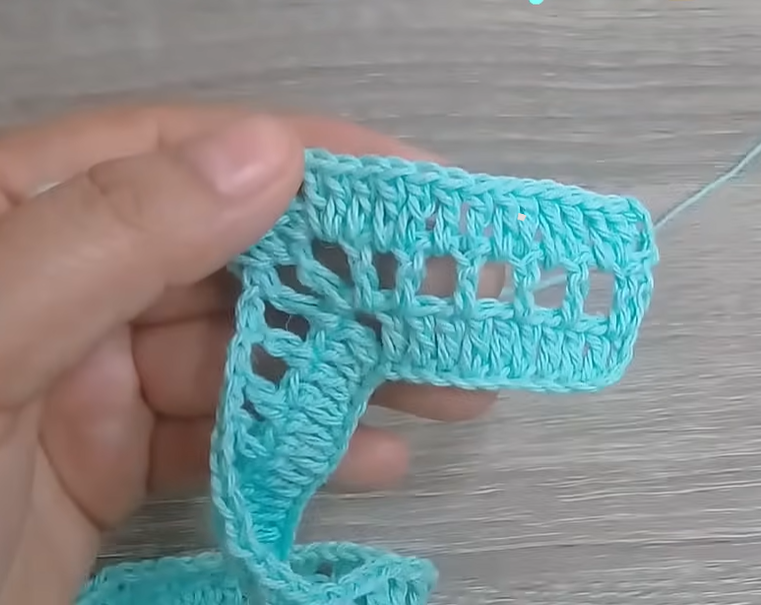
Row 2 (First Yoke Increase Row): Hdc in first st. Hdc in next 10 sts (Right Back Panel). (Hdc 2 in next st, ch 1, Hdc 2 in next st) in next st (Corner 1). Place stitch marker in ch-1 sp. Hdc in next 15 sts (Right Sleeve). (Hdc 2 in next st, ch 1, Hdc 2 in next st) in next st (Corner 2). Place stitch marker in ch-1 sp. Hdc in next 20 sts (Front Panel). (Hdc 2 in next st, ch 1, Hdc 2 in next st) in next st (Corner 3). Place stitch marker in ch-1 sp. Hdc in next 15 sts (Left Sleeve). (Hdc 2 in next st, ch 1, Hdc 2 in next st) in next st (Corner 4). Place stitch marker in ch-1 sp. Hdc in next 10 sts. Hdc 2 in last st (Left Back Panel). [86 hdc, 4 ch-1 sps] Ch 2, turn.
Row 3 (Yoke Increase Row): Hdc in first st. Hdc in each hdc until you reach the first ch-1 sp. (Hdc 2 in ch-1 sp, ch 1, Hdc 2 in ch-1 sp) in ch-1 sp (Corner 1). Hdc in each hdc until you reach the next ch-1 sp. (Hdc 2 in ch-1 sp, ch 1, Hdc 2 in ch-1 sp) in ch-1 sp (Corner 2). Hdc in each hdc until you reach the next ch-1 sp. (Hdc 2 in ch-1 sp, ch 1, Hdc 2 in ch-1 sp) in ch-1 sp (Corner 3). Hdc in each hdc until you reach the next ch-1 sp. (Hdc 2 in ch-1 sp, ch 1, Hdc 2 in ch-1 sp) in ch-1 sp (Corner 4). Hdc in each hdc until last st. Hdc 2 in last st. Ch 2, turn.
Repeat Row 3 for a total of 5-7 yoke rows (including Row 2). The picture shows a yoke with about 6-7 rows. Measure the yoke depth to ensure it’s about 4-5 inches from the neckline to the corner point.
Part 2: Dividing for Sleeves and Body
Next Row (Divide for Body): Ch 2. Hdc in each hdc until you reach the first corner ch-1 sp. Hdc 1 in corner ch-1 sp. Ch 2 (this creates the armhole space). Sk ALL sts between this corner and the next corner (Sleeve 1 sts). Hdc 1 in the next corner ch-1 sp. Hdc in each hdc across the Front Panel until you reach the next corner ch-1 sp. Hdc 1 in corner ch-1 sp. Ch 2 (this creates the second armhole space). Sk ALL sts between this corner and the next corner (Sleeve 2 sts). Hdc 1 in the next corner ch-1 sp. Hdc in each hdc until the end of the row. Sl st to the first hdc of the row to join the round. You will now work the body in rounds. [Approximately 60-70 hdc plus 4 chs for armholes. Total number will vary based on your yoke size.]

Part 3: The Body (Worked in Rounds)
The body of the romper appears to have a textured lace pattern, possibly alternating a solid row with a shell or V-stitch row.
Round 1 (Solid Base): Ch 1. Sc in each hdc around, including the 2 chs in each armhole space. Sl st to join. Count your stitches. It should be a multiple of 4 for the lace pattern.
Round 2 (Lace Pattern – V-Stitches): Ch 4 (counts as dc, ch 1). Dc in same st (forms first V-st). *Sk 3 sts, (dc 1, ch 1, dc 1) in next st (V-st made).* Repeat from * to * around. Sl st to 3rd ch of beg ch-4 to join.
Round 3 (Lace Pattern – Shells): Sl st into the ch-1 sp of the first V-st. Ch 3 (counts as dc). (Dc 1, ch 1, dc 2) in same ch-1 sp (first Shell made). *Shell (dc 2, ch 1, dc 2) in the ch-1 sp of next V-st.* Repeat from * to * around. Sl st to 3rd ch of beg ch-3 to join.
Round 4 (Lace Pattern – V-stitches in Shells): Ch 4 (counts as dc, ch 1). Dc in same st (forms first V-st, placing it in the ch-1 sp of the shell). *Sk 2 dc, (dc 1, ch 1, dc 1) in the ch-1 sp of the next Shell.* Repeat from * to * around. Sl st to 3rd ch of beg ch-4 to join.
Repeat Rounds 3 and 4 alternately until the romper body reaches approximately 10-12 inches from the underarm, or desired length before the crotch shaping.
Part 4: The Legs/Crotch Area
Now you will divide the body into two leg openings.
Next Round (Divide for Legs): Ch 1. Sc in half of the total stitches around (this will be one leg opening). Sl st to first sc to join. Count your stitches for this leg, ensuring it’s an even number or suitable for your leg edging. Leave the remaining stitches unworked for the other leg.
For the first leg: Work 2-3 rounds of sc in the round for the leg opening. Fasten off MC and weave in ends.
For the second leg: Join MC yarn to the remaining unworked stitches, ensuring you start at the ‘inner thigh’ equivalent. Work 2-3 rounds of sc in the round for the leg opening. Fasten off MC and weave in ends.
Part 5: The Short Sleeves
Join MC yarn to the center of the underarm ch-2 space.
Round 1 (Sleeve Base): Ch 2 (counts as hdc). Hdc in each hdc around the armhole opening and into the 2 ch-sp. Sl st to join. [Approx. 30-36 hdc]
Round 2 (Cuff): Ch 1. Sc in each st around. Sl st to join. Fasten off MC and weave in ends. Repeat for the second sleeve.

Part 6: Edging & Finishing Touches
Neckline Edging: Join MC yarn to the top right corner of the back opening. Row 1: Ch 1. Sc evenly around the entire neckline opening. Join with sl st to first sc. Fasten off and weave in ends.
Back Opening Edging: Join MC yarn to the bottom right corner of the back opening. Row 1: Ch 1. Sc evenly up the front opening edge to the neckline. Fasten off. Join MC yarn to the bottom left corner of the back opening. Row 2 (Buttonholes): Ch 1. Sc in first few stitches. *Ch 2 (sk 2 sts for buttonhole), sc in next few sts.* Repeat for 2-3 buttonholes, evenly spaced along the back opening. Sc to end. Fasten off.
Bottom Leg Closure (for diaper changes): On one leg opening (e.g., the front half of the leg), join MC yarn. Row 1 (Buttonholes): Ch 1. Sc in each st across. For buttonholes, evenly space 3-5 (ch 2, sk 2 sts). Sc to end. Fasten off. On the other leg opening, join MC yarn. Row 2 (Solid Band): Ch 1. Sc in each st across. Fasten off.
Assembly:
- Weave in all remaining yarn ends securely.
- Sew 3-5 small buttons onto the solid band of the bottom leg closure, aligning them with the buttonholes on the opposite side.
- Optional: Sew 2-3 small buttons onto the solid back opening band (opposite the buttonhole band).
Blocking (Recommended!): Gently block your romper to open up the lace pattern, even out your tension, and enhance drape. Wet the romper thoroughly, gently squeeze out excess water, lay flat, and shape it to the correct dimensions. Let it dry completely.
Video Tutorial
Adjusting for Different Sizes:
- Initial Chain: Adjust the initial chain to fit the head circumference, ensuring it works with your yoke increase formula (e.g., a multiple of 4 + 4 for the hdc rows).
- Yoke Rows: Add or subtract yoke increase rows to achieve the desired chest circumference and armhole depth. Measure regularly!
- Armhole Chain: For larger sizes, you might need to chain 3-4 stitches for the armhole bridge instead of 2.
- Body Length: Add or subtract repeats of the lace pattern rounds to achieve the desired length from underarm to crotch.
- Leg Length/Width: Adjust the number of stitches when dividing for legs and the number of sc rounds for the leg openings.
- Gauge Swatch: ALWAYS make a gauge swatch for garments to ensure the correct fit!
Enjoy crocheting this sweet and practical romper for your little one!