by
by 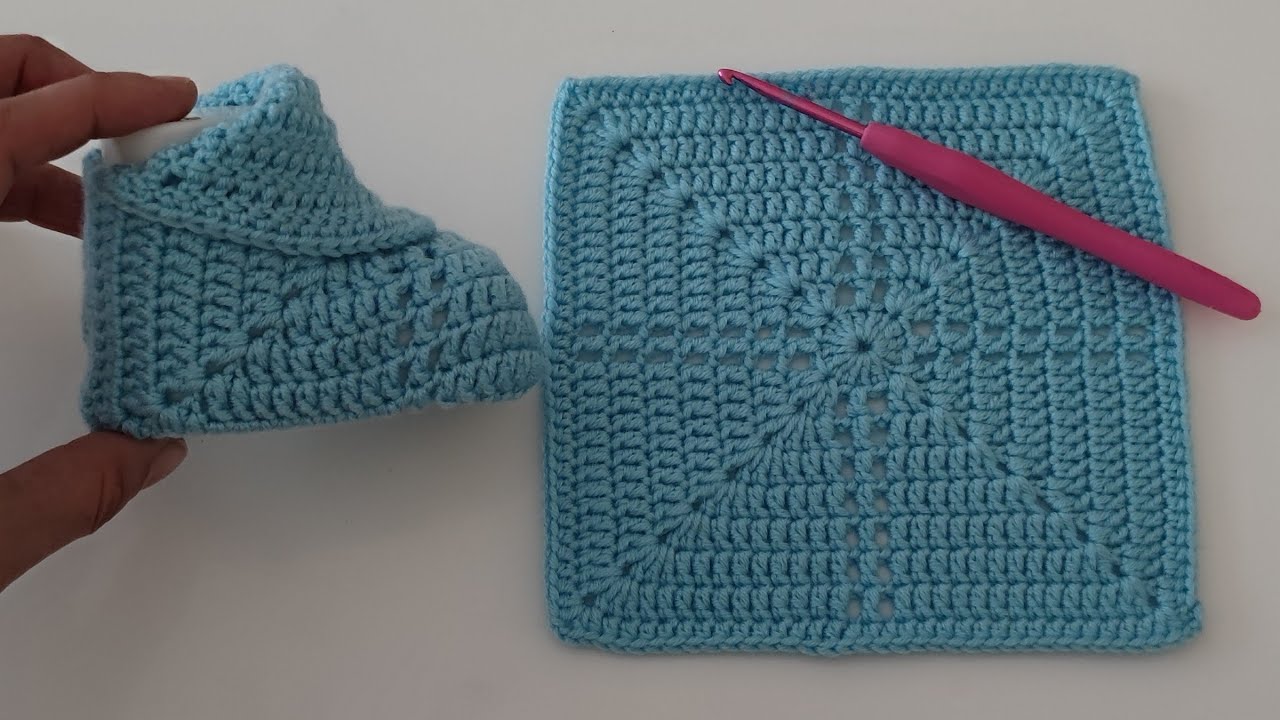
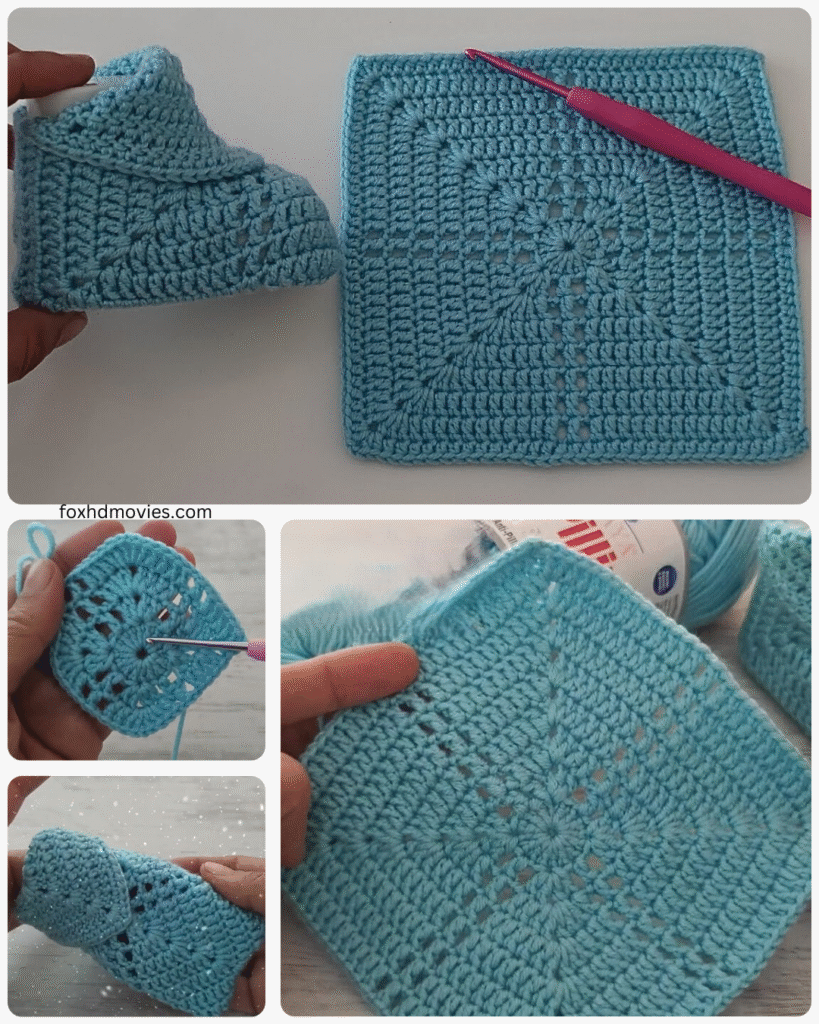
These exquisite crochet baby shoes feature delicate granny squares that come together to create a truly special piece. The openwork design adds a touch of elegance while still providing comfort and a secure fit for your little one. They make a wonderful heirloom gift or a cherished addition to any baby’s wardrobe.
Skill Level: Intermediate Beginner (requires basic granny square knowledge and some shaping)
Materials:
- DK weight yarn in your desired colors (you’ll need small amounts of yarn for the squares and a coordinating color for joining and the sole)
- Crochet hook size G/6 (4.0 mm) or size needed to obtain gauge
- Yarn needle for weaving in ends
- Scissors
- Stitch markers (optional, but helpful for joining)
Gauge:
Aim for a finished granny square of approximately 2.5 – 3 inches square after 4 rounds. Adjust your hook size if needed.
Finished Size:
This pattern is written for approximately 0-3 months (sole length around 3 inches). Instructions for slight adjustments will be included.
Abbreviations (US Crochet Terms):
- ch: chain
- sl st: slip stitch
- sc: single crochet
- hdc: half double crochet
- dc: double crochet
- tr: treble crochet (optional, for a more open granny square)
- sp: space
- st(s): stitch(es)
- beg: beginning
- rep: repeat
Video tutorial
Let’s Get Started!
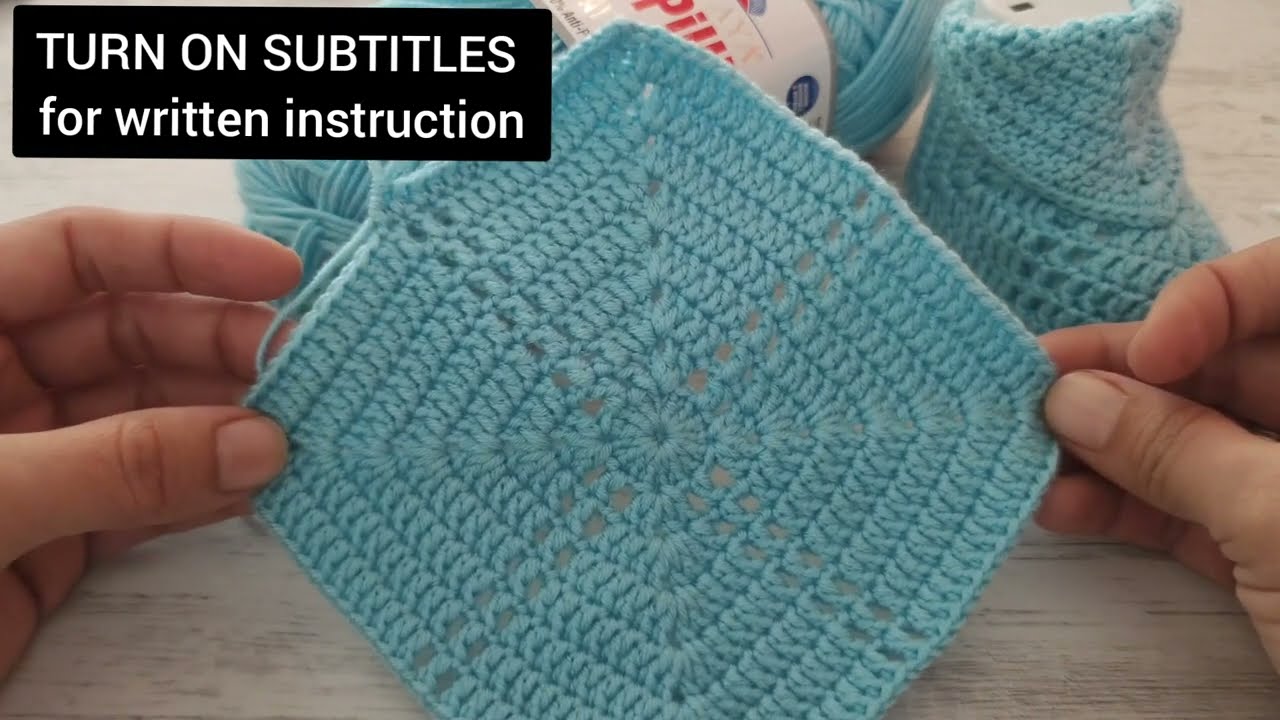
Part 1: Making the Granny Squares (Make 4)
We’ll create four classic granny squares that will form the main body of the shoe. Feel free to get creative with your color combinations for each square!
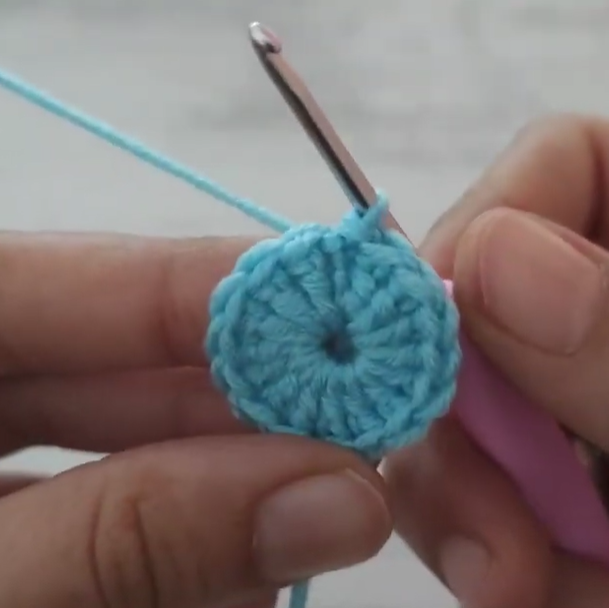
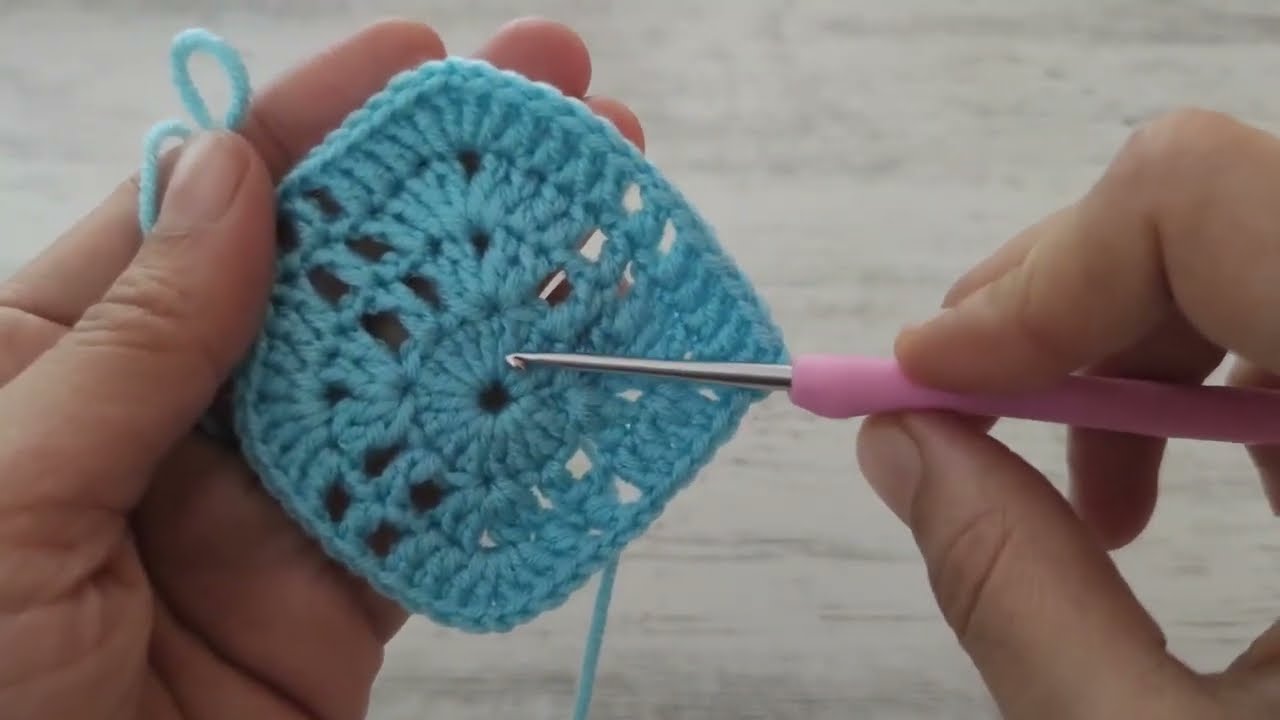
Round 1: With your first color, ch 4, sl st to join into a ring. (Alternatively, you can use a magic ring). Ch 3 (counts as first dc), 2 dc in the ring, ch 2, *3 dc in the ring, ch 2; rep from * twice more. Sl st to the top of the beg ch-3. (4 clusters of 3 dc, 4 ch-2 spaces)
Round 2: Sl st into the next dc and into the first ch-2 sp. Ch 3 (counts as first dc), 2 dc in the same ch-2 sp, ch 2, 3 dc in the same ch-2 sp (corner made). *Ch 1, (3 dc, ch 2, 3 dc) in the next ch-2 sp (corner made); rep from * twice more, ch 1. Sl st to the top of the beg ch-3.
Round 3: Sl st into the next 2 dc and into the first ch-2 sp. Ch 3 (counts as first dc), 2 dc in the same ch-2 sp, ch 2, 3 dc in the same ch-2 sp (corner made). *Ch 1, 3 dc in the next ch-1 sp, ch 1, (3 dc, ch 2, 3 dc) in the next ch-2 sp (corner made); rep from * twice more, ch 1, 3 dc in the last ch-1 sp, ch 1. Sl st to the top of the beg ch-3.
Round 4: Sl st into the next 2 dc and into the first ch-2 sp. Change to your second color (optional). Ch 3 (counts as first dc), 2 dc in the same ch-2 sp, ch 2, 3 dc in the same ch-2 sp (corner made). *Ch 1, 3 dc in each ch-1 sp across to the next corner, ch 1, (3 dc, ch 2, 3 dc) in the next ch-2 sp (corner made); rep from * twice more, ch 1, 3 dc in each ch-1 sp across to the last corner, ch 1. Sl st to the top of the beg ch-3. Fasten off and weave in ends.
Repeat this process to make a total of 4 gorgeous granny squares.
Part 2: Creating the Sole (Make 2)
We’ll now crochet a simple sole that the granny squares will be attached to. Use your coordinating color for this part.
Round 1: Ch 9. In the 2nd ch from the hook, sc 1. Sc in the next 6 ch. In the last ch, work 3 sc. Now working on the other side of the chain, sc in the next 6 ch. Sc in the last ch (where you started the first sc). Sl st to the first sc. (18 sts)
Round 2: Ch 1, sc in the same st. Sc in the next 7 sts. Inc in the next 3 sts. Sc in the next 7 sts. Inc in the last 2 sts. Sl st to the first sc. (23 sts)
Round 3: Ch 1, sc in the same st. Sc in the next 8 sts. (Sc 1, inc) repeat 3 times. Sc in the next 8 sts. (Inc, sc 1) repeat 2 times. Sl st to the first sc. (28 sts)
Round 4: Ch 1, sc in the same st. Sc in the next 9 sts. (Sc 2, inc) repeat 3 times. Sc in the next 9 sts. (Inc, sc 2) repeat 2 times. Sl st to the first sc. (33 sts)
For a slightly larger sole (approx. 3-6 months, 3.5 inches): Add one more round, following the same increasing pattern: Ch 1, sc in the same st. Sc in the next 10 sts. (Sc 3, inc) repeat 3 times. Sc in the next 10 sts. (Inc, sc 3) repeat 2 times. Sl st to the first sc. (38 sts)
Fasten off the first sole and weave in the end. Make a second sole, but do not fasten off after the last round.
Part 3: Joining the Granny Squares to the Sole
Now we’ll carefully join the granny squares to the edge of the second sole.
- Position two granny squares side by side. Using your coordinating yarn and a yarn needle or your crochet hook, join them together along one edge using a whip stitch or single crochet. Aim to join through the back loops only for a neater seam.
- Now, align one joined edge of the two squares with one of the longer sides of the sole (the side with more stitches).
- Using your crochet hook and coordinating yarn, single crochet the joined granny squares to the sole. Work one sc in each stitch along the edge of the sole and try to evenly distribute the stitches across the edge of the granny squares (you might need to work more than one sc per granny square stitch or skip some stitches to ensure a flat join).
- Repeat this process with the remaining two granny squares, joining them together along one edge and then attaching this joined pair to the opposite long side of the sole. You should now have a basic shoe shape forming.
Part 4: Shaping the Heel
Now we’ll work around the back to create a snug heel.
- With the right side facing you, attach your coordinating yarn to one of the back corners where a granny square meets the sole.
- Ch 1, then work single crochet evenly across the back edge of the sole and up the side of the adjacent granny square.
- Continue working single crochet across the top edge of that granny square.
- Now work single crochet down the other side of the granny square and across the remaining back edge of the sole. Sl st to the first sc.
- Next Round: Ch 1, sc in each st around. Sl st to the first sc.
- Repeat the last round for 2-3 more rounds, decreasing slightly at the center back in each round to create a more defined heel shape. You can do this by working a sc2tog (single crochet two together) in the center back of each of these rounds.
Part 5: Creating the Ankle Opening and Strap
Now we’ll shape the front opening and create a strap to secure the shoe.
- With the right side facing you, find the center front of the shoe (where the two front granny squares meet).
- Attach your coordinating yarn to one side of the opening.
- Work single crochet evenly across the edge of the granny square towards the center.
- Creating the Strap: Ch 15 (adjust length as needed for the strap).
- Attach the chain to the opposite side of the opening on the other granny square with a slip stitch or single crochet.
- Continue working single crochet evenly across the edge of the second granny square. Sl st to the first sc of this round.
- Next Round (Optional): You can work one more round of single crochet around the entire opening and strap for a neater finish.
Part 6: Adding a Fastener (Optional)
To secure the strap, you can add a button or create a loop.
- Button: Sew a small button to the side of the shoe where the strap will fasten. The button should be positioned so the strap can comfortably loop around it.
- Loop: At the end of the strap, instead of just chaining, you could create a small loop by chaining a few stitches and slip stitching back into the base of the chain.
Finishing Touches:
- Weave in all remaining yarn ends securely.
- You can add decorative elements like small crocheted flowers, ribbons woven through the granny squares, or other embellishments to enhance the gorgeous look of your baby shoes.

Adjusting the Size:
- For a smaller size: Use a smaller hook and/or thinner yarn. You could also use granny squares with fewer rounds.
- For a larger size: Use a larger hook and/or thicker yarn. You can also add an extra round to your granny squares or add more rounds to the sole.
Tips for Gorgeous Granny Square Baby Shoes:
- Neat Joins: Pay close attention to how you join your granny squares and the sole for a seamless and professional look.
- Color Coordination: Choose colors that complement each other to enhance the visual appeal of the granny squares.
- Blocking (Optional but Recommended): Gently blocking your finished granny squares before joining can help them achieve a uniform size and shape, resulting in a more polished final product.
- Stitch Consistency: Maintain consistent tension throughout your work for even and beautiful granny squares.