by
by 
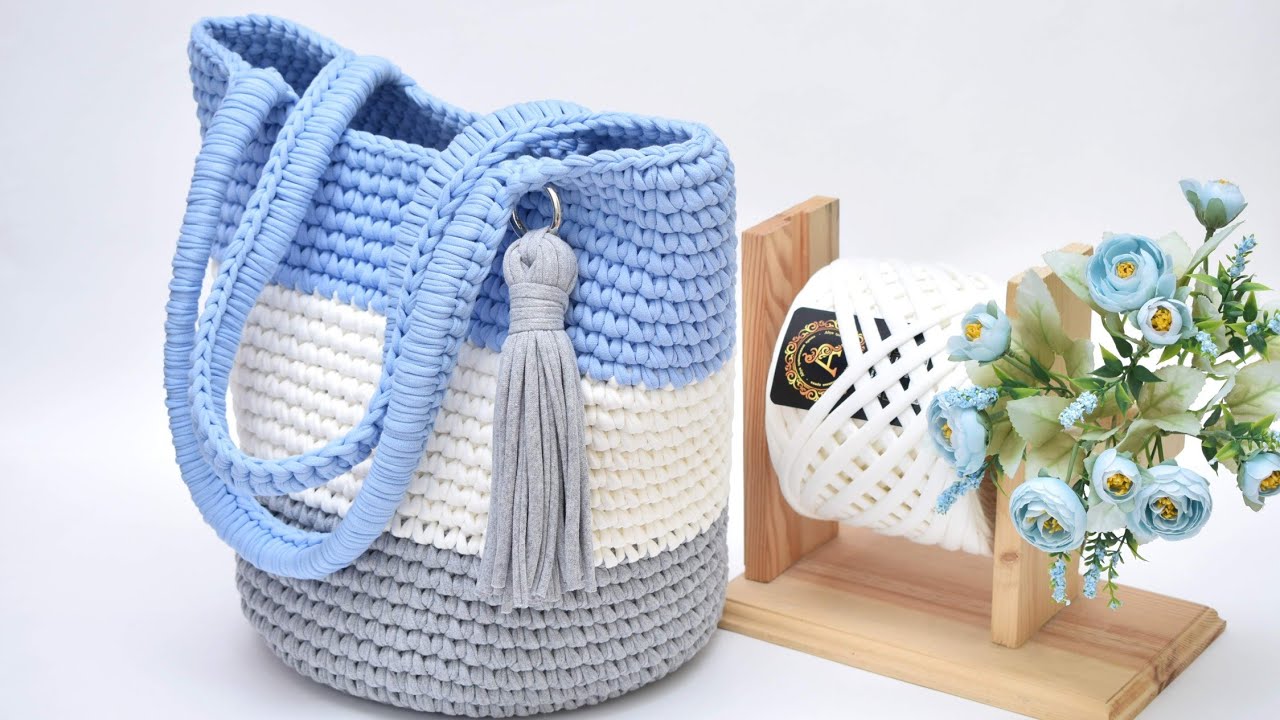
Hello, creative souls! Are you ready to combine your love for yarn with your need for a stylish and practical accessory? Today, we’re embarking on a delightful journey to crochet a beautiful and functional handbag that’s surprisingly easy to make, even if you’re relatively new to the craft.
Forget complicated patterns and intimidating techniques. This guide will walk you through a simple yet chic design, allowing you to create a unique handbag that reflects your personal style. Get your favorite yarn ready, and let’s crochet ourselves a gorgeous new carry-all!
What You’ll Need to Get Started:
- Medium to Bulky Weight Yarn: Choose a yarn that’s sturdy enough to hold its shape. Cotton, acrylic blends, or even a durable wool can work well. Consider the color and texture you desire for your finished bag. Approximately 300-400 yards should be sufficient for a medium-sized bag.
- Crochet Hook: Select a hook size appropriate for your chosen yarn weight. A common size for medium weight yarn is H/8 (5.0 mm) or I/9 (5.5 mm). Check your yarn label for recommendations.
- Scissors: For snipping your yarn.
- Yarn Needle: For weaving in ends securely.
- Stitch Markers (optional but helpful): To mark the beginning of rounds or specific stitches.
- Measuring Tape: To check your dimensions as you work.
- Optional Embellishments: Buttons, magnetic snaps, fabric lining, handles (leather, chain, or crocheted), decorative tassels, etc., to personalize your bag.
Understanding the Basics: Simple Stitches, Stunning Results
This easy handbag pattern primarily utilizes two fundamental crochet stitches:
- Chain (ch): The foundation of our project.
- Single Crochet (sc): A tight and sturdy stitch that creates a dense fabric for the body of the bag.
We’ll be working in continuous rounds for the main body, which means no joining at the end of each round unless specified. This creates a seamless and smooth finish.
Video tutorial
The Pattern: Building Your Beautiful Bag, Step by Step
Let’s get crocheting! This pattern creates a simple tote-style bag. You can easily adjust the size by changing the number of starting chains and the number of rounds you work.
Part 1: The Base of the Bag
- Magic Ring (or Chain Start):
- Magic Ring Method: Wrap the yarn around your fingers to create a loop. Insert your hook into the loop, yarn over, and pull through a loop. Chain 1 to secure the ring (this chain does not count as a stitch).
- Chain Start Method: Chain 2. Work 6 single crochet (sc) into the second chain from the hook.
- Round 1: Work 6 single crochet (sc) into the magic ring (or around the chain-2). Pull the magic ring tight to close the center. (6 sc)
- Round 2: Work 2 single crochet (sc) in each stitch around. (12 sc)
- Round 3: *Sc in the next stitch, 2 sc in the next stitch.* Repeat from * to * around. (18 sc)
- Round 4: *Sc in the next 2 stitches, 2 sc in the next stitch.* Repeat from * to * around. (24 sc)
- Continue Increasing: Continue increasing in this manner, adding one more single crochet between each increase in each round. For example:
- Round 5: *Sc in the next 3 stitches, 2 sc in the next stitch.* (30 sc)
- Round 6: *Sc in the next 4 stitches, 2 sc in the next stitch.* (36 sc)
- …and so on.
- Desired Base Size: Continue increasing until your base reaches your desired width. For a medium-sized bag, a diameter of 6-8 inches is a good starting point.

Part 2: The Body of the Bag
- Round 1 (Transition to Body): Single crochet (sc) in each stitch around. Do not join. Place a stitch marker at the beginning of this round. (The number of stitches will be the final circumference of your bag’s opening).
- Continue Working Even: Single crochet (sc) in each stitch around, working in continuous rounds. Move your stitch marker up at the beginning of each new round.
- Desired Height: Continue working rounds of single crochet until your bag reaches your desired height. For a tote-style bag, a height of 10-12 inches is a common range.
Part 3: Creating the Handles (Two Options)
Option 1: Simple Crocheted Handles
- Mark Handle Placement: Once the body of your bag is complete, place stitch markers on opposite sides of the opening to indicate where you want your handles to be attached. Ensure they are evenly spaced.
- First Handle: Starting at one of your stitch markers, chain 40-50 (adjust this number for your desired handle length). Skip the stitches between your stitch marker and the next point where you want to attach the handle, and slip stitch (sl st) into that stitch.
- Second Handle: Repeat Step 2 on the opposite side of the bag.
- Reinforce Handles (Optional but Recommended): For added strength, work a round of single crochet (sc) over the chain of each handle.
Option 2: Attaching Purchased Handles
- Once the body of your bag is complete, you can simply sew or attach purchased handles (leather, chain, or sturdy fabric) to the top edges of your bag, ensuring they are securely fastened and evenly spaced.
Part 4: Finishing Touches
- Edging (Optional): You can work a final round of slip stitch (sl st), reverse single crochet (crab stitch), or another decorative edge around the top opening of your bag for a cleaner finish.
- Weave in Ends: Use your yarn needle to weave in all loose ends securely on the inside of your bag.
- Add Embellishments (Optional): Now is the time to personalize your bag! You can sew on buttons, attach magnetic snaps for closure, add a crocheted flower or tassel, or even sew in a fabric lining with pockets for added functionality.

Tips and Variations for Your Unique Bag:
- Stripes: Change colors every few rounds to create a stylish striped effect.
- Texture: Experiment with different crochet stitches for the body of the bag, such as half double crochet (hdc) for a softer fabric or double crochet (dc) for a more open weave. Just remember to adjust your stitch counts accordingly.
- Bottom Shape: Instead of a flat circle, you can start with a chain and work in rows to create a rectangular or oval base.
- Handle Styles: Get creative with your handles! You can crochet wider straps, braided handles, or even use different yarns for a contrasting look.
- Closure Options: Consider adding a button and loop closure, a drawstring closure, or a flap with a magnetic snap.
Care for Your Crocheted Handbag:
- Hand washing is generally recommended for crocheted items. Use a mild detergent and lukewarm water.
- Gently squeeze out excess water and lay flat to dry. Avoid hanging, as it can stretch the bag out of shape.
- Reshape your bag while it’s still damp if needed.