by
by 
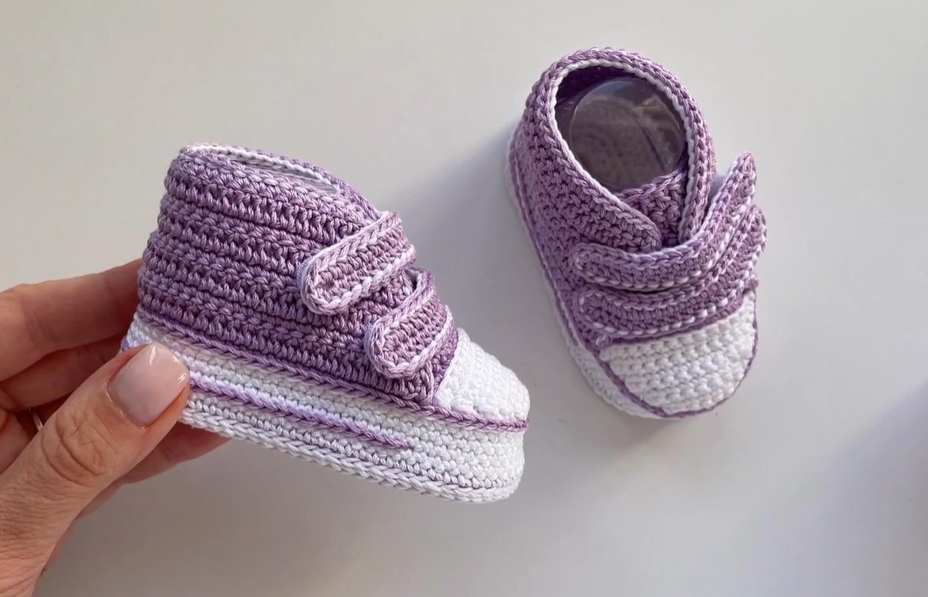
Making a baby sneaker involves a few more steps and shaping than a basic bootie, but it’s definitely achievable!
Here is the pattern:
Detailed Crochet Baby Sneaker Pattern
This pattern will guide you through making a cute pair of baby sneakers.
Skill Level: Intermediate
Size: 3-6 Months (approx. 4 – 4.25 inches sole length)
Note: To adjust the size, modify the starting chain length for the sole and the number of increase rounds. Adjust the number of rounds for the upper and side panels.
Materials:
- Approximately 80-100 yards of DK weight yarn in Main Color (MC).
- Approximately 20-30 yards of DK weight yarn in Contrasting Color 1 (CC1) for the sole trim and accents.
- Approximately 10-15 yards of DK weight yarn in Contrasting Color 2 (CC2) for the toe cap and tongue.
- Crochet hook size E/4 (3.5 mm) or size needed to obtain gauge.
- Tapestry needle for weaving in ends and assembly.
- Scissors
- Stitch marker (optional, but very helpful)
- Small amount of fiberfill or yarn scraps for stuffing the toe (optional, helps hold shape).
- Yarn or thin ribbon for laces (approx. 15-20 inches per shoe).
Gauge:
18 hdc stitches and 14 rows = 4 inches (10 cm) in hdc with MC.
Checking your gauge is important for getting the correct size.
Abbreviations:
- ch: chain
- st(s): stitch(es)
- sl st: slip stitch
- sc: single crochet
- hdc: half double crochet
- dc: double crochet
- inc: increase (work 2 hdc in the same stitch)
- dec: decrease (hdc2tog – half double crochet 2 stitches together)
- FO: Fasten off
- BLO: Back loop only
- FLO: Front loop only
- MC: Main Color
- CC1: Contrasting Color 1
- CC2: Contrasting Color 2
Notes:
- The sole is worked in the round.
- The upper is worked in rounds and then divided for the toe and side panels.
- The tongue is worked flat separately.
- Join rounds with a sl st unless otherwise instructed. Ch 1 at the beginning of the round does not count as a stitch unless stated.

Pattern Instructions:
Make 2 (for a pair)
Part 1: The Sole
Using CC1:
Round 1: Ch 13. Hdc in the 2nd ch from the hook and in the next 10 chs. 3 hdc in the last ch. Now working on the opposite side of the starting chain, hdc in the next 10 chs. 2 hdc in the last ch. Join with a sl st to the first hdc. (26 hdc)
Round 2: Ch 1. Inc in the first st. Hdc in the next 10 sts. Inc in the next 3 sts. Hdc in the next 10 sts. Inc in the next 2 sts. Join with a sl st to the first hdc. (32 hdc)
Round 3: Ch 1. Hdc in the first st. Inc in the next st. Hdc in the next 10 sts. (Hdc in next st, inc in next st) 3 times. Hdc in the next 10 sts. (Hdc in next st, inc in next st) 2 times. Join with a sl st to the first hdc. (38 hdc)
Round 4: Ch 1. Sc in BLO in each st around. Join with a sl st to the first sc. (38 sc) FO CC1.
Working in the back loop only creates the base for the upper.
Part 2: Building the Upper Base
Using MC:
Round 5: Attach MC with a sl st in the first st of Round 4. Ch 1. Hdc in each st around. Join with a sl st to the first hdc. (38 hdc)
Round 6: Ch 1. Hdc in each st around. Join with a sl st to the first hdc. (38 hdc)
Part 3: Shaping the Toe Cap
Using CC2:
Find the center 12 stitches at the front of the shoe. Count back 6 stitches from the join/heel area, mark it. Count 12 stitches forward from there. You will attach CC2 in the 13th stitch from the marked heel stitch. This area of 12 stitches will be the toe.
Row 1 (Toe): Attach CC2 with a sl st in the first marked toe stitch. Ch 1. Hdc in the same st and in the next 11 sts across the front of the shoe. (12 hdc) Do NOT join. Turn.
Row 2 (Toe): Ch 1. Dec over the first 2 sts. Hdc in the next 8 sts. Dec over the last 2 sts. (10 hdc) Turn.
Row 3 (Toe): Ch 1. Dec over the first 2 sts. Hdc in the next 6 sts. Dec over the last 2 sts. (8 hdc) Turn.
Row 4 (Toe): Ch 1. Sc in each st across. (8 sc) FO CC2.
This creates the curved toe cap shape.
Part 4: Creating the Side Panels
Using MC:
We will now work around the remaining stitches of Round 6 (the unworked stitches on the sides and back).
Round 7: Attach MC with a sl st in the first unworked st after the toe cap (on one side of the shoe). Ch 1. Hdc in each unworked st around the side, across the back (heel), and up the other side, stopping just before the other side of the toe cap. Join with a sl st to the first hdc of this round. (Approx. 26 hdc – count your stitches to be sure you worked only the side/heel stitches).
Round 8: Ch 1. Hdc in each st around. Join with a sl st to the first hdc. (26 hdc)
Round 9: Ch 1. Hdc in each st around. Join with a sl st to the first hdc. (26 hdc)
Work more rounds here for a higher-top sneaker.
Part 5: Ankle Trim and Eyelets
Using CC1:
Round 10 (Optional Eyelet Round): Attach CC1 with a sl st in any st. Ch 1. Sc in the first 2 sts. Ch 1, skip 1 st (creates eyelet). Sc in the next 3 sts. Ch 1, skip 1 st. Repeat from * around the ankle opening until you reach the last few stitches. Sc in remaining sts. Join with a sl st to the first sc.
Round 11: Ch 1. Sc in each sc and in each ch-1 space around. Join with a sl st to the first sc. FO CC1.
Part 6: The Tongue
Using CC2:
Ch 7.
Row 1: Hdc in the 2nd ch from the hook and in each ch across. (6 hdc) Turn.
Rows 2-8: Ch 1. Hdc in each st across. (6 hdc) Turn.
Adjust the number of rows for desired tongue length.
FO, leaving a long tail for sewing.
Part 7: The Heel Tab (Optional)
Using MC or CC1:
Ch 5.
Row 1: Sc in the 2nd ch from the hook and in each ch across. (4 sc) Turn.
Rows 2-4: Ch 1. Sc in each st across. (4 sc) Turn.
FO, leaving a long tail for sewing.
Video tutorial
Assembly:
- Weave in all ends on the shoe parts (sole, upper, toe).
- Attach the Tongue: Position the straight (non-starting chain) edge of the tongue inside the shoe, aligning it with the base of the toe cap. Sew it securely in place using the tail and tapestry needle.
- Attach the Heel Tab (Optional): Position the heel tab at the back of the shoe, centered vertically, with the top edge level with the ankle opening trim. Sew it securely in place.
- Weave in any remaining assembly ends.
- Insert optional fiberfill or yarn scraps into the toe area to help it keep its shape.
- Thread laces through the eyelets (if you made them). If you skipped the eyelet round, you can simply thread laces through the stitches of the side panels.
Repeat all steps for the second sneaker.