 by
by 
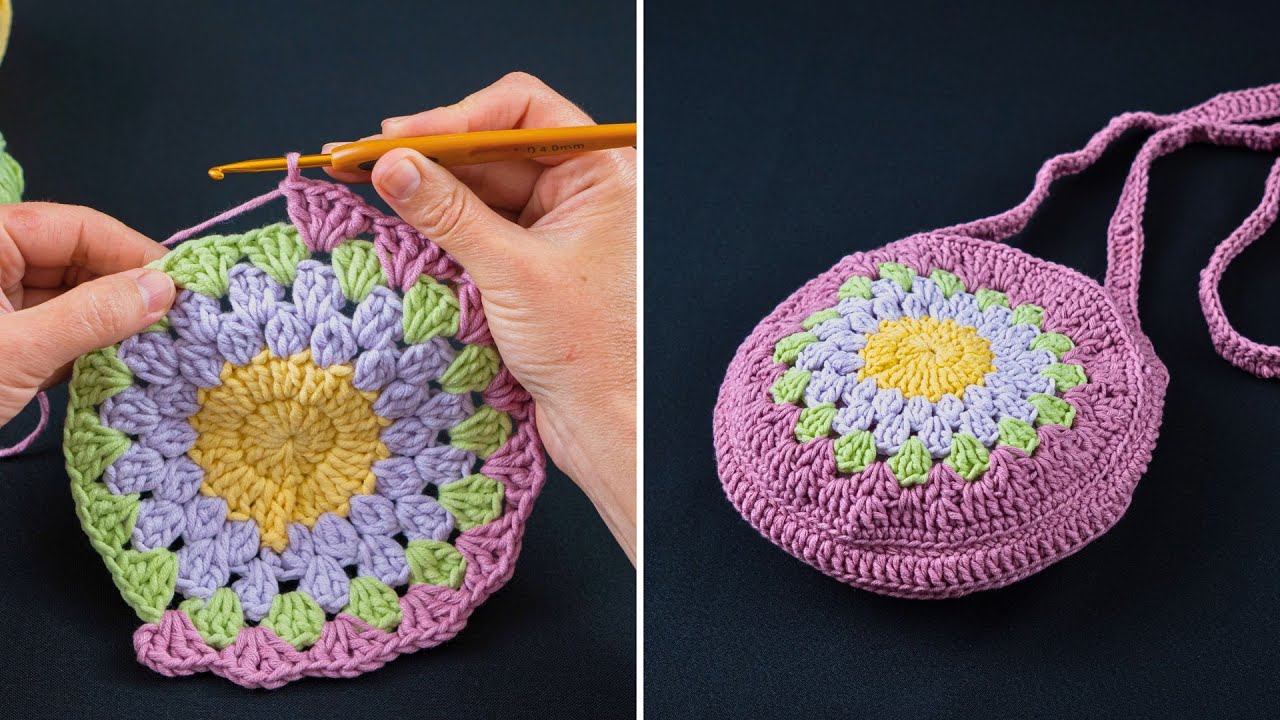
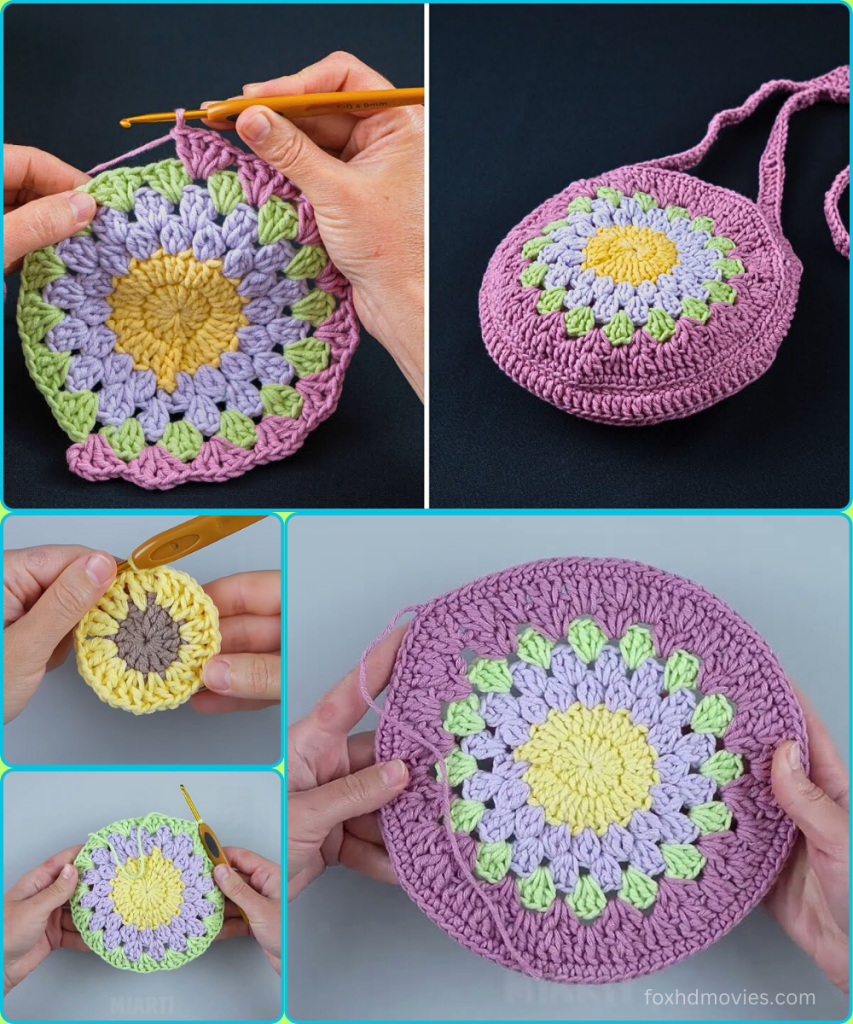
Step aside, squares! This charming circular bag brings a playful, bohemian vibe to your handmade accessory collection. Made from two identical, colorful motifs joined together, this project is a great way to use up leftover yarn and practice your circular crochet skills. The construction is straightforward, and the result is a beautiful, one-of-a-kind bag that’s perfect for casual outings.
The pattern builds on a solid center, then transitions to a decorative, open stitch pattern that creates a beautiful flower-like effect. Finally, a solid single crochet border joins the two pieces and gives the bag its shape and durability.
What You’ll Need:
- Yarn: Worsted weight (Aran/10 ply) cotton yarn is an excellent choice for its sturdy texture and clean stitch definition. You’ll need four colors as seen in the example.
- Color A (Center): Yellow (approx. 20-30 yards)
- Color B (First Border): Purple/Lilac (approx. 30-40 yards)
- Color C (Second Border): Green (approx. 40-50 yards)
- Color D (Final Border & Bag Body): Dusty Rose/Pink (approx. 100-150 yards)
- Crochet Hook: Size H/5.0mm (or hook size needed to achieve a firm, but not stiff, fabric).
- Yarn Needle: For weaving in ends and seaming.
- Scissors
- Stitch Marker (optional): Helpful for marking the start of your rounds.
Abbreviations Used:
- ch: chain
- sl st: slip stitch
- sc: single crochet
- dc: double crochet
- tr: treble crochet (or triple crochet)
- st(s): stitch(es)
- sp: space
- rnd: round
- FO: fasten off
- [ ]: repeat instructions in brackets
- ( ): stitch count at the end of the round
Gauge:
Your finished circular motif should measure approximately 18-20 cm (7-8 inches) in diameter. If your circle is coming out smaller, try going up a hook size. If it’s too large, go down a hook size. The exact size isn’t as critical as consistency, as long as both of your circles are the same size.
Part 1: The Circular Motifs (Make 2)
We’ll start by making two identical circular pieces that will form the front and back of your bag.

Using Color A (Yellow)
Rnd 1 (Center):
- Make a magic ring (or ch 4 and sl st to the first ch to form a ring).
- Ch 3 (counts as 1st dc), work 11 dc into the ring.
- Join with a sl st to the top of the initial ch 3. (12 dc)
- Pull the magic ring tight to close the center. FO Color A.
Using Color B (Purple/Lilac)
Rnd 2:
- Join Color B in any stitch. Ch 3 (counts as 1st dc).
- Work 1 dc in the same stitch. Work 2 dc in each stitch around.
- Join with a sl st to the top of the initial ch 3. (24 dc)
- FO Color B.
Using Color C (Green)
Rnd 3 (First Granny Round):
- Join Color C in any stitch. Ch 3 (counts as 1st dc), 2 dc in the same stitch.
- [Ch 1, skip 2 stitches, 3 dc in the next stitch] around.
- After the last cluster, ch 1, join with a sl st to the top of the initial ch 3. (8 clusters of 3 dc, 8 ch-1 spaces)
- FO Color C.
Using Color D (Dusty Rose/Pink)
Rnd 4 (Second Granny Round):
- Join Color D in any ch-1 space. Ch 3 (counts as 1st dc), 2 dc in the same ch-1 space.
- [Ch 1, 3 dc in the next ch-1 space] around.
- After the last cluster, ch 1, join with a sl st to the top of the initial ch 3. (8 clusters of 3 dc, 8 ch-1 spaces)
- You should now have a decorative circle.
- Do not fasten off Color D on your first circle. This yarn will be used to create the bag’s body and strap.

Now, repeat all the steps above to create your second identical circle. On this second circle, do not cut the yarn after Rnd 4.
Part 2: Joining the Two Motifs & Creating the Bag Body
This part creates the depth of the bag and joins the two sides together.
- Place your two circular motifs together with their wrong sides facing each other (so the right sides are facing out).
- Make sure the stitches and clusters line up neatly.
- With the yarn still attached to your second circle, ch 1.
- You will now work single crochet stitches through both layers to join the circles together.
- Work 1 sc in each dc stitch and 1 sc in each ch-1 space around the circumference of the circle.
- You’ll need to leave an opening for the bag. Continue working the sc stitches until you have joined about three-quarters of the circle’s circumference.
- Do not cut the yarn! You will use this yarn to create the strap.

Part 3: The Crocheted Strap
The strap is made directly from the opening of the bag.
- With the yarn still attached, ch a long chain to your desired strap length. For a shoulder strap, a chain of 150-200 stitches is a good starting point. For a crossbody strap, you’ll need even more. You can always chain a little extra and take out stitches later.
- Once you have your chain, turn your work.
- Starting in the second chain from the hook, work 1 sc into each chain all the way back down the chain. This will create a sturdy, flat strap.
- When you reach the end of the chain, sl st into the top of the bag on the opposite side of the opening to attach your strap.
- FO and weave in all remaining ends securely.
Video tutorial
Finishing Touches:
- Weave in all remaining ends: This is a crucial step for a professional and durable finish.
- Blocking (Optional but Recommended): Gently wash your finished bag according to the yarn instructions, then stuff it with a towel to help it hold its shape and allow it to air dry. This will help even out the stitches and give the bag a crisp finish.
You’ve now created a beautiful and unique circular bag that’s all your own! Enjoy carrying it on your next adventure.