 by
by 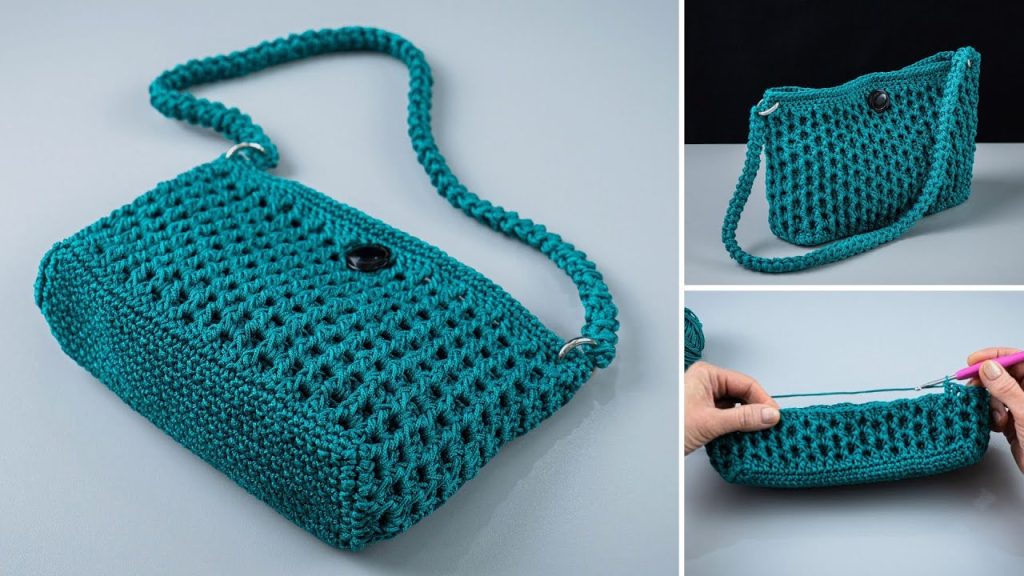
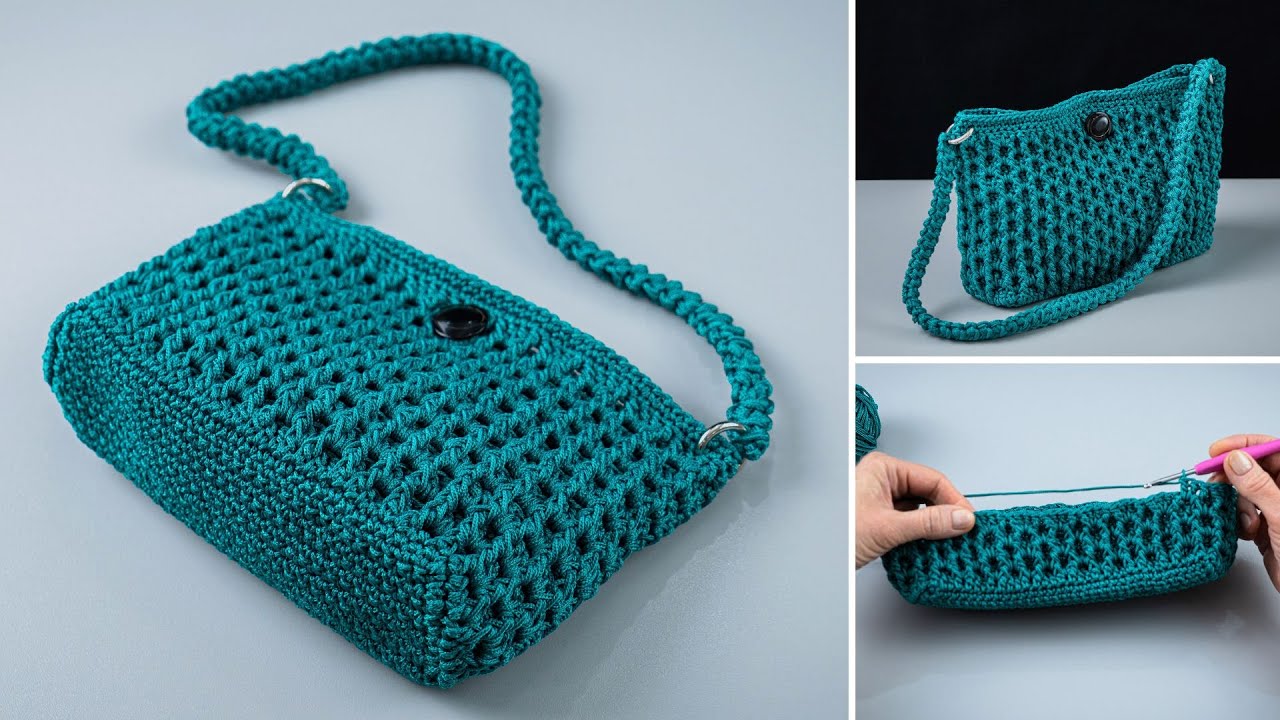
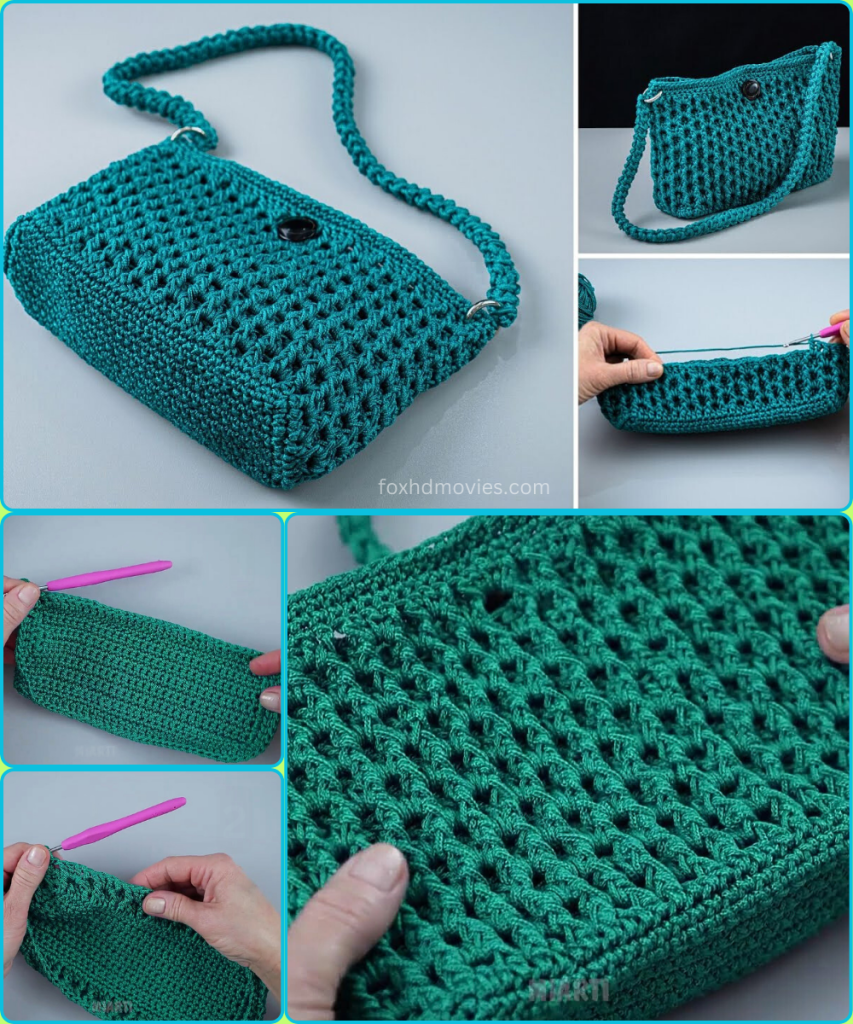
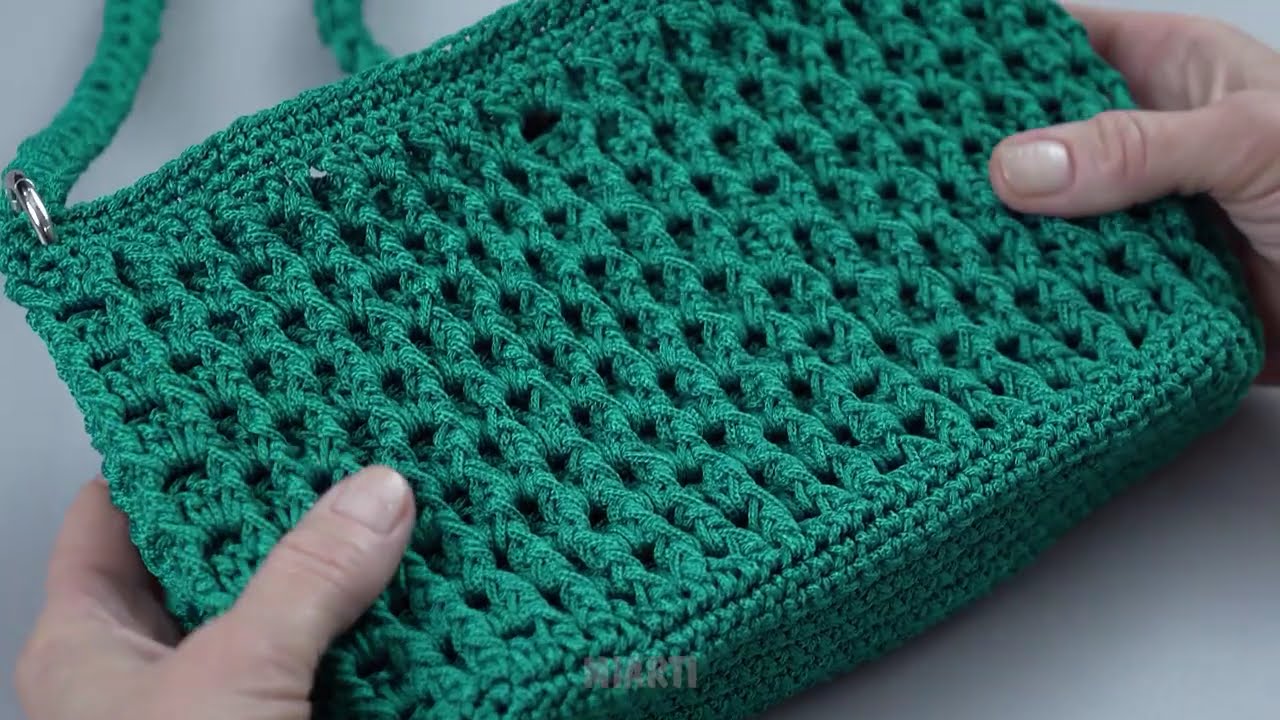
Hello, crocheters! It’s time to make a beautiful new accessory. Today’s project is a charming Serene Crosshatch Handbag, a stylish and sturdy bag perfect for a night out or a casual outing. This pattern is designed to be long and detailed, making it perfect for an intermediate crocheter ready to tackle a project with a unique stitch pattern and a structured shape. The bag is worked in the round, creating a seamless piece, and features a lovely openwork crosshatch stitch.
Materials Needed
- Approximately 150-200g of worsted weight (or aran weight) cotton or T-shirt yarn. The image shows a beautiful teal color.
- A 4.0mm (G-6) crochet hook.
- Two D-rings or split key rings for the strap (about 1.5 inches in diameter).
- A stylish button for the flap closure.
- Scissors.
- Tapestry needle for weaving in ends.
- Stitch marker (essential for working in continuous rounds).
Gauge
Gauge is not critical for a project like this, but a consistent tension will ensure your stitches are uniform and the bag holds its shape well.
- 14 single crochets (sc) and 16 rows = 4 inches (10 cm).
Stitches and Abbreviations
- ch: chain
- sl st: slip stitch
- sc: single crochet
- dc: double crochet
- sc inc: single crochet increase (work 2 sc in the same stitch)
- v-st: V-Stitch (dc, ch 1, dc in the same stitch or space)
- sk: skip
- […]: repeat instructions within brackets
- (…): number of stitches at the end of the round or row
Construction Overview
This handbag is worked in continuous spiral rounds, starting with the base. You’ll then work straight up for the body, using a lovely V-stitch and a unique crossed stitch to create the beautiful texture. Finally, you’ll create a top flap and a sturdy strap to finish the bag.
Part 1: The Base
We will start with a rectangular base to give the bag a nice flat bottom.
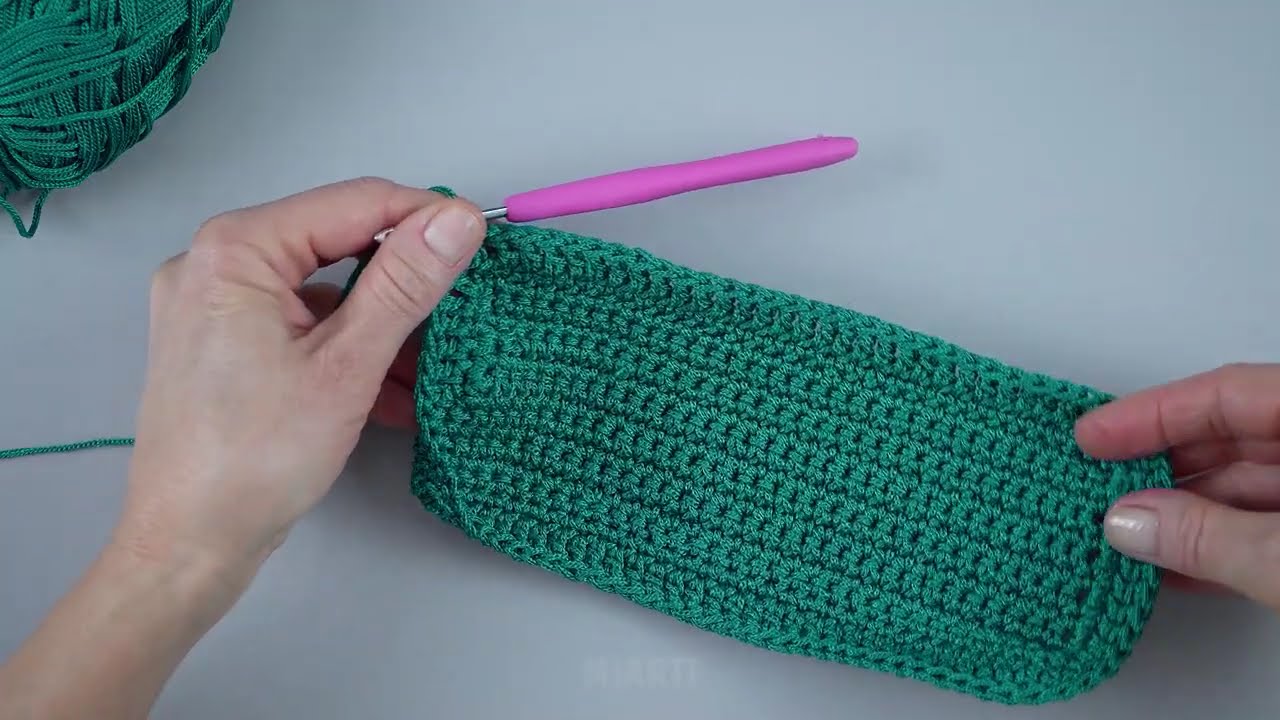
Round 1: Ch 26. Sc in the 2nd ch from the hook. Sc in the next 23 chs. Work 3 sc in the last ch. Working down the other side of the starting chain, sc in the next 23 chs. Work 2 sc in the last ch. Do not join, continue in a spiral. (50 sc)
Round 2: Sc in the first 24 sc. Work 2 sc in each of the next 2 sc. Sc in the next 24 sc. Work 2 sc in each of the last 2 sc. Do not join. (54 sc)
Round 3: Sc in the first 25 sc. Work 2 sc in each of the next 2 sc. Sc in the next 25 sc. Work 2 sc in each of the last 2 sc. Do not join. (58 sc)
Round 4: Sc in the first 26 sc. Work 2 sc in each of the next 2 sc. Sc in the next 26 sc. Work 2 sc in each of the last 2 sc. Do not join. (62 sc)
Continue increasing in this manner until your base is the desired width. A good stopping point is when the base measures about 10-12 inches long, which should be around 70-75 stitches in circumference. For this pattern, we’ll stop at 72 stitches.
Round 5: Sc in the first 29 sc. Work 2 sc in each of the next 2 sc. Sc in the next 29 sc. Work 2 sc in each of the last 2 sc. (72 sc)
Part 2: The Body of the Bag
Now we will work in continuous spiral rounds without increasing. This will create the upright sides of the bag.
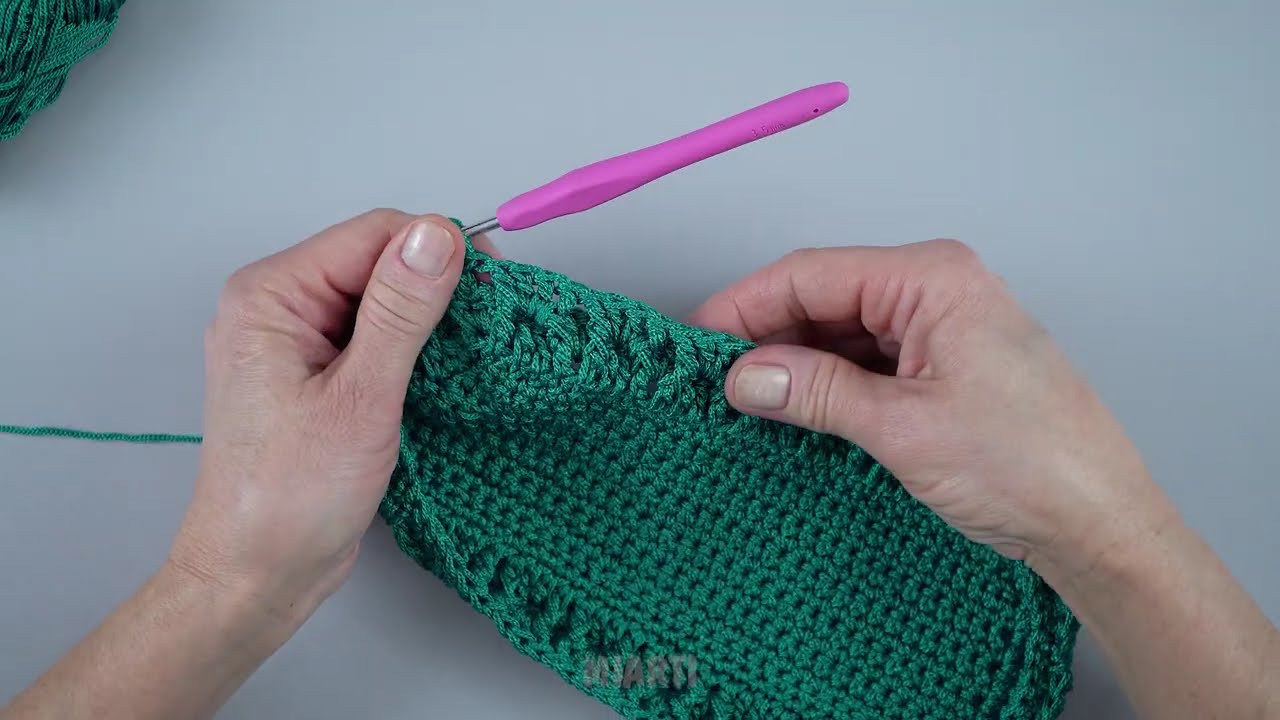
Round 6: Working in the back loop only, sc in each stitch around. This creates a clean edge and helps the bag stand upright. (72 sc)
Round 7: Ch 1. Sc in each sc around. (72 sc)
Round 8 (V-Stitch Row): Ch 1. [Sk 1 st, v-st in the next st] around. The row should end with a dc. Do not join. (36 v-sts)
Round 9: Sc in each dc and each ch-1 space around. (72 sc)
Round 10: Sc in each sc around. (72 sc)
Round 11 (Crosshatch Row): [Dc in the next st. Sk 1 st, dc in the next st, and then go back and dc in the skipped st]. Repeat from * to * around. (36 crossed dc)
Round 12: Sc in each sc around. (72 sc)
Rounds 13-20: Repeat Rounds 8-12 until you have reached the desired height of your bag. The image shows approximately three or four sets of the V-stitch and crosshatch pattern.
Part 3: The Top Flap
We’ll now work in rows to create the top flap that closes the bag.
Row 1: Sc in the next 35 stitches. Turn your work. (35 sc)
Row 2: Ch 1. Sc in each of the 35 sc. Turn. (35 sc)
Row 3: Ch 1. Sc in the first 3 sc. sc dec in the next 2 sts. Sc in the next 25 sc. sc dec in the next 2 sts. Sc in the last 3 sc. Turn. (33 sc)
Row 4: Ch 1. Sc in each of the 33 sc. Turn. (33 sc)
Row 5: Ch 1. Sc in the first 3 sc. sc dec in the next 2 sts. Sc in the next 23 sc. sc dec in the next 2 sts. Sc in the last 3 sc. Turn. (31 sc)
Row 6: Ch 1. Sc in each of the 31 sc. Turn. (31 sc)
Row 7: Ch 1. Sc in the first 15 sc. Ch 2. Sk 2 sts. Sc in the last 14 sc. Turn. (A buttonhole)
Row 8: Ch 1. Sc in each sc and each ch of the ch-2 space across. (31 sc)
Fasten off and weave in ends.
Part 4: The Strap
Now, we’ll create the sturdy handle.
Row 1: Ch 5. Sc in the 2nd ch from the hook and in each ch across. (4 sc)
Row 2: Ch 1. Turn. Sc in each sc across. (4 sc)
Repeat Row 2 until the strap is your desired length.
Video tutorial
Attaching the D-rings: Work sc around the D-rings to secure them, and then sew the ends of your strap to the D-rings. Sew the D-rings to the sides of the bag, making sure they are centered.
Sew your button onto the body of the bag, aligning it with the buttonhole you created on the flap.
Your Serene Crosshatch Handbag is now complete! The structured base, the beautiful texture, and the unique design make this a showstopper. Enjoy your new accessory!