 by
by 
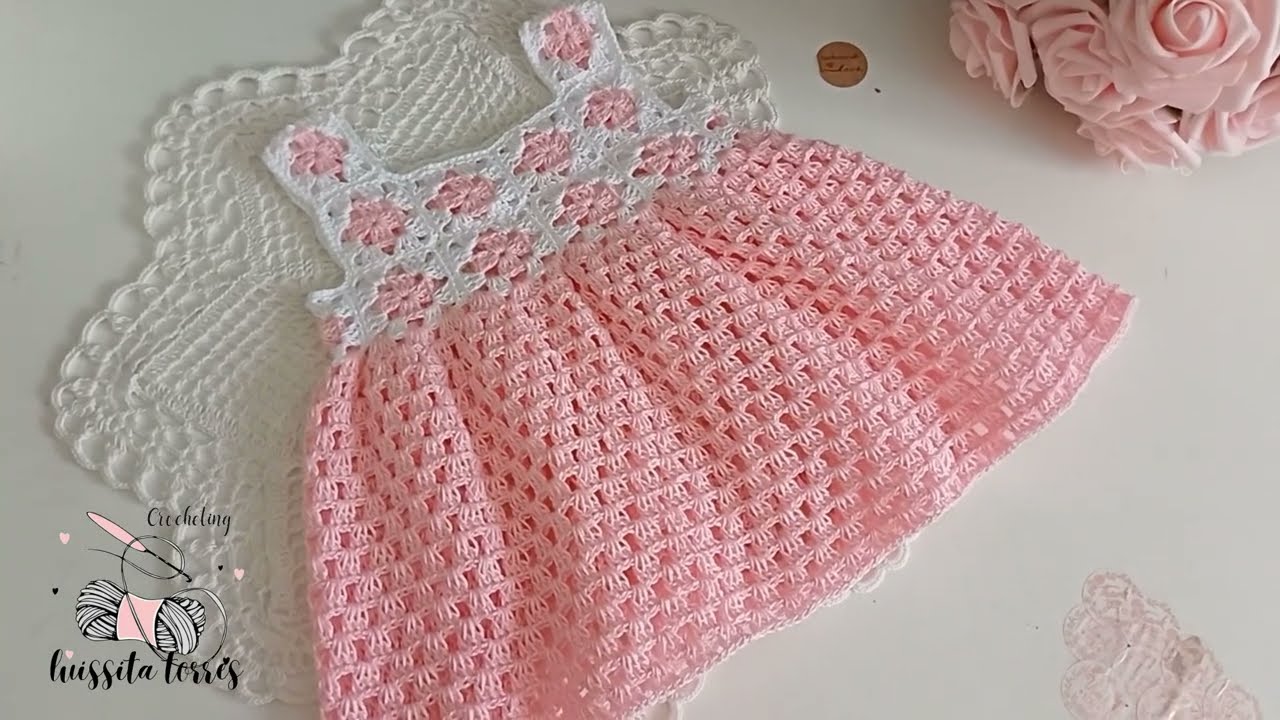
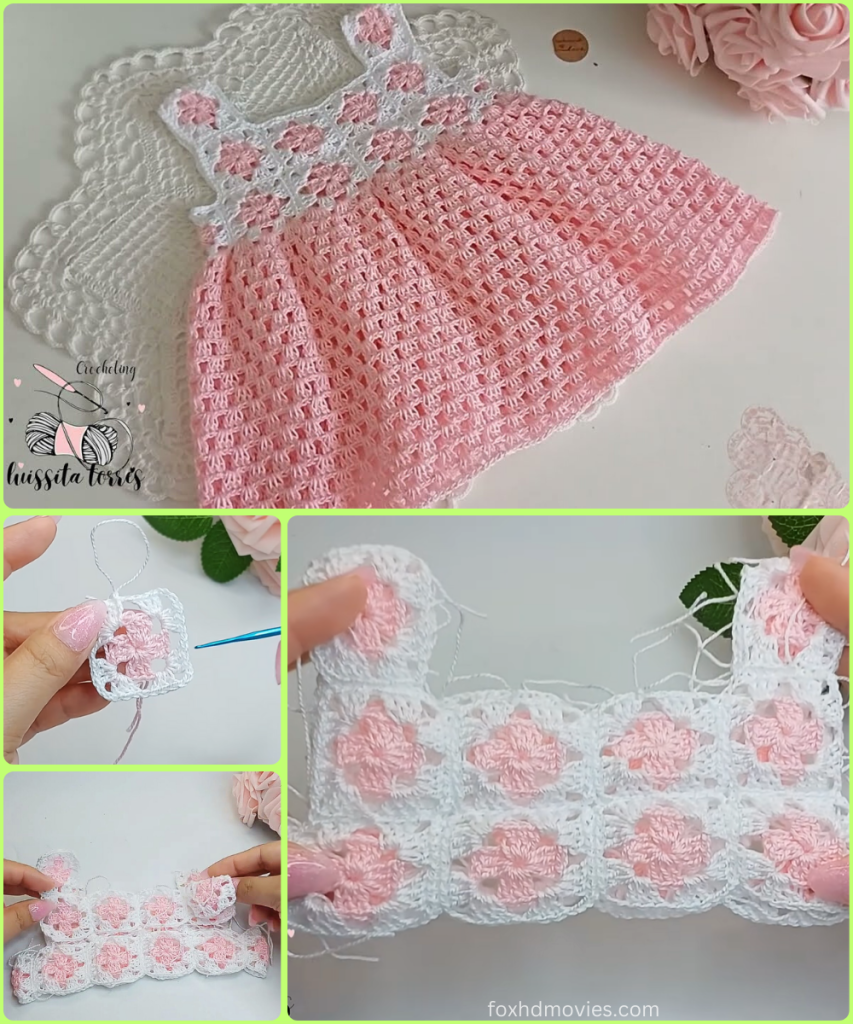
Capture a little bit of floral elegance with this adorable two-toned baby dress! Featuring a delicate white rosette yoke and a flowing pink skirt worked in a classic fan stitch, this dress is perfect for a special occasion or as a thoughtful gift. The design is both beautiful and practical, with a top-down construction that makes it easy to adjust for the perfect fit.
Let’s dive into this charming project and create a dress that will be treasured for years to come!
Skill Level: Intermediate
Materials You’ll Need:
- Yarn:
- Approximately 150-200 yards of sport (size 2) or DK (size 3) weight yarn in a main color (e.g., pink). A cotton or cotton blend is recommended for a soft, breathable garment.
- Approximately 50-75 yards of sport (size 2) or DK (size 3) weight yarn in a contrasting color (e.g., white).
- A crochet hook appropriate for your yarn. A size F/5 (3.75mm) or G/6 (4.0mm) hook would be a good starting point.
- Scissors
- Yarn needle for weaving in ends
- Stitch markers
- Buttons or a ribbon for the back closure
Key Stitches and Abbreviations:
- ch: chain
- st(s): stitch(es)
- sl st: slip stitch
- sc: single crochet
- dc: double crochet
- V-st: V-stitch (dc, ch 1, dc) in the same stitch
- Shell/Fan st: fan stitch (dc, ch 1, dc, ch 1, dc) in the same stitch (can be adjusted for more or fewer dc as desired)
- Tr cluster: treble cluster stitch
- sk: skip
- sp: space
- rnd: round
Pattern Instructions:
Part 1: The Yoke (White Yarn)
The yoke is worked in a beautiful rosette square motif and then joined to form the top of the dress.
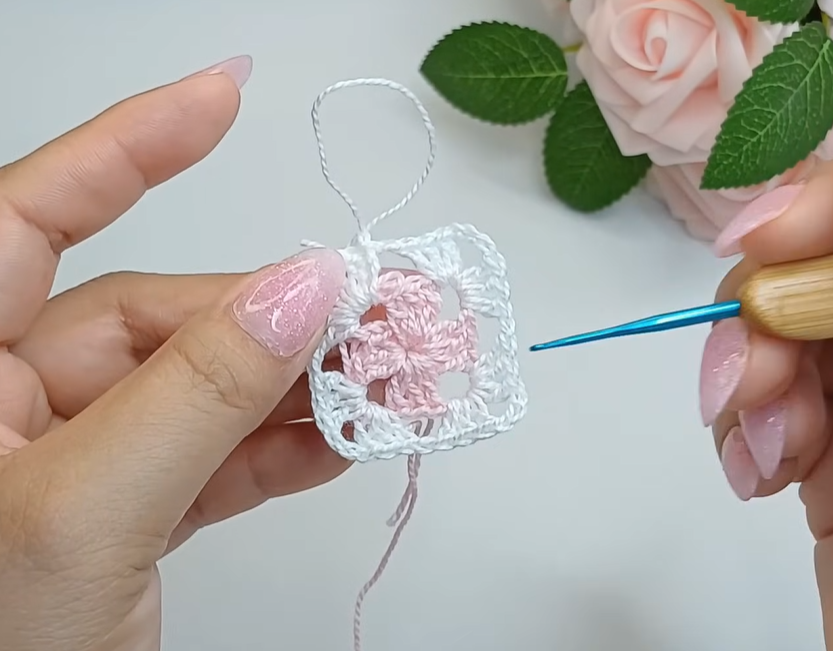
- Make Rosette Squares: You will need to make enough squares to wrap around the baby’s chest. A good starting point is 4-5 squares for an infant.
- Rnd 1: With white yarn, ch 4, sl st to first ch to form a ring. ch 3 (counts as first dc), 11 dc in ring. Join with sl st to top of ch 3. (12 dc)
- Rnd 2: ch 1, sc in same st, ch 2, sc in next dc, ch 2, repeat from * around. Join with sl st to first sc. (12 sc, 12 ch-2 sps)
- Rnd 3: Shell st in next ch-2 sp, sk sc, repeat from * around. Join with sl st to first dc. (6 Shells)
- Rnd 4: Ch 3, dc in next dc, [dc, ch 2, dc] in ch-1 sp, dc in next dc, repeat from * around. This will start to square off the motif. Continue to shape with corners in subsequent rounds until you have a small square with a central rosette.
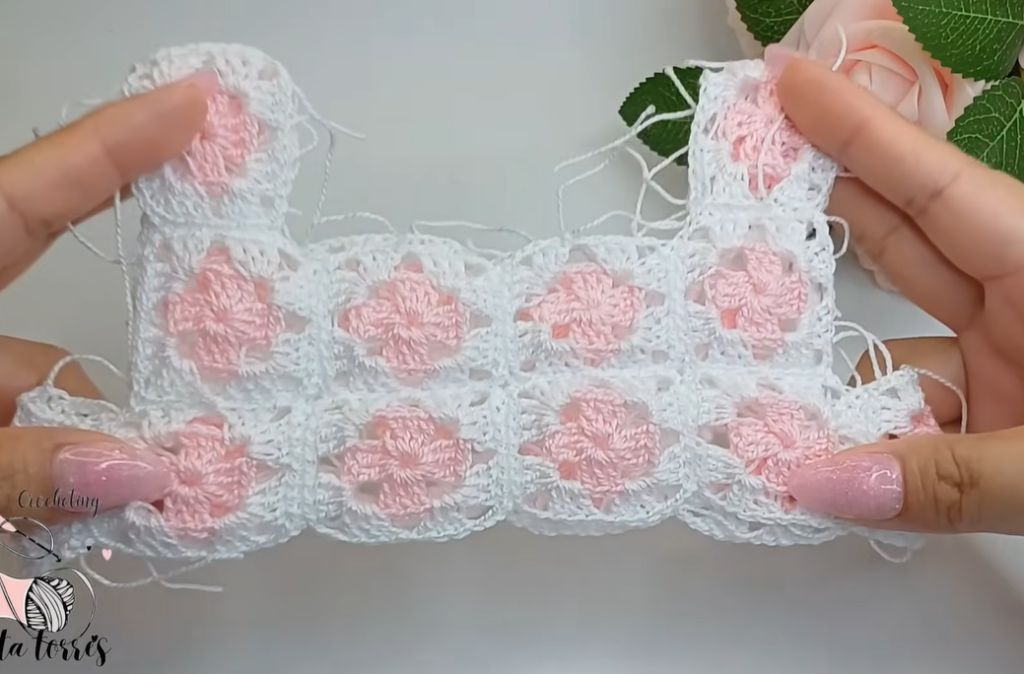
- Join Squares: Join the squares to each other by working a sc or sl st seam along one side of each square, forming a long strip. The number of squares you join will determine the width of the dress at the chest.
- Create Armholes: Join the ends of the long strip of squares, leaving openings for the armholes. For example, join 2 squares, leave an opening, join 2 squares, leave an opening, then join the first two squares to the second two. This forms the neckline and armholes.
- Work Neck & Armhole Edging: Add a simple sc or sl st border around the neckline and armholes for a neat finish.
Part 2: The Skirt (Pink Yarn)
The skirt is worked in rounds directly from the bottom edge of the finished yoke.
- Attach Yarn: Join your pink yarn to the bottom of the yoke at the side seam.
- Rnd 1: ch 3 (counts as dc), dc in each st around the bottom of the yoke. Join with sl st.
- Rnd 2: ch 3 (counts as dc), ch 1, sk 1, dc in next st. Repeat from * around. Join with sl st.
- Rnd 3 (Shell Stitch): ch 1, sc in first st. sk 2 sts, [5 dc] in next st (this is your shell stitch). Repeat from * around, adjusting to end the round with a sc.
- Rnd 4: ch 1, sc in the first sc. ch 2, [5 dc] in the center dc of the next shell, ch 2, sc in the next sc. Repeat from * around.
- Rnd 5: ch 1, sc in the first sc. [5 dc] in the ch-2 sp, ch 2, sc in the center dc of the next shell. Repeat from * around.
- Continue working in this fan stitch pattern, increasing the number of fans or stitches in each fan every few rounds as needed to create a gentle A-line flare, until the skirt reaches your desired length.
Part 3: Finishing Touches

- Lace Edging: Join your white yarn to the last row of the skirt. Work a delicate border such as a picot stitch, a scalloped edge, or a simple single crochet border to match the yoke.
- Back Opening: If you’ve created a split in the back for easier dressing, work a simple sc border up the back edges, adding button loops on one side.
- Weave in Ends: Weave in all loose ends securely with your yarn needle.
- Blocking: Gently block the finished dress to help it lay flat and define the stitches.
You’re Done!
Video tutorial
Congratulations! You’ve just crocheted a beautiful and intricate baby dress with a lovely rosette yoke and a classic fan stitch skirt. This project is a testament to your skill and patience, resulting in a unique and heartfelt garment.
Share your finished dress with me on social media using #RosetteDressPattern—I’d love to see your color choices! Happy crocheting!