 by
by 
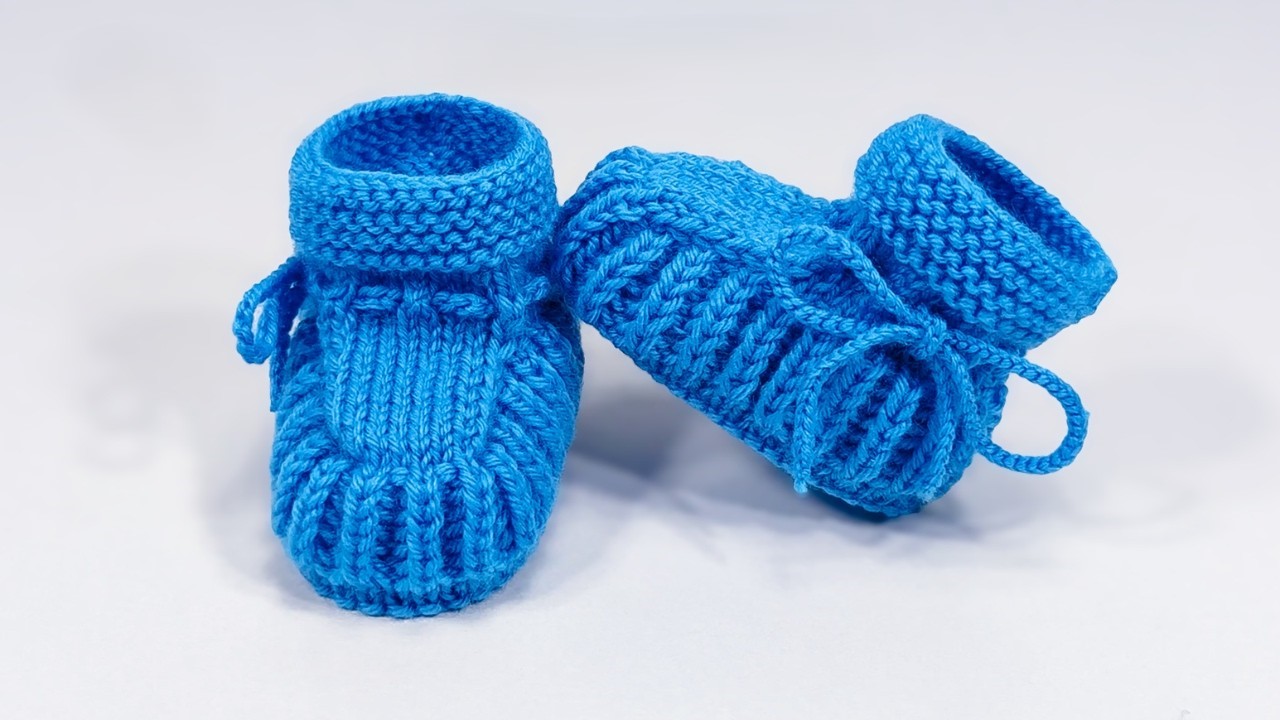
There’s something truly magical about creating handmade treasures for the tiny humans in our lives. These knitted baby booties are not only adorable but also incredibly practical for keeping those little toes warm and snug. Inspired by a fantastic tutorial, this pattern is designed to walk you through each step, from casting on to the final touches. You’ll learn how to make a delicate and adaptable bootie that fits perfectly, and we’ll even cover how to adjust the size and add your own personal flair!
Skill Level: Easy
Finished Size (Approximate):
- Sole Length: 3.5 – 3.75 inches (9 – 9.5 cm)
- Suitable for: Newborn to 3 Months
Materials You’ll Need:
- Yarn: DK weight (Light Worsted / 8 ply) baby yarn in your chosen color. You’ll need approximately 40-50 yards per pair.
- Why DK weight? It’s perfect for baby items – soft, not too bulky, and knits up beautifully!
- Knitting Needles: Double-pointed needles (DPNs) or a short circular needle (for magic loop) in size US 4 (3.5 mm).
- Needle size is key for gauge, so have a couple of sizes on hand if you’re unsure of your tension.
- Tapestry Needle: Essential for seaming and weaving in those pesky yarn tails.
- Scissors
- Stitch Markers (optional): These little helpers are great for marking the beginning of rounds or important sections.
- Ribbon or Cord (optional): About 12-15 inches (30-38 cm) per bootie for a charming decorative touch.
Gauge (Don’t Skip This!):
24 stitches and 32 rows = 4 inches (10 cm) in stockinette stitch.
- Why is gauge important? It ensures your finished bootie matches the intended size. If your gauge is off, your bootie might be too big or too small!
- How to Swatch: Cast on 30 stitches. Knit in stockinette stitch (knit on RS rows, purl on WS rows) for about 40 rows. Bind off. Measure a 4-inch square in the middle of your swatch. If you have more than 24 stitches in 4 inches, try a larger needle size. If you have fewer, try a smaller needle size.
Abbreviations (US Knitting Terms):
- CO: Cast On
- K: Knit
- P: Purl
- K2tog: Knit 2 stitches together (decrease)
- SSK: Slip, slip, knit (decrease) – Slip 1 stitch knitwise, slip next stitch knitwise, then knit them together through the back loops.
- St(s): Stitch(es)
- RS: Right Side
- WS: Wrong Side
- BO: Bind Off
- M1L: Make 1 Left – Lift the bar between the last stitch and the next stitch from the front with the left needle, knit into the back of it.
- M1R: Make 1 Right – Lift the bar between the last stitch and the next stitch from the back with the left needle, knit into the front of it.
Let’s Start Knitting Your Bootie!
This pattern breaks down the bootie into easy-to-manage sections: the flat sole, the main body, the toe shaping, and the ankle cuff.
Part 1: The Sole (Knitted Flat)
We’ll begin by creating the flat, oval-shaped sole of the bootie.
Using your knitting needles, CO 10 stitches.
- Row 1 (RS): K all stitches.
- Row 2 (WS): P all stitches.
- Row 3 (Increase Row – RS): K1, M1L, K to last st, M1R, K1. (12 sts)
- Row 4 (WS): P all stitches.
- Row 5 (Increase Row – RS): K1, M1L, K to last st, M1R, K1. (14 sts)
- Row 6 (WS): P all stitches.
- Row 7 (Increase Row – RS): K1, M1L, K to last 3 sts, M1R, K1. (16 sts)
- Row 8 (WS): P all stitches.
- Rows 9-28: Continue in stockinette stitch (K on RS rows, P on WS rows). (20 rows total, maintaining 16 sts).
- If you want a longer sole, simply add more rows in this section. Make sure to add an even number of rows to keep the pattern consistent.
- Row 29 (Decrease Row – RS): K1, K2tog, K to last 3 sts, SSK, K1. (14 sts)
- Row 30 (WS): P all stitches.
- Row 31 (Decrease Row – RS): K1, K2tog, K to last 3 sts, SSK, K1. (12 sts)
- Row 32 (WS): P all stitches.
- Row 33 (Decrease Row – RS): K1, K2tog, K to last 3 sts, SSK, K1. (10 sts)
- Row 34 (WS): P all stitches.
BO all stitches. You’ve completed the sole!
Part 2: Picking Up Stitches for the Body
Now, we’ll pick up stitches around the perimeter of the sole to begin knitting the sides of the bootie.
- With the RS of the sole facing you, and starting at the center of one of the short ends (this will be the heel end), pick up and knit 10 stitches along that short end.
- Pick up and knit 20 stitches evenly along the first long side.
- Pick up and knit 10 stitches along the other short end (the toe end).
- Pick up and knit 20 stitches evenly along the remaining long side. (You should have a total of 60 stitches picked up).
Join to work in the round, being careful not to twist your stitches. Place a stitch marker to mark the beginning of the round.
Part 3: Bootie Sides (Garter Stitch Edge)
We’ll create a few rounds of garter stitch (knit every round) for a nice, sturdy base for the sides of the bootie.
- Rnd 1: Purl all stitches.
- Rnd 2: Knit all stitches.
- Rnd 3: Purl all stitches.
- Rnd 4: Knit all stitches.
Part 4: Shaping the Toe (Worked Flat)
This section creates the top of the foot, giving the bootie its shape.
- Locate Center Front: Count 20 stitches from your beginning of round marker. Place a new stitch marker here. This section of 20 stitches will be the front of the bootie.
- Row 1 (RS): K15. K2tog. K1. (17 sts worked). Turn your work.
- Important: For this section, you are only working on these 17 stitches for the toe. The remaining stitches on your needle are held for later.
- Row 2 (WS): P1. P2tog. P to end of these 17 toe stitches. Turn.
- Row 3 (RS): K to 2 sts before the gap (where your current working stitches meet the held stitches). K2tog (knitting the last stitch of your working section with the first unworked stitch from the side). Turn.
- Row 4 (WS): P to 2 sts before the gap. P2tog (purling the last stitch of your working section with the first unworked stitch from the side). Turn.
Repeat Rows 3 and 4 until you have 8 stitches remaining on your toe section. Continue repeating Rows 3 and 4 until all side stitches have been incorporated into the toe shaping, and you have only the 8 toe stitches remaining on your needle.
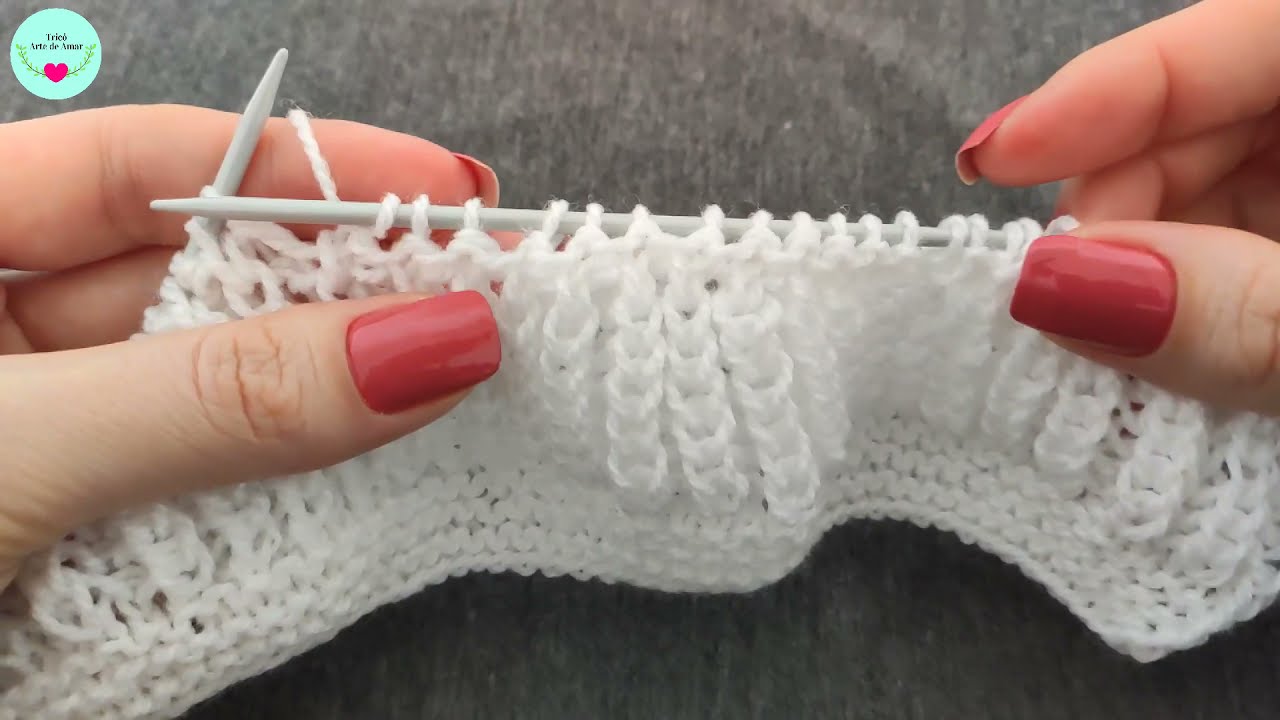
Part 5: Ankle Cuff
Now we’ll knit the ankle cuff in the round again, adding an eyelet row for a ribbon!
- Pick up and knit stitches along the side edges of the toe opening you just created. Pick up 1 stitch for every row end of the toe shaping.
- Continue knitting in the round across the remaining stitches from the sides/back of the bootie. (You should have approximately 48-52 stitches in total, depending on your toe shaping and picked up stitches).
- Rnd 1 (Eyelet Row):K2tog, YO. Repeat from * to * around. (This creates the perfect holes for your ribbon or cord).
- YO (Yarn Over): Bring your yarn over the right needle to create a new stitch.
- Rnd 2: Knit all stitches.
- Rnd 3: Purl all stitches.
- Rnd 4: Knit all stitches.
BO all stitches loosely.
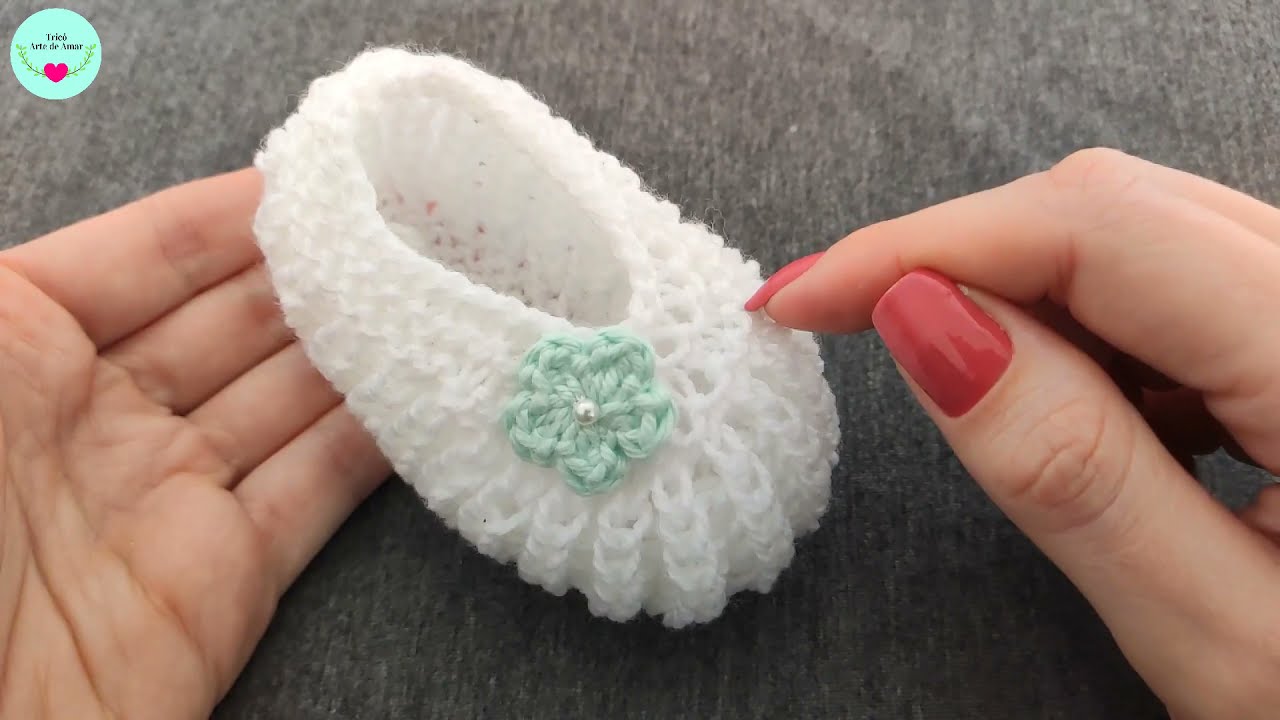
Part 6: Finishing Touches & Embellishments
Almost done! These final steps will make your booties look polished and ready for tiny feet.
- Seam the Sole: Using your tapestry needle and a length of yarn, neatly seam the cast-on and bound-off edges of the sole together to form a closed sole.
- Weave in all ends: Securely weave in all remaining yarn tails.
- Add Ribbon/Cord (Optional): Cut a length of ribbon or make a simple knitted/crocheted cord (e.g., chain 40-50, then single crochet back across). Thread it through the eyelet row (Rnd 1 of the ankle cuff) around the ankle of the bootie. Tie a sweet bow at the front.
- Make a second bootie: Repeat all steps to create a matching bootie for the other foot!
Video tutorial
Sizing Adjustments:
The beauty of this pattern is its adaptability! Here’s how you can modify it for different sizes:
- For a smaller size (e.g., Preemie/Newborn):
- Reduce the initial CO stitches for the sole (e.g., CO 8 stitches).
- Reduce the number of increase rows for the sole.
- Reduce the number of stockinette rows for the main sole length.
- Reduce the number of stitches picked up around the sole.
- Reduce the number of stitches for the toe shaping.
- For a larger size (e.g., 3-6 months or 6-9 months):
- Increase the initial CO stitches for the sole (e.g., CO 12 stitches).
- Add more increase rows to the sole to make it wider.
- Add more stockinette rows for the main sole length.
- Increase the number of stitches picked up around the sole.
- Increase the number of stitches for the toe shaping.
- Add more rows to the ankle cuff for a taller bootie.
General Sizing Tip: The sole length is your most critical measurement. After knitting the sole (Part 1), measure it. It should be slightly smaller than the actual foot length, as knitting has a lovely stretch to it.
I hope you enjoy knitting these adorable and easy baby booties! They make fantastic gifts and are a joy to create.