by
by 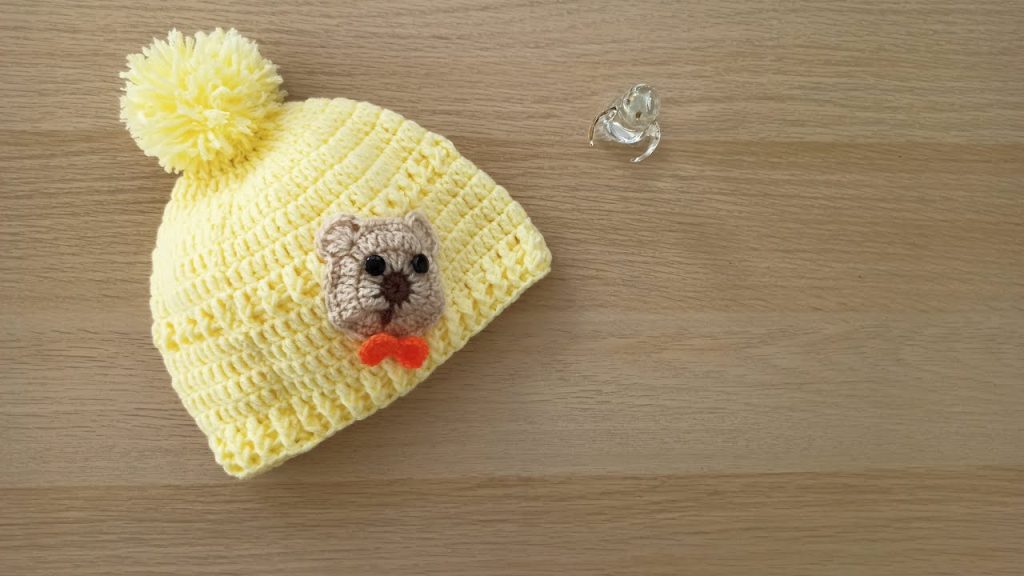
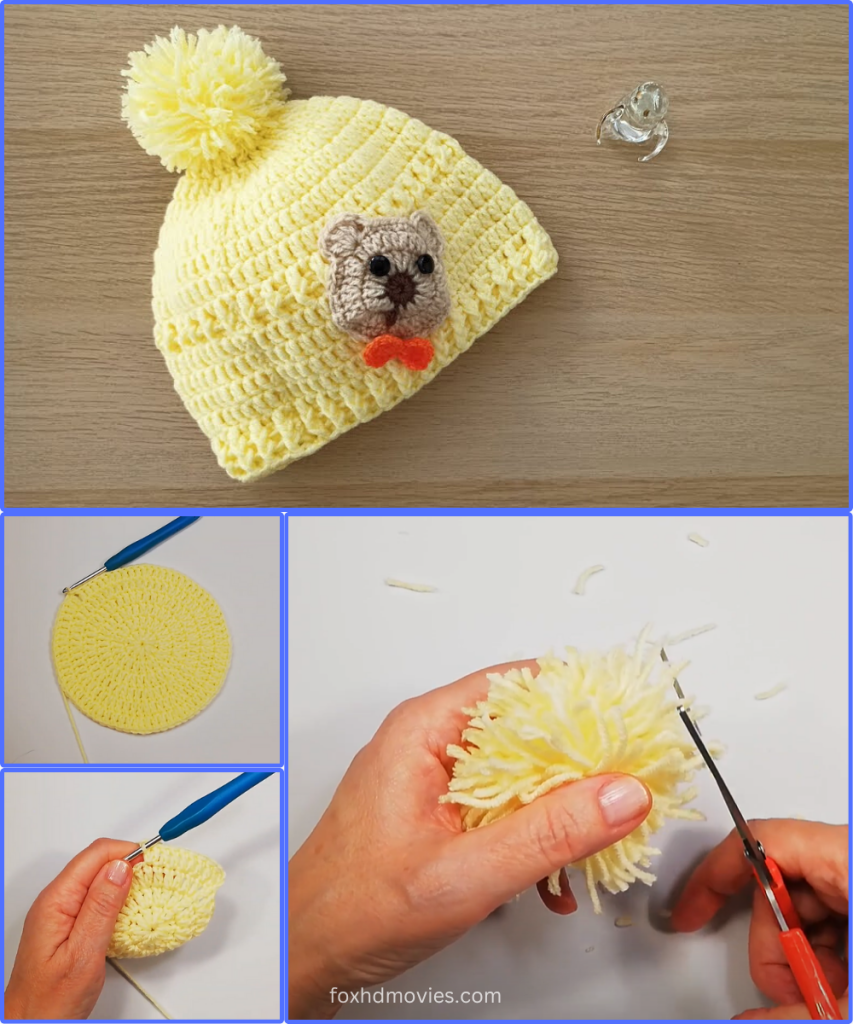
Hello, heartwarming makers! There’s nothing quite as sweet as a baby in a handmade hat, and today we’re going to create an absolutely irresistible one: a cozy yellow beanie topped with a fluffy pompom and adorned with the cutest little crocheted bear face! This hat is perfect for keeping tiny heads warm and makes a truly cherished gift.
The beanie itself features a lovely textured stitch, possibly a variation of half double crochet or double crochet that creates subtle ridges, giving it a comforting feel and appealing look. The bear appliqué adds a touch of playful charm that will surely melt hearts. This pattern is suitable for intermediate crocheters or confident beginners eager to learn a few new techniques.
Materials You’ll Need:
- Yarn: DK weight (Light Worsted / 8 ply) yarn.
- Main Color: Yellow (approx. 50-70g, depending on size).
- Bear Face Color: Light Brown/Tan (approx. 5-10g).
- Nose/Eye Color: Dark Brown or Black (small amount).
- Bow Tie Color: Orange/Red (small amount).
- Crochet Hook: 3.5mm (E/4) or 4.0mm (G/6) – choose the hook size that gives you a nice, dense fabric for the hat, but not too stiff.
- Stuffing: A tiny bit of fiberfill for the bear’s snout (optional).
- Yarn Needle: For weaving in ends, sewing seams, and attaching appliqués.
- Scissors
- Stitch Markers (optional, but helpful for rounds)
Abbreviations Used:
- ch: chain
- sl st: slip stitch
- sc: single crochet
- hdc: half double crochet
- dc: double crochet
- inc: increase (2 stitches in the same stitch)
- hdc2tog: half double crochet 2 together (decrease)
- sc2tog: single crochet 2 together (decrease)
- st(s): stitch(es)
- rep: repeat
- FO: fasten off
- BLO: back loop only
Gauge (Approximate):
Crucial for hat sizing! Make sure to check your gauge. 16 hdc x 12 rows = 4 inches (10 cm)
Size Chart & Notes (Approximate):
This pattern is written for 0-6 months with notes for adjusting to other sizes.
- 0-6 Months: Hat circumference approx. 14-16 inches / 35-40 cm
- 6-12 Months: Hat circumference approx. 16-18 inches / 40-45 cm
- 12-24 Months: Hat circumference approx. 18-19.5 inches / 45-50 cm
Sizing Adjustment:
- To adjust circumference, increase or decrease the number of stitches in the initial rounds. Ensure your stitch count remains consistent with the pattern’s increase ratio (e.g., if it says inc every X stitches, maintain that ratio).
- To adjust height, add or subtract rounds in the straight body section before the brim.
Pattern: Cuddly Bear Beanie
The hat is worked from the top down.
Part 1: The Beanie (Main Color: Yellow)
Using a 4.0mm hook.
Round 1: Make a magic ring. Ch 1. 10 hdc into the ring. Join with a sl st to the top of the first hdc. (10 hdc)
- Alternatively, Ch 2, 10 hdc in 2nd ch from hook. Join with sl st.
Round 2: Ch 1. 2 hdc in each st around. Join with a sl st to the top of the first hdc. (20 hdc)
Round 3: Ch 1. Hdc in next st, 2 hdc in next st (inc). Rep from * to * around. Join with a sl st to the top of the first hdc. (30 hdc)
Round 4: Ch 1. Hdc in next 2 sts, 2 hdc in next st (inc). Rep from * to * around. Join with a sl st to the top of the first hdc. (40 hdc)
Round 5: Ch 1. Hdc in next 3 sts, 2 hdc in next st (inc). Rep from * to * around. Join with a sl st to the top of the first hdc. (50 hdc)
Round 6: Ch 1. Hdc in next 4 sts, 2 hdc in next st (inc). Rep from * to * around. Join with a sl st to the top of the first hdc. (60 hdc)
- For larger sizes: Continue increasing in this manner (e.g., Round 7: Hdc in next 5 sts, inc, etc.) until your circle diameter (measured flat) is approximately 4.5 inches for 0-6 months, 5.5 inches for 6-12 months, or 6-6.5 inches for 12-24 months. Once the desired diameter is reached, proceed to the straight body rounds.
Part 2: Body of the Hat (Textured Stitch)
The texture in the image appears to be created by alternating stitches or working in specific loops. Let’s try alternating hdc in BLO and FLO to achieve a similar ribbed effect.
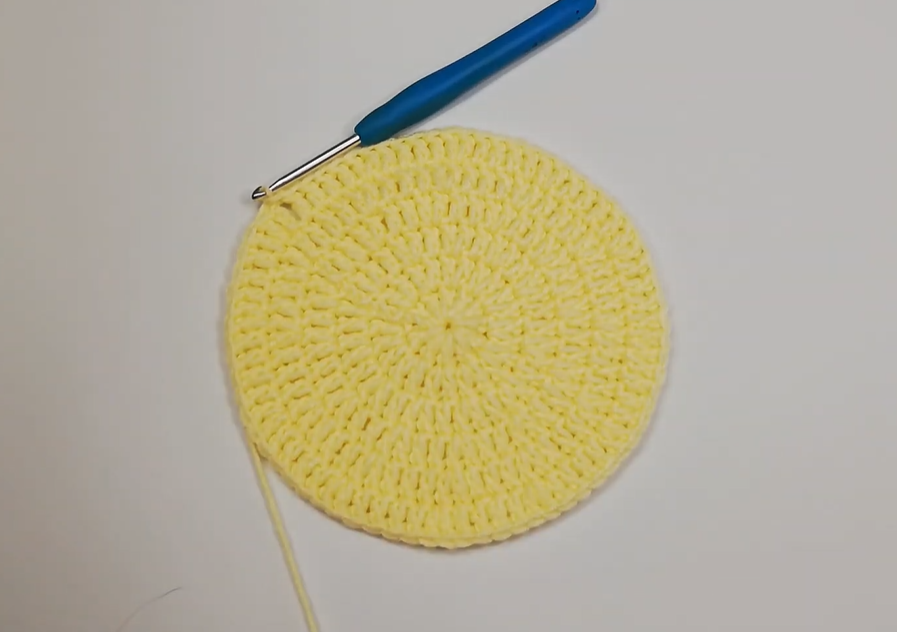
Round (Next, e.g., 7 for 0-6m): Ch 1. Hdc in BLO in each st around. Join with a sl st to the top of the first hdc. (60 hdc)
- This round creates a slight ridge that adds to the texture.
Round (Next): Ch 1. Hdc in FLO in each st around. Join with a sl st to the top of the first hdc. (60 hdc)
- This round pushes another ridge forward, enhancing the texture.
Repeat these two rounds (Hdc in BLO, then Hdc in FLO) until the hat measures approximately 5.5 inches (for 0-6m) from the crown (top center of hat), or desired height before the brim. The image shows about 9-10 textured rows.
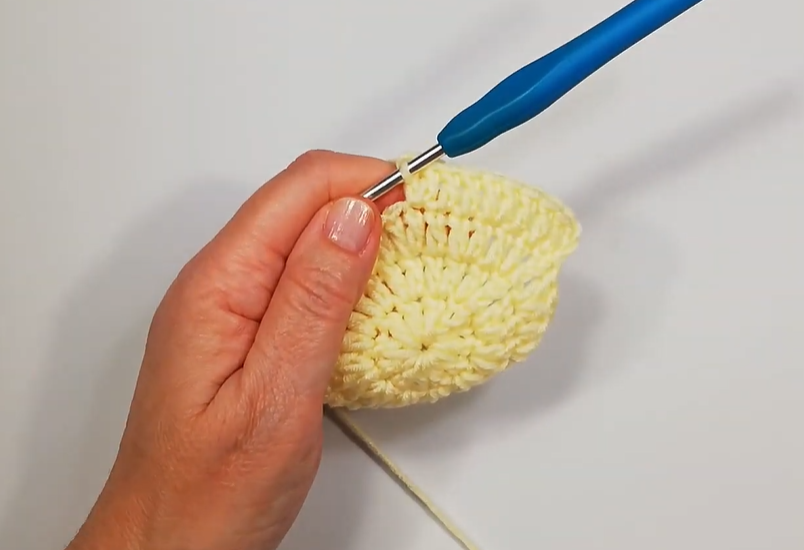
Part 3: Hat Brim
The brim looks like a simple single crochet edge.
Next Round: Ch 1. Sc in each st around. Join with a sl st to the top of the first sc. (60 sc)
Repeat this round 1-2 more times for a sturdy brim (total of 2-3 sc rounds for the brim).
FO and weave in all ends securely.
Part 4: The Bear Face Appliqué (Bear Face Color: Light Brown/Tan)
Head: Round 1: Make a magic ring. Ch 1. 8 sc into the ring. Join with a sl st to the first sc. (8 sc) Round 2: Ch 1. 2 sc in each st around. Join with a sl st to the first sc. (16 sc) Round 3: Ch 1. Sc in next sc, 2 sc in next sc (inc). Rep from * to * around. Join with a sl st to the first sc. (24 sc)
Ears (make 2): Round 1: Make a magic ring. Ch 1. 6 sc into the ring. Join with a sl st to the first sc. (6 sc) FO, leaving a long tail for sewing.
Snout (Optional, for dimension, or simply embroider): Round 1: Make a magic ring. Ch 1. 6 sc into the ring. Join with a sl st to the first sc. (6 sc)
- Optional: Stuff very lightly with fiberfill to give it a little puff. FO, leaving a long tail for sewing.
Assembly of Bear Face:
- Sew the two ears onto the top edge of the Head circle.
- Sew the Snout onto the lower center of the Head circle. If not stuffing, simply sew flat.
- Using Nose/Eye Color (Dark Brown/Black) yarn and a yarn needle:
- Embroider two small eyes above the snout.
- Embroider a small triangular nose on the top of the snout.
- Embroider a small vertical line from the nose, and two small curved lines for a mouth, as shown in the picture.
Part 5: Tiny Bow Tie (Bow Tie Color: Orange/Red)
Bow: Row 1: Ch 6. Sc in 2nd ch from hook and in each ch across. (5 sc) Row 2-3: Ch 1. Turn. Sc in each sc across. (5 sc) FO, leaving a long tail. Cinch the middle of this rectangle with the long tail, wrapping tightly to form a bow. Secure the ends.
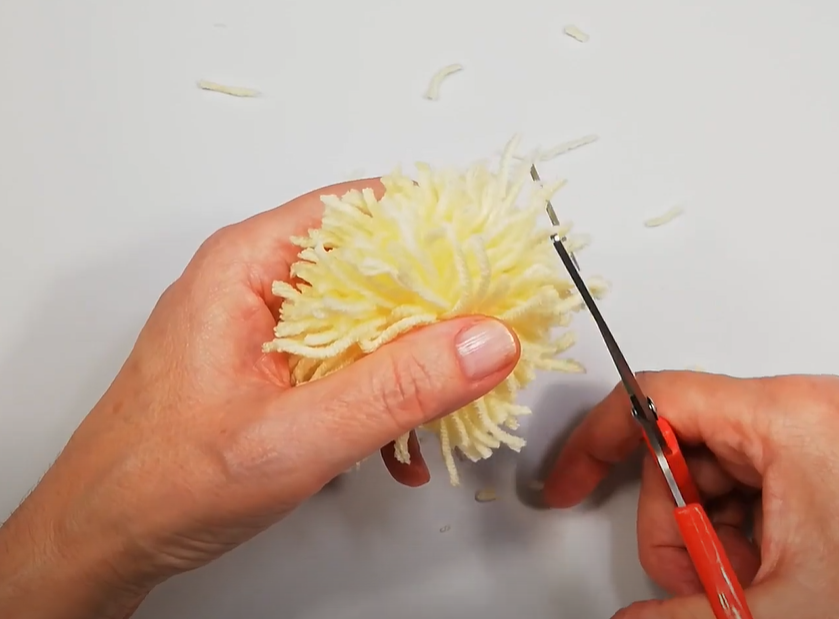
Part 6: Pompom
Make a medium-sized pompom in Main Color (Yellow). You can use a pompom maker, a fork, or cardboard cutouts. Ensure it’s fluffy and securely tied.
Final Assembly:
- Securely sew the finished Bear Face Appliqué onto the front of the hat, slightly above the brim. Position it to your liking, referring to the image.
- Sew the Tiny Bow Tie just below the bear’s snout/mouth area.
- Securely attach the Pompom to the very top (crown) of the hat.
Video tutorial
Finishing Touches:
- Weave in all remaining loose ends neatly.
- Give your finished hat a gentle block if desired to even out stitches and perfect its shape.
- Admire your adorable Cuddly Bear Beanie, ready to keep a little one warm and stylish!
I hope you enjoy creating this charming crochet hat! It’s a wonderful project that combines texture, color, and a sweet appliqué for a truly unique handmade item. Don’t forget to share your finished projects – I’d love to see them. Happy crocheting!