by
by 
Hello, fellow crafters! Are you ready to dive into a project that’s both visually stunning and wonderfully tactile? This pattern will guide you through creating a charming small container featuring a beautiful textured stitch, reminiscent of basket weave, worked in vibrant color blocks. It’s perfect for holding small treasures, organizing your desk, or even as a unique gift!
This project is fantastic for practicing front post and back post stitches, which create that lovely raised and recessed effect. Don’t be intimidated if you’re new to these stitches; I’ll explain everything clearly. Let’s get our hooks and colorful yarns ready!
Skill Level: Intermediate (familiarity with basic crochet stitches and post stitches is helpful)
Materials You’ll Need:
- Yarn: DK or light worsted weight yarn in at least 3 contrasting colors. Cotton or a cotton blend is recommended for a sturdy basket.
- Color A: Yellow (for base and sections)
- Color B: Pink (for sections)
- Color C: Purple/Fuchsia (for sections)
- (You’ll need roughly 20-30 yards per color for a small basket)
- Crochet Hook: 3.5mm – 4.0mm (or hook size appropriate for your chosen yarn to create a dense fabric that holds its shape).
- Stitch Marker: Essential for working in rounds.
- Yarn Needle: For weaving in ends.
- Scissors
Abbreviations Used:
- ch: chain
- sl st: slip stitch
- sc: single crochet
- dc: double crochet
- inc: increase (2 sc or 2 dc in the same stitch)
- FPdc: front post double crochet (yarn over, insert hook from front to back around the post of the specified stitch, yarn over, pull up a loop, [yarn over, pull through 2 loops] twice)
- BPdc: back post double crochet (yarn over, insert hook from back to front around the post of the specified stitch, yarn over, pull up a loop, [yarn over, pull through 2 loops] twice)
- FO: fasten off
- st(s): stitch(es)
Gauge: Not critical, but aim for a firm fabric to ensure your container holds its shape.
Pattern Notes:
- This container is worked from the bottom up.
- The base is worked in continuous rounds of single crochet.
- The sides use a combination of front post and back post double crochet to create the textured pattern.
- Color changes happen at the beginning of each textured round.
Part 1: The Base (Work in continuous rounds with Color A – Yellow)
We’ll start with a flat, sturdy circular base. Use a stitch marker to mark the first stitch of each round and move it up as you go.
Round 1: Start with a magic ring. Sc 8 into the ring. (8 sc) Round 2: 2 sc in each st around. (16 sc) Round 3: (Sc in next st, inc) around. (24 sc) Round 4: (Sc in next 2 sts, inc) around. (32 sc) Round 5: (Sc in next 3 sts, inc) around. (40 sc) Round 6: (Sc in next 4 sts, inc) around. (48 sc) Round 7: (Sc in next 5 sts, inc) around. (56 sc)
Continue increasing in this manner until your base is the desired diameter for your container (e.g., 3-4 inches or 8-10 cm). Ensure the last round ends with a multiple of stitches that can be divided by the repeat for your post stitches (e.g., a multiple of 4 or 6). For the basket in the image, a base of about 56-64 stitches might be appropriate before starting the sides.
Last Base Round (Transition to Sides): Sl st into the next stitch. Ch 1. Sc in the back loop only (BLO) of each stitch around. Join with a sl st to the first sc. FO Color A. (56 sc, or your final count) Working in the BLO creates a ridge that helps the sides stand up.
Part 2: The Sides (Working in rounds with color changes)
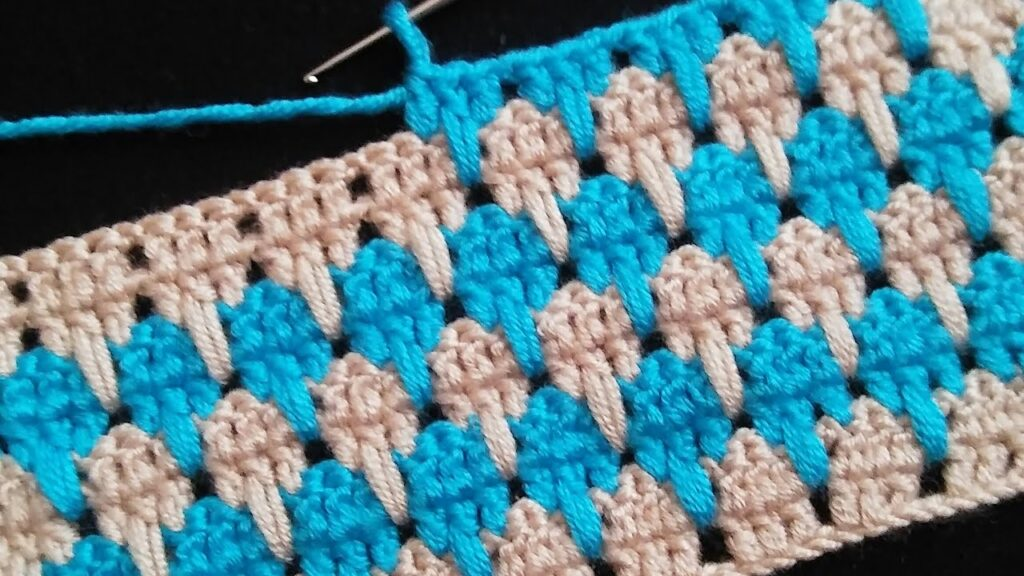
Now we’ll create the beautiful textured sides using post stitches. Each round will be a new color.
Round 1 (Texture Start – Join Color B – Pink): Join Color B with a sl st into the first st of the previous round. Ch 2 (does not count as st). FPdc around the next 2 sts, BPdc around the next 2 sts. Repeat from * around. Join with a sl st to the top of the first FPdc. FO Color B. (56 sts – or your count)
Round 2 (Texture – Join Color C – Purple/Fuchsia): Join Color C with a sl st into the top of the first FPdc of the previous round. Ch 2. You’ll now work FPdc into previous BPdc and BPdc into previous FPdc to create the basket weave effect. BPdc around the next 2 FPdc, FPdc around the next 2 BPdc. Repeat from * around. Join with a sl st to the top of the first BPdc. FO Color C. (56 sts)
Round 3 (Texture – Join Color A – Yellow): Join Color A with a sl st into the top of the first BPdc of the previous round. Ch 2. FPdc around the next 2 BPdc, BPdc around the next 2 FPdc. Repeat from * around. Join with a sl st to the top of the first FPdc. FO Color A. (56 sts)
Round 4 (Texture – Join Color B – Pink): Join Color B with a sl st into the top of the first FPdc of the previous round. Ch 2. BPdc around the next 2 FPdc, FPdc around the next 2 BPdc. Repeat from * around. Join with a sl st to the top of the first BPdc. FO Color B. (56 sts)
Continue repeating the pattern of Round 3 and Round 4, alternating colors (Yellow, Pink, Purple/Fuchsia, Yellow, Pink, Purple/Fuchsia… or whatever sequence you prefer) until your container reaches the desired height. The image shows about 5-6 rounds of texture.

Part 3: The Rim/Edging (Optional – Continue with last color used)
To give your container a neat finish, you can add a simple single crochet border.
Final Round (using the color of your last textured round): Ch 1. Sc in each st around. Join with a sl st to the first sc. FO, weave in all ends securely.
Video tutorial
Congratulations! You’ve just created a beautifully textured and colorful crochet container! This project is a fantastic way to add a handmade touch to your home decor or organize small items in style.
Don’t forget to share your finished containers with me on social media! Tag me and use the hashtag #TexturedBasket. I can’t wait to see your color combinations!
Happy Crocheting!