by
by 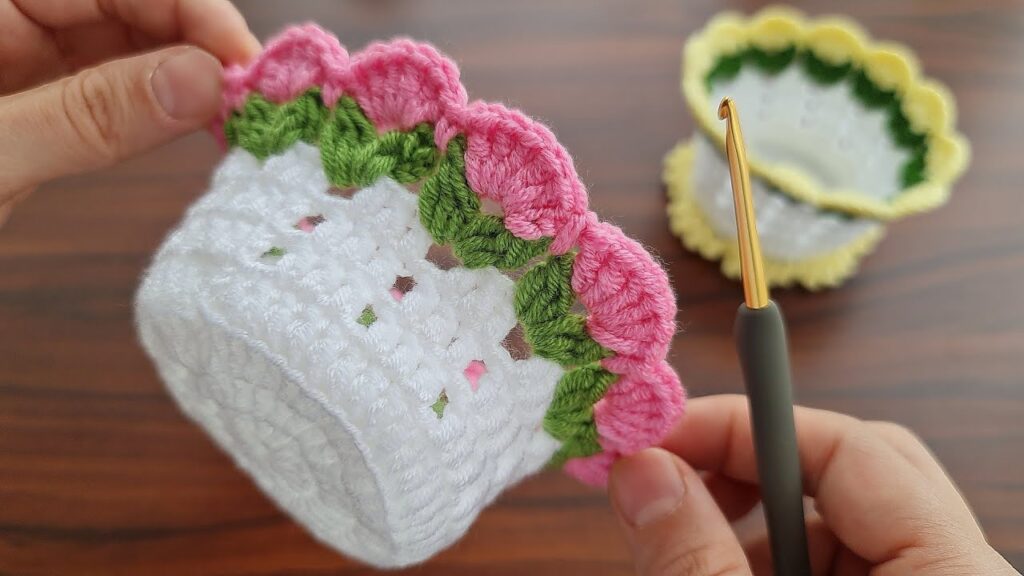
Hello, creative crafters! Looking for a quick and delightful project to add a touch of handmade charm to your home? This adorable little crochet item, with its sturdy base and beautiful scalloped edge, is just the thing! It could be a sweet mini basket for trinkets, a decorative coaster, or even a cozy for a small jar.
This pattern is fantastic for beginners who want to try color changes and simple decorative stitches. We’ll combine solid single crochet with a lovely shell stitch border that resembles pretty petals or leaves. Let’s gather our yarns and get started on this cute creation!
Skill Level: Easy
Materials You’ll Need:
- Yarn: DK or light worsted weight yarn in three colors. Cotton or a cotton blend is recommended for a sturdy finish.
- Main Color (MC): White (for the base and body) – approx. 30-40 yards
- Accent Color 1 (AC1): Green (for the “leaves” or base of the scallop) – approx. 10-15 yards
- Accent Color 2 (AC2): Pink (for the “petals” or top of the scallop) – approx. 10-15 yards
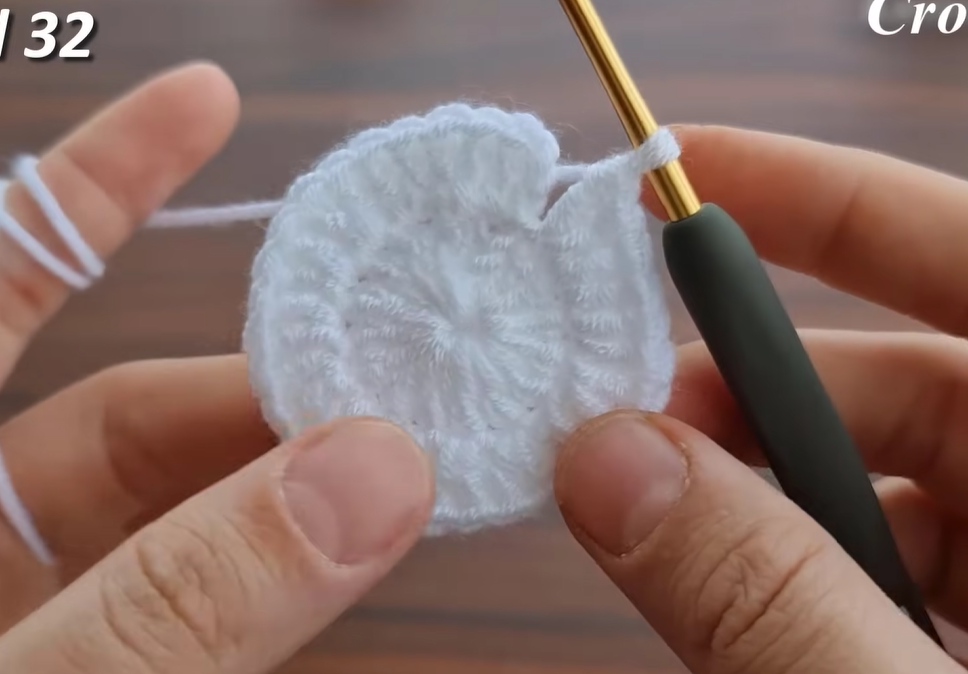
- Crochet Hook: 3.5mm – 4.0mm (or hook size appropriate for your chosen yarn to create a firm fabric). The hook in the image looks like a 3.0mm-3.5mm.
- Stitch Marker: Helpful for marking the beginning of rounds.
- Yarn Needle: For weaving in ends.
- Scissors

Abbreviations Used:
- ch: chain
- sl st: slip stitch
- sc: single crochet
- dc: double crochet
- inc: increase (2 sc in the same stitch)
- sk: skip
- FO: fasten off
- st(s): stitch(es)
- sp: space
Gauge: Not critical, but aim for a firm fabric to ensure your item holds its shape.
Pattern Notes:
- This item is worked from the bottom up.
- The base and body are worked in continuous rounds of single crochet.
- The decorative border is worked in separate rounds, changing colors.
- The size provided is for a small container (approx. 3 inches/7.5 cm diameter at base). Adjust the number of increase rounds in the base for a different size.
Part 1: The Base (Work in continuous rounds with Main Color – White)
We’ll start with a flat, sturdy circular base. Use a stitch marker to mark the first stitch of each round and move it up as you go.
Round 1: Start with a magic ring. Sc 8 into the ring. (8 sc) Round 2: 2 sc in each st around. (16 sc) Round 3: (Sc in next st, inc) around. (24 sc) Round 4: (Sc in next 2 sts, inc) around. (32 sc) Round 5: (Sc in next 3 sts, inc) around. (40 sc) Round 6: (Sc in next 4 sts, inc) around. (48 sc)
You can add more rounds for a larger base, following the (Sc in N sts, inc) pattern. Ensure your final stitch count for the base is a multiple of 4 for the border pattern (if it’s not exactly a multiple, you can adjust slightly in the last sc round).
Part 2: The Body (Work in continuous rounds with Main Color – White)
Now we’ll create the straight sides of the container.
Round 7: Sc in the back loop only (BLO) of each stitch around. (48 sc) Working in the BLO creates a distinct ridge that helps the sides stand up neatly.
Round 8 – Round 11 (or until desired height): Sc in each stitch around, working into both loops. (48 sc) The image shows about 5 rows of white single crochet for the body. Adjust the number of rows based on how tall you want your item to be.
When you reach your desired height, sl st into the next stitch. FO Main Color.

Part 3: The Green “Leaves” Border (Join Accent Color 1 – Green)
This round creates the base for the scalloped edge.
Round 1 (Green): Join AC1 with a sl st in any stitch of the last white round. Ch 1. Sc in the same stitch. Ch 3, sk 3 sts, sc in next st. Repeat from * around. Join with a sl st to the first sc. (12 sc, 12 ch-3 sps, if your base had 48 stitches). FO Accent Color 1.

Part 4: The Pink “Petals” Border (Join Accent Color 2 – Pink)
This round creates the beautiful petal-like scallops.
Round 1 (Pink): Join AC2 with a sl st in any ch-3 space from the previous green round. (Ch 2, 4 dc, ch 2, sl st) into the same ch-3 space. Repeat from * in each ch-3 space around. Join with a sl st to the first sl st. FO Accent Color 2.
Video tutorial
Finishing:
- Weave in all your loose ends neatly using your yarn needle. Take your time to hide them well for a professional finish.
Congratulations! You’ve just created a charming and versatile scalloped crochet item! Whether it’s holding small treasures, protecting your table as a coaster, or adding a cute touch to a jar, it’s sure to bring a smile.
Don’t forget to share your finished creations with me on social media! Tag me and use the hashtag #ScallopedCrochet. I’d love to see your color choices!
Happy Crocheting!