 by
by 
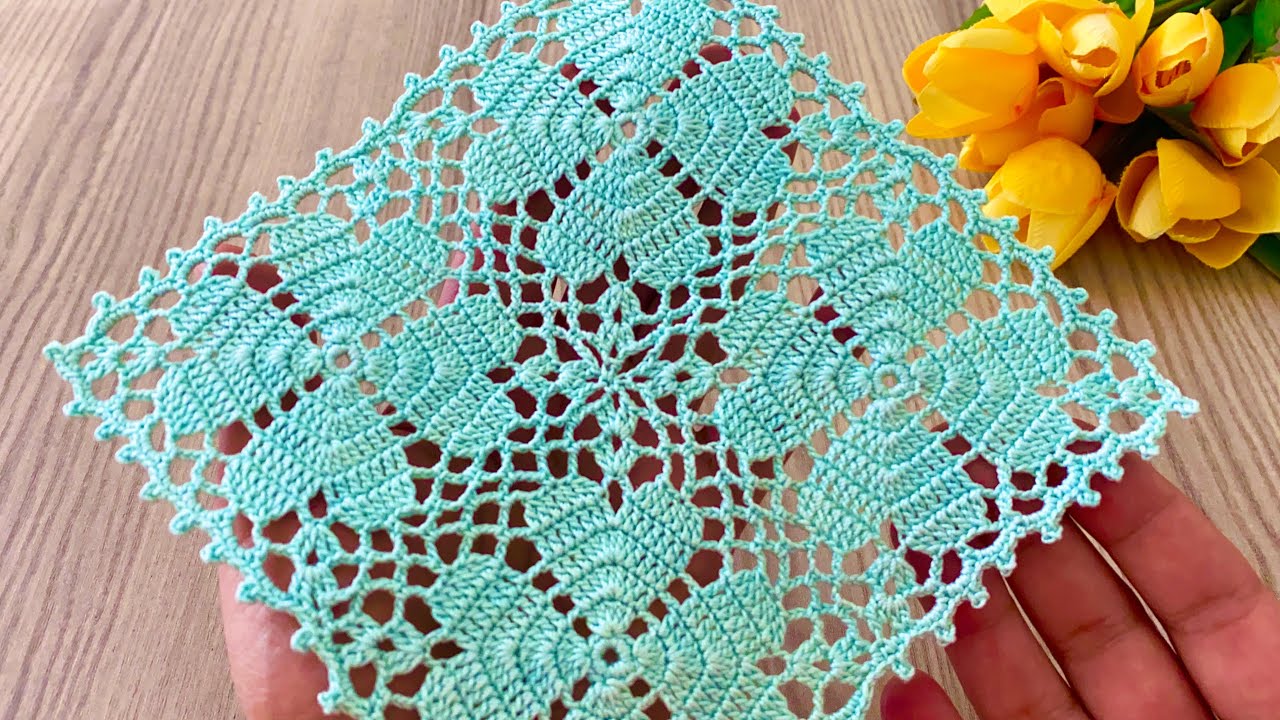
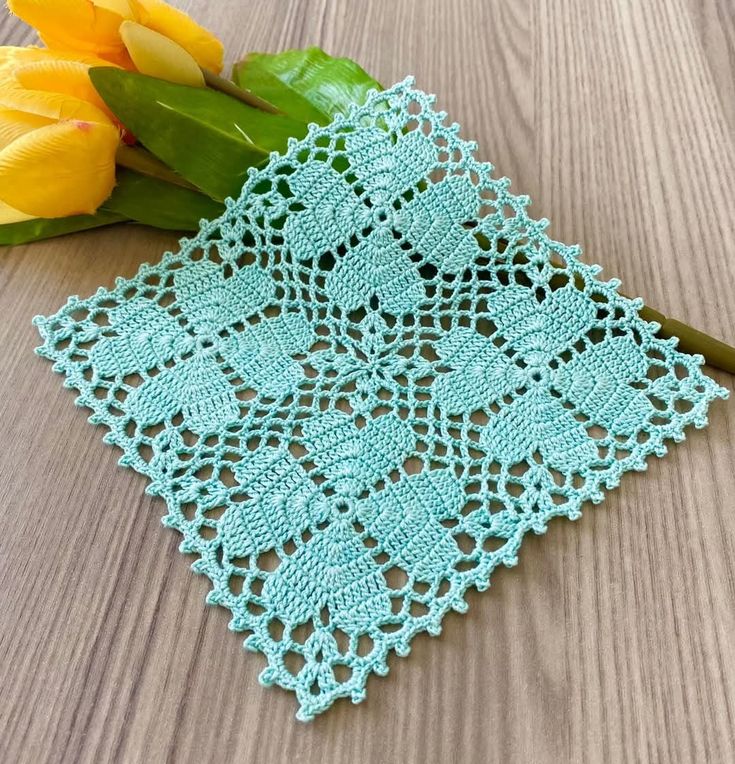
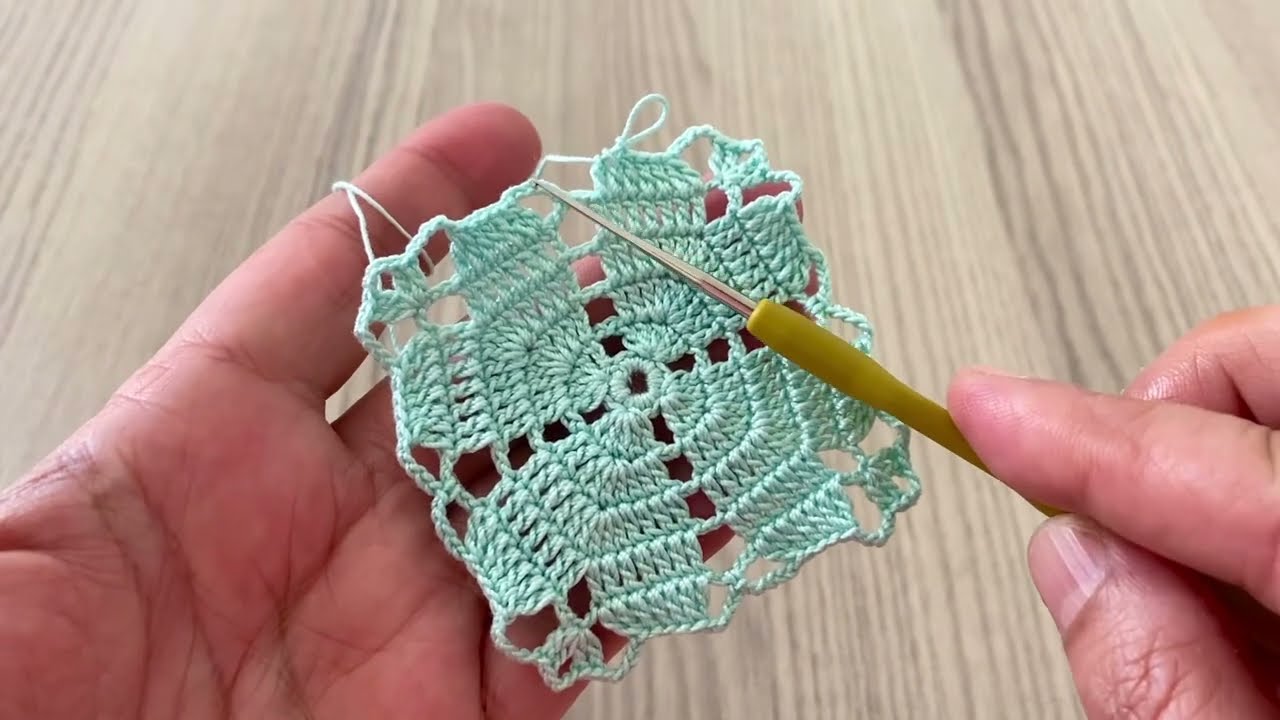
Are you looking for a charming new project to add a touch of handmade elegance to your home? This beautiful square doily is just the thing! Featuring a lovely textured design and a delicate lacy border, it’s perfect for beginners and experienced crocheters alike.
This doily works up quickly and makes a fantastic coaster, a decorative accent under a small vase, or even a delightful gift for a loved one.
Finished Size: Approximately 6 inches by 6 inches (This is an estimate, adjust hook size for different sizes.)
Materials You’ll Need:
- Yarn: DK weight cotton yarn in the color of your choice (the sample uses a light teal/aqua)
- Hook: 3.5 mm (E) crochet hook (or size needed to achieve desired gauge)
- Scissors
- Yarn Needle for weaving in ends
Stitches Used (US Terms):
- ch: chain
- sl st: slip stitch
- sc: single crochet
- dc: double crochet
- tr: treble crochet (yarn over twice, insert hook, yarn over, pull up loop, [yarn over, pull through 2 loops] 3 times)
- V-stitch (V-st): (dc, ch 1, dc) in the same stitch/space
- Shell: (2 dc, ch 1, 2 dc) in the same stitch/space
Gauge: Not critical for this project, but consistent tension is recommended.

Pattern Instructions
Center Square
Start: Ch 4, join with a sl st to form a ring.
Round 1: Ch 3 (counts as 1 dc), 11 dc into the ring. Join with a sl st to the top of initial ch 3. (12 dc)
Round 2: Ch 3 (counts as 1 dc), dc in the same stitch. 2 dc in next dc. Repeat from * around. Join with a sl st to the top of initial ch 3. (24 dc)
Round 3: Ch 3 (counts as 1 dc), dc in next 2 dc, * (dc, ch 2, dc) in next dc (this forms your corner), dc in next 3 dc.* Repeat from * 3 more times, omitting the last 3 dc on the final repeat. Join with a sl st to the top of initial ch 3. (32 dc, 4 ch-2 spaces)
Round 4: Sl st into the ch-2 corner space. Ch 3 (counts as 1 dc), (dc, ch 2, 2 dc) in the same ch-2 space (first corner shell). Dc in each of the next 7 dc. (2 dc, ch 2, 2 dc) in the next ch-2 space. Repeat from * 2 more times. Dc in each of the remaining 7 dc. Join with a sl st to the top of initial ch 3. (44 dc, 4 ch-2 spaces)
Round 5: Sl st into the ch-2 corner space. Ch 3 (counts as 1 dc), (dc, ch 2, 2 dc) in the same ch-2 space. Dc in each dc across to next corner. (2 dc, ch 2, 2 dc) in the ch-2 space. Repeat from * 2 more times. Dc in each remaining dc. Join with a sl st to the top of initial ch 3. (Increase of 8 dc per round. At the end of R5, you should have 60 dc, 4 ch-2 spaces)
Continue increasing in this manner for a few more rounds if you desire a larger center square, always placing (2 dc, ch 2, 2 dc) in each corner ch-2 space and a dc in each dc along the sides.
(From the image, it looks like the center square is roughly 5-6 rounds before the more open lace pattern begins. Let’s assume 6 rounds for this pattern.
Round 6: Sl st into the ch-2 corner space. Ch 3 (counts as 1 dc), (dc, ch 2, 2 dc) in the same ch-2 space. Dc in each dc across to next corner. (2 dc, ch 2, 2 dc) in the ch-2 space. Repeat from * 2 more times. Dc in each remaining dc. Join with a sl st to the top of initial ch 3. (68 dc, 4 ch-2 spaces)

Lace Edging
Round 7: Ch 1, sc in the first dc. Ch 3, skip 2 dc, sc in the next dc. Repeat from * across to the corner ch-2 space. In the corner ch-2 space, (sc, ch 5, sc). Continue the ch 3, skip 2 dc, sc in next dc pattern along the next side. Repeat for all 4 sides and corners. Join with a sl st to the initial sc.
Round 8: Sl st into the first ch-3 space. Ch 3 (counts as 1 dc), 2 dc in the same ch-3 space. 3 dc in each ch-3 space across to the corner ch-5 space. In the corner ch-5 space, (3 dc, ch 2, 3 dc). Repeat from * around. Join with a sl st to the top of initial ch 3.
Round 9: Sl st into the next dc, sl st into the space between the 3-dc groups from the previous round (if there’s a space, otherwise into the first dc of the next 3-dc group). Ch 1. Sc in the space between the 3-dc groups. Ch 3, sc in the next space between 3-dc groups. Repeat from * across to the corner ch-2 space. In the corner ch-2 space, (sc, ch 5, sc). Continue the ch 3, sc in next space pattern along the next side. Repeat for all 4 sides and corners. Join with a sl st to the initial sc.
Round 10: Sl st into the first ch-3 space. Ch 3 (counts as 1 dc), 2 dc in the same ch-3 space. 3 dc in each ch-3 space across to the corner ch-5 space. In the corner ch-5 space, (3 dc, ch 2, 3 dc). Repeat from * around. Join with a sl st to the top of initial ch 3.

(The image shows a series of “leaf” or “petal” like shapes in the next round. These are often made using groups of double or treble crochets.)
Round 11 (Creating the “Petals”): Ch 1. Sc in the first dc. Ch 3, skip 2 dc, sc in the next dc (you are creating chain spaces similar to earlier rounds). Continue this pattern until you reach the center of the side (approximately the middle 3-dc group). In the next ch-3 space, work a Shell (2 dc, ch 1, 2 dc). Continue the ch 3, skip 2 dc, sc in the next dc pattern until you reach the corner. In the corner ch-2 space, (sc, ch 5, sc). Repeat this pattern for all 4 sides and corners, ensuring to place a Shell in the approximate center of each side. Join with a sl st to the initial sc.
Round 12 (Refining the “Petals”): Sl st into the first ch-3 space. Ch 1, sc in the same ch-3 space. Ch 3, sc in the next ch-3 space. Repeat until you reach the Shell. Work (3 dc, ch 1, 3 dc) in the ch-1 space of the Shell. Continue ch 3, sc in the next ch-3 space until you reach the corner. In the corner ch-5 space, (sc, ch 5, sc). Repeat for all 4 sides and corners. Join with a sl st to the initial sc.
Round 13 (Final Edging – Scallops): Sl st into the first ch-3 space. Ch 1, sc in the same ch-3 space. [ch 3, sc] in the next ch-3 space. Repeat this along the side until you reach the group of 3 dc before the corner. In the ch-1 space of the corner (where you had the (3dc,ch1,3dc) from previous round), work a Shell (2 dc, ch 1, 2 dc) or a slightly larger shell like (3 dc, ch 2, 3 dc) for a more pronounced corner. In the next ch-5 corner space, work (sc, ch 7, sc) for a very open, decorative corner. Continue the ch 3, sc pattern along the sides. Join with a sl st to the initial sc.
Video tutorial
Finishing:
Fasten off and weave in all loose ends securely. Block your doily to open up the lace work and create a crisp, professional finish. Simply dampen the doily, gently stretch it into shape, and pin it to a foam board or towel until completely dry.
Enjoy your beautiful new square doily! Share your creations with us in the comments below! We’d love to see them.