 by
by 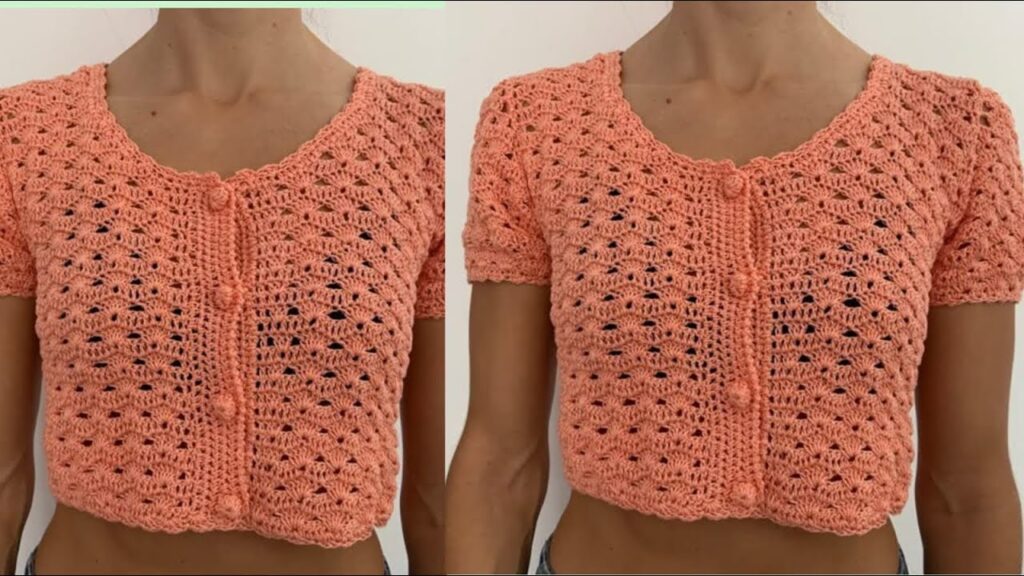
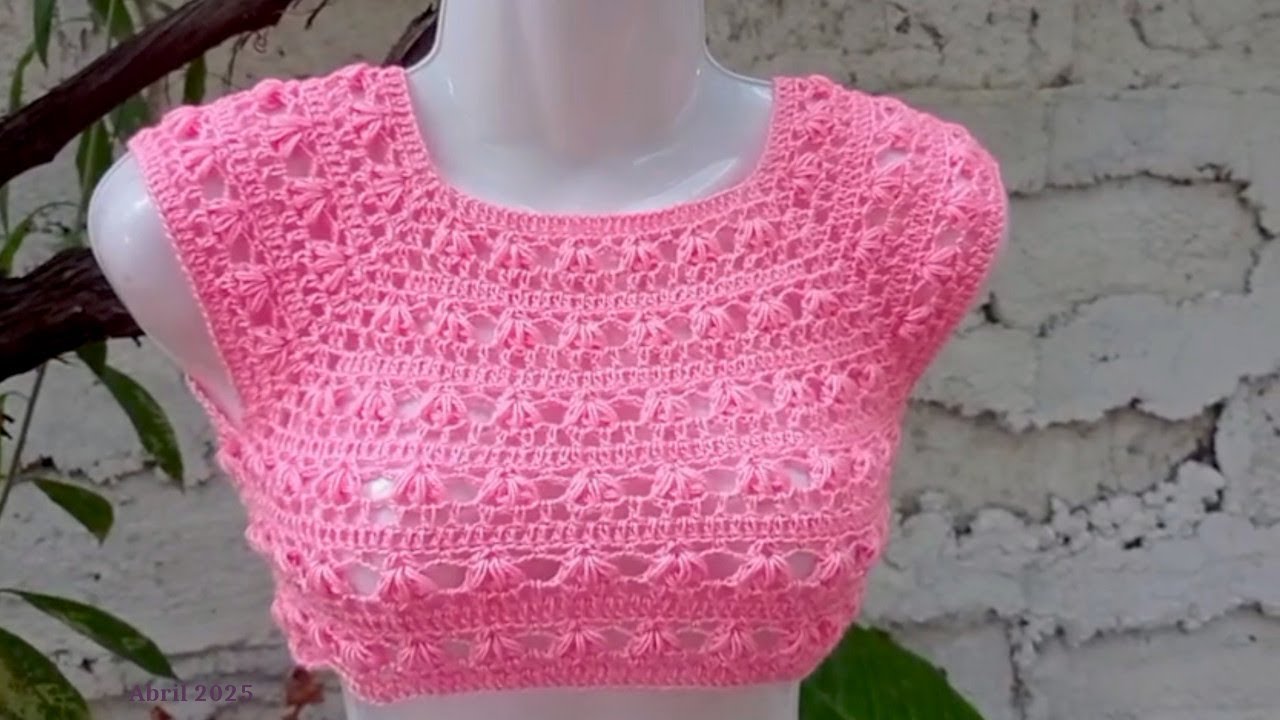
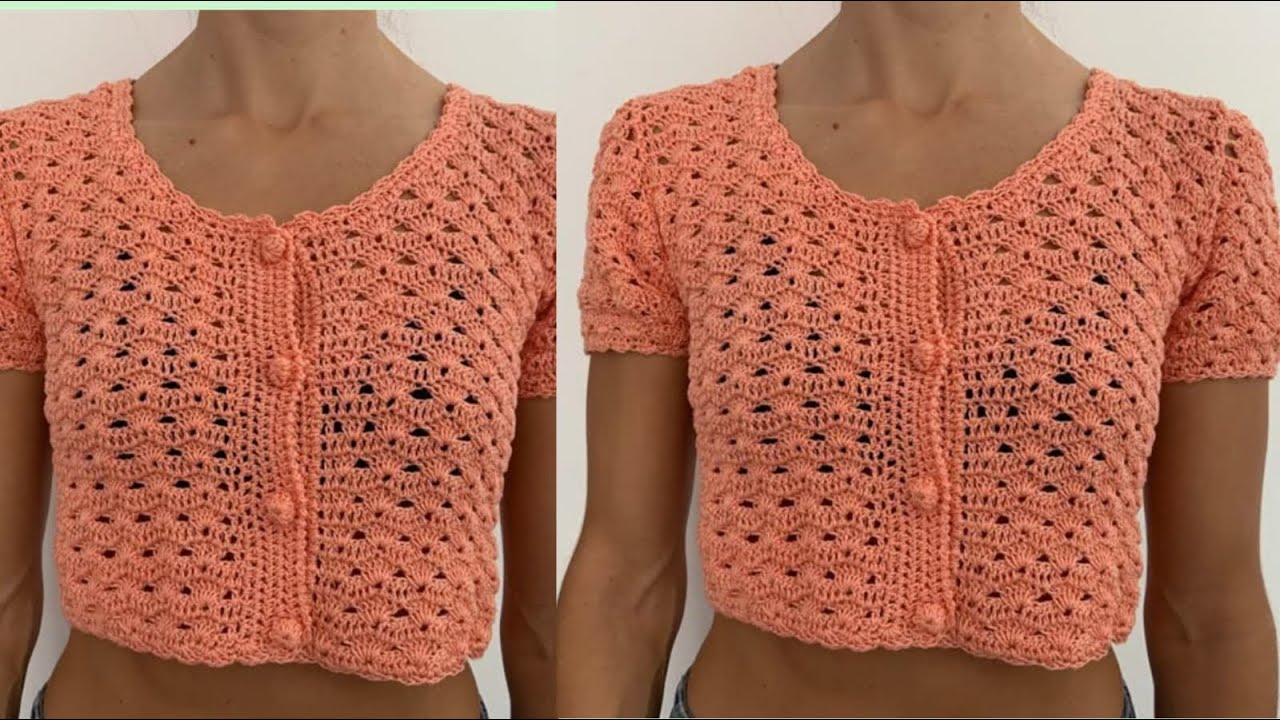
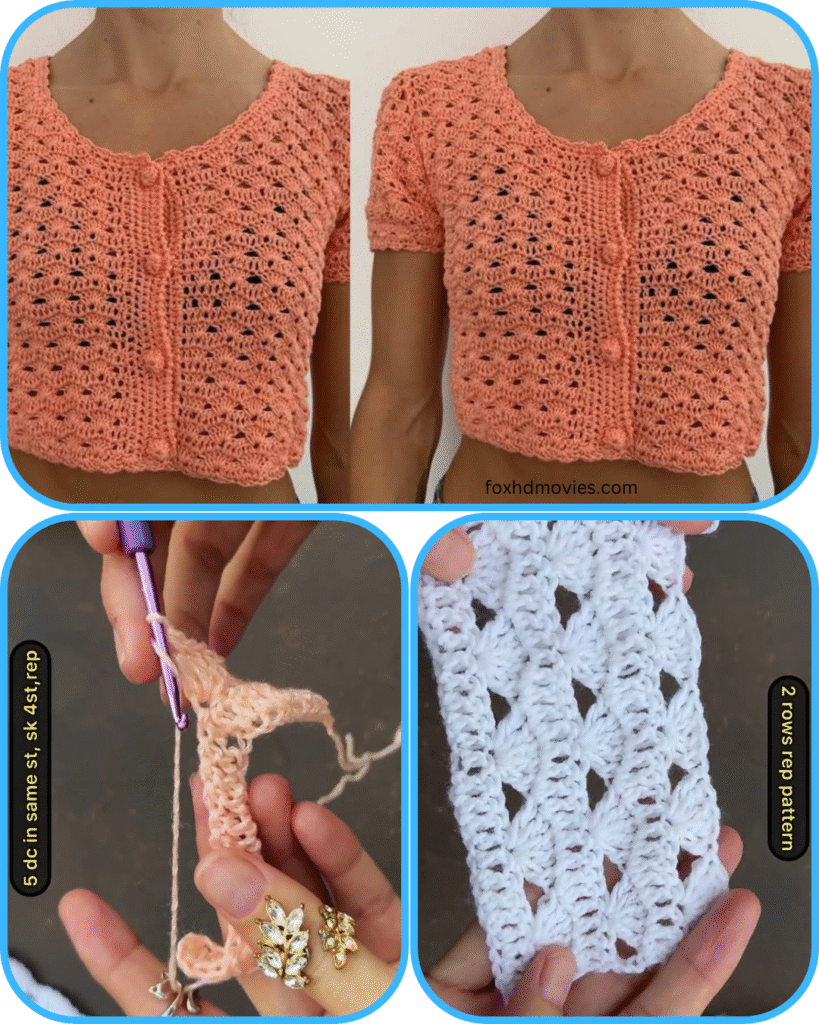
Looking for the perfect lightweight layer for spring and summer? This gorgeous crocheted cropped cardigan is just what you need! With its delicate fan stitch pattern and flattering silhouette, it’s a versatile piece that can be dressed up or down. Wear it over a camisole, a sundress, or even with high-waisted jeans for a effortlessly stylish look.
This pattern is written for a women’s size Small/Medium, but instructions are given for adjusting the size.
Finished Measurements (Approximate for S/M):
- Bust: 34-36 inches
- Length (from shoulder to hem): 16-17 inches
- Sleeve Length (from shoulder): 5-6 inches
Materials You’ll Need:
- Yarn: DK (Light Worsted) weight cotton or cotton blend yarn. Approximately 600-700 yards for S/M. (Sample uses a lovely peach color)
- Hook: 4.0 mm (G/6) crochet hook, or size needed to obtain gauge.
- Buttons: 3-5 buttons (approximately 0.5-0.75 inch diameter)
- Tapestry Needle for weaving in ends and sewing buttons
- Scissors
Gauge: 16 stitches and 8 rows = 4 inches in fan stitch pattern (measure after blocking). It’s crucial to check your gauge! Adjust your hook size if necessary to match the gauge, as this will affect the overall size of your cardigan.
Stitches Used (US Terms):
- ch: chain
- sl st: slip stitch
- sc: single crochet
- dc: double crochet
- sk: skip
- Fan Stitch: (2 dc, ch 1, 2 dc) in same stitch or space
- V-stitch (V-st): (dc, ch 1, dc) in same stitch or space
Pattern Notes:
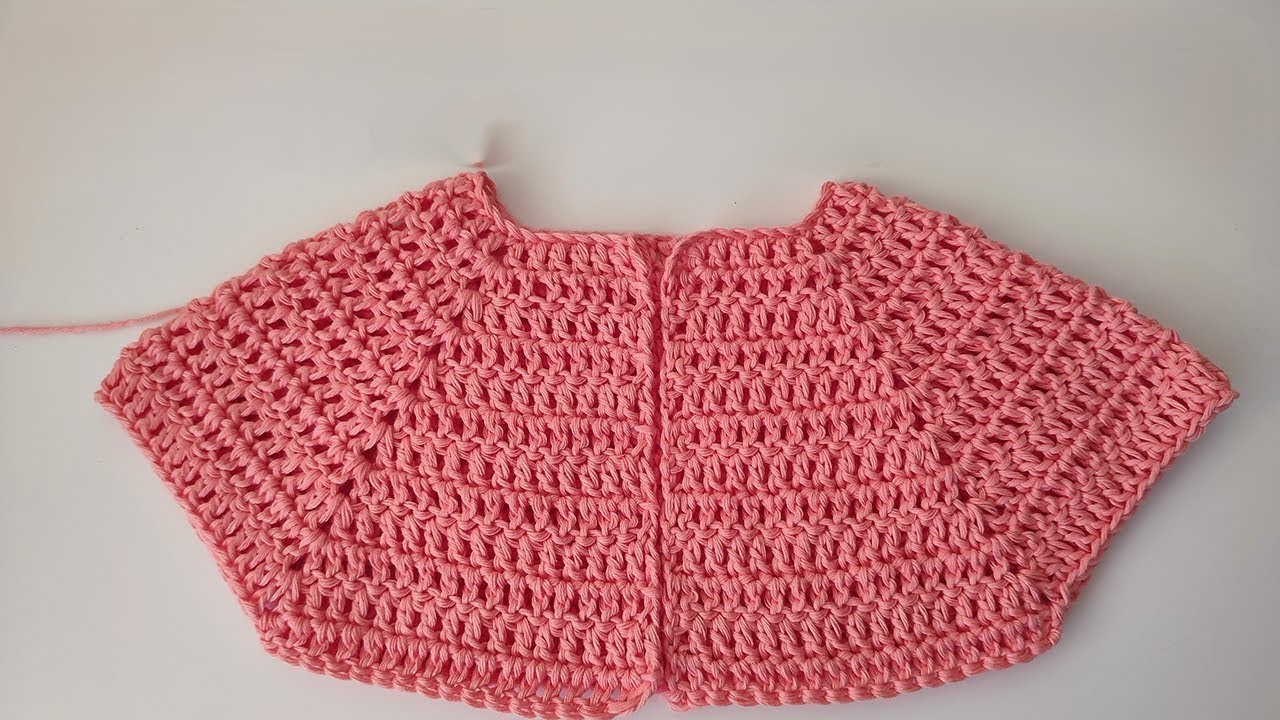
- This cardigan is worked in one piece from the bottom up to the armholes, then split for the front panels and back.
- The button band is added at the end.
- Ch 3 at the beginning of a row counts as a dc. Ch 1 at the beginning of a row does NOT count as a stitch.
Pattern Instructions
Main Body (Bottom Up)
Foundation Chain: Ch 140 (or a multiple of 8 + 4 for your desired width. For larger sizes, add multiples of 8. For smaller sizes, subtract multiples of 8). Make sure your chain is not too tight.
Row 1: Sc in 2nd ch from hook, sk 3 ch, Fan Stitch in next ch, sk 3 ch, sc in next ch. Repeat from * across. Turn.
Row 2: Ch 3 (counts as dc), dc in next dc. Ch 1, dc in ch-1 space of next Fan Stitch, ch 1, dc in next 2 dc. Repeat from * across to the last sc. Dc in last sc. Turn.
Row 3: Ch 1, sc in first dc. Sk ch-1 space, Fan Stitch in next dc (the dc in the ch-1 space of the previous row’s Fan), sk ch-1 space, sc in next 2 dc. Repeat from * across to the last dc. Sc in last dc. Turn.
Repeat Row 2 and Row 3 until your piece measures approximately 10-11 inches from the beginning, or until it reaches your armpits. End with a Row 2 repeat.
Divide for Armholes
Now we will work on the Right Front, Back, and Left Front separately. Count your fan stitches across the last row.
- For S/M: Approximately 17 fan stitches.
- Divide: Right Front (4 fans), Back (9 fans), Left Front (4 fans).
- Adjust these numbers based on your total fan count for your size.
Right Front
Row 1 (Right Side): Continue with the pattern (either Row 2 or Row 3, depending on what your last body row was). Work across the first 4 fan repeats. Turn.
- (Make sure your last stitch of this section is a sc if your last body row was a Row 3, or a dc if your last body row was a Row 2.)
Continue working in the pattern on these 4 fan repeats only until the front panel measures approximately 6-7 inches from the start of the armhole (or to your desired shoulder height). Fasten off.

Back
Row 1 (Right Side): Skip the next 1-2 stitches (to create a small armhole opening, adjust as needed) after the Right Front section. Join yarn in the appropriate stitch to start the next 9 fan repeats for the back. Work across these 9 fan repeats in the established pattern. Turn.
- (Again, ensure your first stitch matches the pattern (sc or dc) based on the row you’re continuing with.)
Continue working in the pattern on these 9 fan repeats until the back panel measures approximately 7-8 inches from the start of the armhole (or to your desired shoulder height). Fasten off.
Left Front
Row 1 (Right Side): Skip the next 1-2 stitches after the Back section. Join yarn in the appropriate stitch to start the final 4 fan repeats for the left front. Work across these 4 fan repeats in the established pattern. Turn.
Continue working in the pattern on these 4 fan repeats until the left front panel measures approximately 6-7 inches from the start of the armhole (matching the Right Front). Fasten off.
Shoulder Seams
Lay your cardigan flat with the wrong side facing up. Line up the shoulders of the front panels with the shoulders of the back panel. You can seam the shoulders using a sl st, sc, or by sewing with a tapestry needle.
- Sl St Seam: Join yarn at the outer edge of one shoulder. Sl st through both layers (front and back) across the shoulder seam.
- Repeat for the other shoulder.
Sleeves
Attach Yarn: Join yarn at the armpit area of one sleeve opening.
Round 1: Ch 1, sc evenly around the armhole opening. Aim for approximately 4-5 sc per 2 rows of the main body, and 1 sc per stitch along the top of the armhole shaping. Join with a sl st to the first sc.
Round 2: Ch 3 (counts as dc), dc in next sc. Sk 3 sc, Fan Stitch in next sc, sk 3 sc, dc in next 2 sc. Repeat from * around. Join with a sl st to the top of initial ch 3.
Round 3: Ch 1, sc in first dc. Sk ch-1 space, Fan Stitch in next dc (the dc in the ch-1 space of the previous row’s Fan), sk ch-1 space, sc in next 2 dc. Repeat from * around. Join with a sl st to the first sc.
Repeat Round 2 and Round 3 until your sleeve measures approximately 5-6 inches from the armpit, or your desired short sleeve length.
Cuff (Optional, for a neater finish): Ch 1, sc evenly around the cuff. Join with a sl st. Fasten off.
Repeat for the second sleeve.

Front Button Band
Attach Yarn: Join yarn at the bottom right corner of the cardigan (when wearing it).
Row 1: Ch 1, sc evenly along the entire front opening, including the neckline. When you reach the bottom of the neckline, work around the neckline edge, and then down the other front opening to the bottom. Aim for approximately 2 sc per 2 rows of dc and 1 sc per sc. Turn.
Row 2: Ch 1, sc in each sc across. Turn.
Row 3 (Buttonholes – for Right-Handed Crocheters on Left Front Band, or Left-Handed on Right Front Band):
- If you want the buttons on the left front (and buttonholes on the right front), this will be on the second side you work.
- Ch 1, sc in first few sc.
- Create buttonholes: Ch 2, sk 2 sc, sc in next few sc. Repeat for 3-5 buttonholes, evenly spaced. Make sure they align with where you want your buttons.
- Sc to the end of the row. Turn.
Row 4: Ch 1, sc in each sc across, working 2 sc into each ch-2 buttonhole space. Turn.
Row 5: Ch 1, sc in each sc across. Fasten off.
Video tutorial
Finishing
- Weave in all loose ends using your tapestry needle.
- Sew your buttons onto the side opposite your buttonholes, lining them up carefully.
- Blocking is highly recommended! Gently wet your cardigan, lay it flat, and gently shape it to the desired dimensions. Pin it in place if necessary and let it air dry completely. Blocking will even out your stitches and open up the fan pattern beautifully.
Enjoy your new, stylish crocheted cropped cardigan! Don’t forget to share your finished project with us – tag us on social media or leave a comment below! Happy crocheting!