by
by 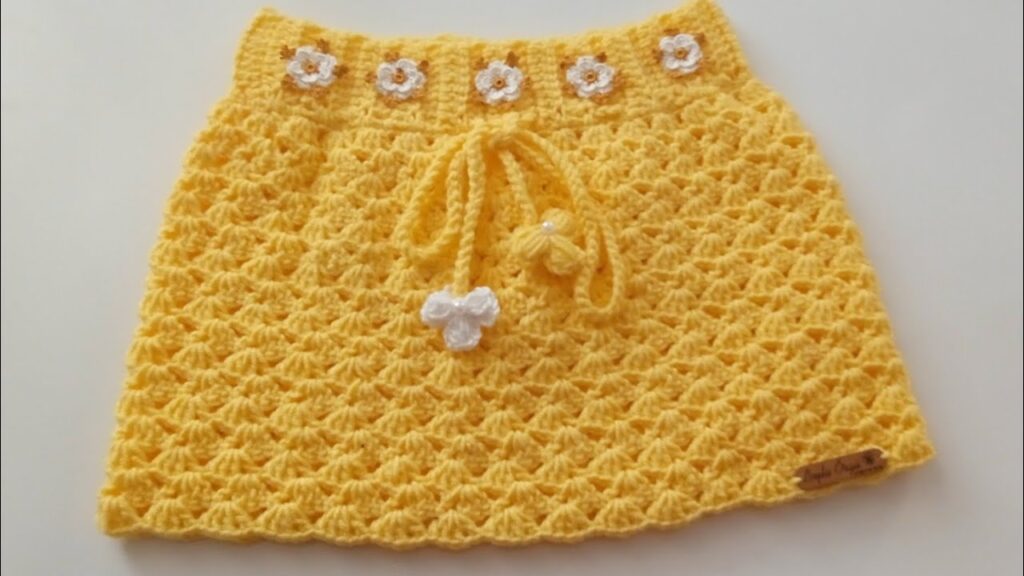
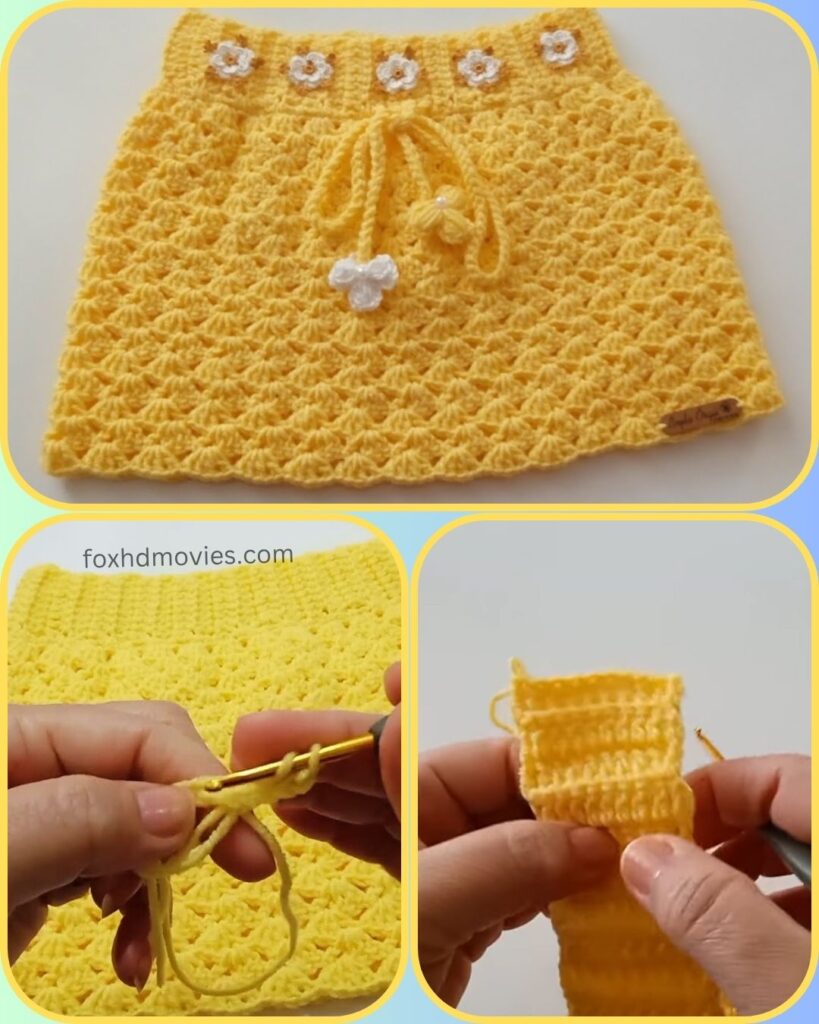
How cheerful is this little yellow skirt? With its beautiful texture and sweet floral details, it’s perfect for a sunny day outfit! This skirt features an elastic-free drawstring waist for comfort and a lovely shell stitch pattern that’s fun to crochet.
This pattern is designed for an intermediate beginner or intermediate crocheter. If you’re comfortable with basic stitches and working in the round, you can definitely tackle this project!
Let’s get started on creating some sunshine for your little one’s wardrobe!
Skill Level: Easy-Intermediate Yarn Weight: DK (light worsted) yarn Hook Size: 4.0mm (G/6) crochet hook (or size needed to obtain gauge) Other Materials:
- Yarn needle for weaving in ends
- Small amount of white yarn for the flower embellishments (optional)
- Small amount of contrasting yarn for the flower centers (optional, like light brown or yellow)
- Stitch marker (helpful for working in the round)
Gauge: 4 shells and 8 rows = 4 inches (10 cm) in pattern stitch (Shell Stitch). It’s important to check your gauge to ensure the skirt will be the correct size. Adjust your hook size if necessary.
Finished Size (approximate): Toddler (2-3T) – with notes for adjustments for other sizes. For larger or smaller sizes, you’ll need to adjust your starting chain and the number of rows.
Stitches Used:
- ch: chain
- sl st: slip stitch
- sc: single crochet
- hdc: half double crochet
- dc: double crochet
- Shell Stitch (Shell): (2 dc, ch 1, 2 dc) in the same stitch or space
- V-stitch (V-st): (dc, ch 1, dc) in the same stitch/space (for the drawstring)
Pattern Notes:
- This skirt is worked from the top down, in the round.
- Ch 2 at the beginning of a round counts as a dc. Ch 1 does NOT count as a stitch unless specified.
- Always join rounds with a sl st to the top of the beginning ch-2 (or first stitch if ch 1).
- For the main body, you will be working the Shell stitch into the ch-1 space of the Shell from the previous round.
Let’s Begin! The Waistband
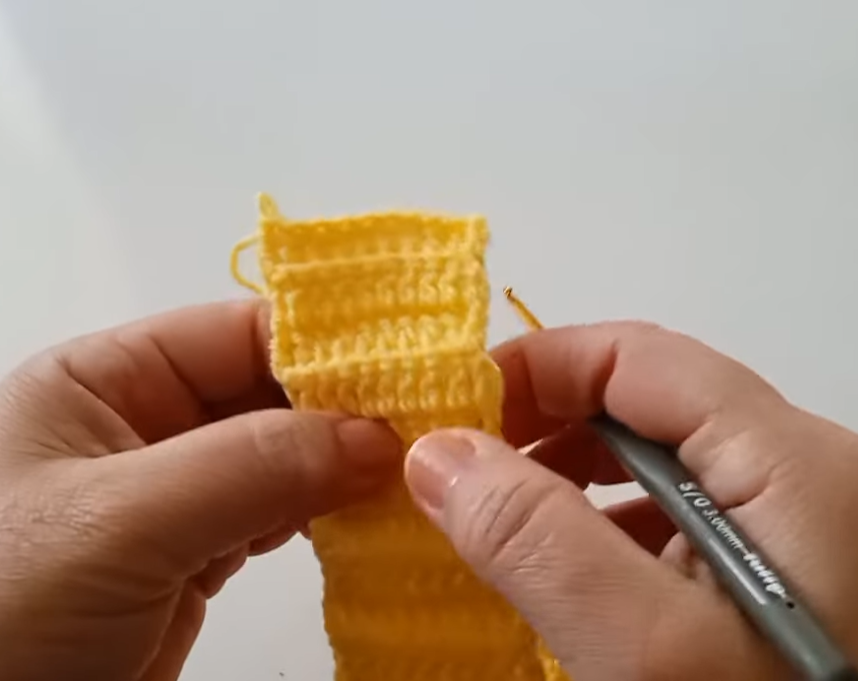
We’ll start by creating the ribbed waistband where the drawstring will go.

Starting Chain: Ch 60 (this is for approximately a 19-20 inch waist. Adjust as needed for your desired waist circumference, making sure your chain is a multiple of 2.) Join with a sl st to the first ch, being careful not to twist the chain.
Round 1: Ch 1, hdc in each ch around. Join with a sl st to the first hdc. (60 hdc)
Round 2: Ch 1, hdc in the back loop only of the next hdc. Repeat from * to * around. Join with a sl st. Working in the back loop only creates a subtle ribbed effect.
Repeat Round 2 for a total of 3-4 rounds, or until your waistband is approximately 1 inch wide.
Creating the Drawstring Channel
Now we’ll make the row where the drawstring will be threaded through.
Next Round: Ch 2 (counts as dc), dc in the next hdc. Ch 1, skip 1 hdc, dc in the next hdc. Repeat from * to * around, ending with ch 1, skip 1 hdc. Join with a sl st to the top of the beginning ch-2. You’ve created small gaps for your drawstring.
The Skirt Body (Shell Stitch Pattern)
Now for the beautiful main body of the skirt!
Round 1: Ch 2 (counts as dc), dc in the same stitch where you joined. Skip the next dc. Shell Stitch (2 dc, ch 1, 2 dc) in the next ch-1 space from the previous round. Repeat from * to * around. In the very last ch-1 space of the round, work 2 dc. Join with a sl st to the top of the beginning ch-2. This round might feel a little different as you’re establishing the first set of shells.
Round 2: Ch 2, dc in the same stitch where you joined. Shell Stitch (2 dc, ch 1, 2 dc) in the ch-1 space of the next Shell from the previous round. Repeat from * to * around. Work 2 dc into the last Shell’s ch-1 space. Join with a sl st to the top of the beginning ch-2.
Repeat Round 2 until the skirt reaches your desired length (typically around 9-12 inches from the top of the waistband, depending on the child’s height and desired style).
Last Round (Edging): Ch 1, sc in each dc and into each ch-1 space around. Join with a sl st. Fasten off.

The Drawstring
Make a long chain: Ch enough to be about double the circumference of the skirt’s waist (e.g., if waist is 20 inches, chain about 40 inches long). For a thicker cord, you can make a slip stitch cord, or work a row of sc into your chain.
Add the little “beads” (optional, as seen in image):
- At each end of the drawstring, ch 3. Sl st into the 3rd ch from hook to form a tiny ring.
- Work 4-5 dc into the ring. Sl st to the first dc. Fasten off.
- You can make these in the main yellow color, or white for contrast as in the image.
Thread the drawstring: Use your yarn needle to carefully weave the drawstring through the “ch 1, skip 1 dc” spaces in the drawstring channel you created earlier. Start from the center front and weave all the way around. Tie a knot at the ends of the drawstring, or secure your little “beads.”

Optional Flower Embellishments:
Make 5-7 flowers for the waistband, and 2-3 for the drawstring ends.
Flower Pattern:
- With white yarn and a smaller hook (e.g., 3.0mm):
- Ch 2. 5 sc in the 2nd ch from hook. Join with a sl st to first sc.
- (Ch 2, 2 dc in same st, ch 2, sl st in same st) Repeat 5 times around the circle, working into each sc. You’ll form 5 small petals.
- Fasten off, leaving a tail for sewing.
- Flower Center (optional): With a contrasting color (like light brown or light yellow), thread your yarn needle and make a few small stitches in the center of each flower to create a knot or small circle.
Attach Flowers: Sew the flowers evenly spaced along the top of the waistband. If desired, you can also sew a couple onto the ends of your drawstring.
Video tutorial
Finishing
- Weave in all remaining loose ends securely.
And there you have it – a vibrant and playful Little Sunshine Skirt, ready for twirls and adventures! Don’t forget to share your finished skirts with me on social media – I love to see your beautiful creations!
Happy crocheting!