 by
by 
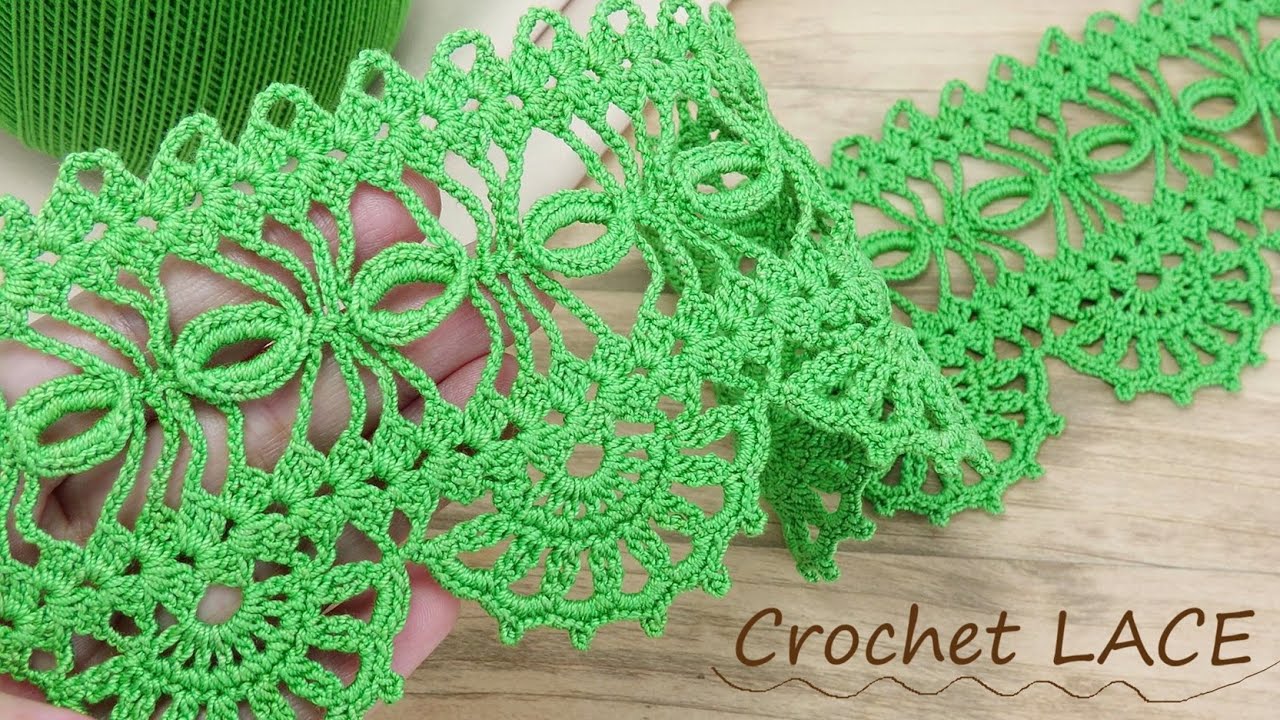
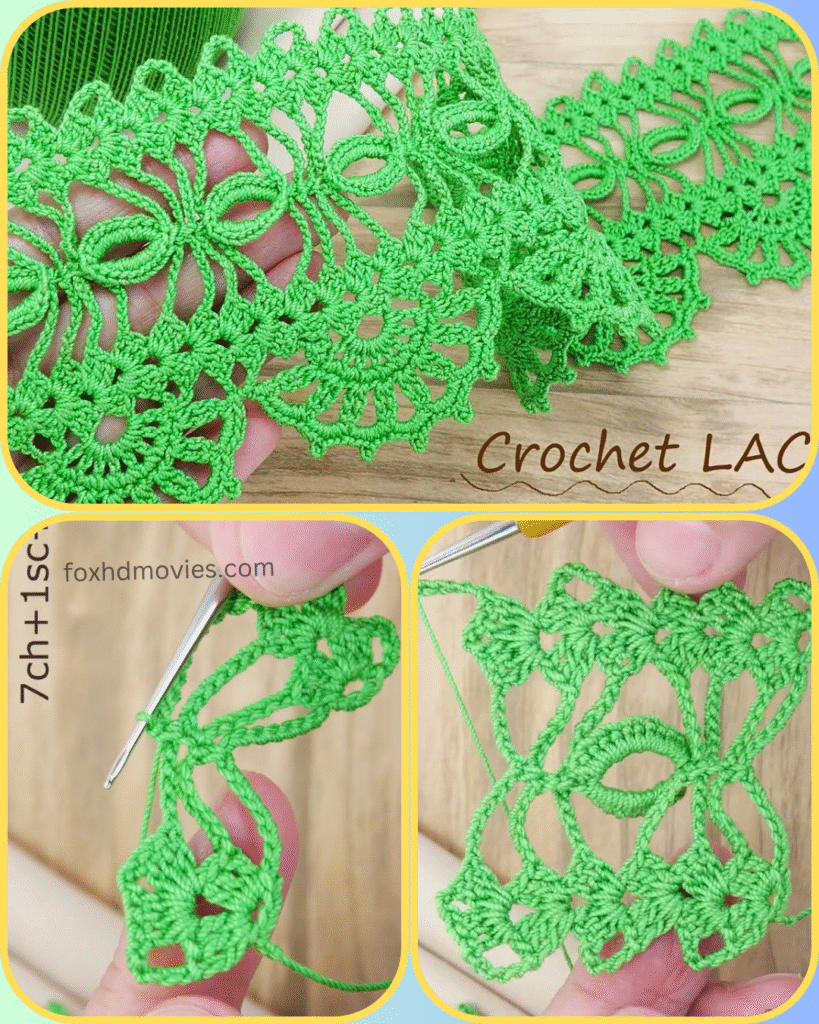
Hello, creative crafters! Today, we’re going to make a truly exquisite piece of crochet lace: the “Evergreen Elegance” ribbon! This stunning design features a repeating floral motif connected by delicate arches, creating a continuous band of intricate lace. It’s absolutely perfect for trimming garments, embellishing home decor items, creating unique bookmarks, or even joining multiple strips for a lightweight shawl or tablecloth. The sample is in a vibrant green, which beautifully showcases the openwork, but imagine it in any color that speaks to your heart!
Let’s gather our supplies and start crocheting this lovely lace!
Skill Level: Intermediate to Advanced
Materials:
- Yarn: Fine weight (fingering or #1) cotton yarn in your desired color. Mercerized cotton is highly recommended for its sheen and excellent stitch definition, which is crucial for intricate lace.
- Hook: 1.50mm – 2.00mm steel crochet hook (or size needed to obtain your desired gauge and drape). A smaller hook will result in a tighter, more defined lace.
- Yarn Needle: For weaving in ends.
- Scissors
Gauge: Not critical for a single motif, but for consistency in a long ribbon, aim for uniformity. One complete floral repeat should measure approximately 1.5 – 2 inches in length.
Abbreviations (US Terms):
- ch: chain
- sl st: slip stitch
- sc: single crochet
- hdc: half double crochet
- dc: double crochet
- tr: treble crochet (yarn over 2 times)
- dtr: double treble crochet (yarn over 3 times)
- trtr: triple treble crochet (yarn over 4 times)
- picot: ch 3, sl st in 3rd ch from hook
- st(s): stitch(es)
- sp: space
- sk: skip
- FO: Fasten off
Pattern for Evergreen Elegance Lace Ribbon (Work in Rows)
This ribbon is created by working a series of connected motifs. Each “section” or “repeat” forms one of the main floral elements.
Initial Setup (Start of your ribbon):
Ch 10, sl st to first ch to form a ring. (This creates the center for your first flower).

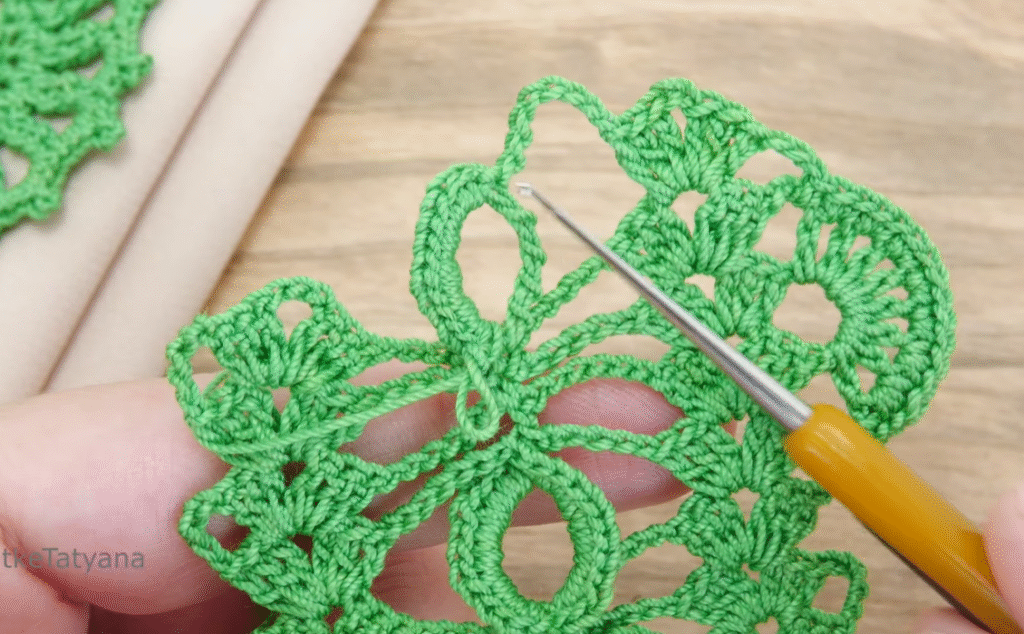
Round 1 (Flower Center): Ch 3 (counts as 1 dc), 15 dc in ring. Join with sl st to top of ch 3. (16 dc)
Round 2 (Petal Bases): Ch 1, sc in first st. Ch 3, sk 1 st, sc in next st. Repeat from * to * 6 more times. Ch 3, sk 1 st, sl st to first sc to join. (8 sc, 8 ch-3 sps)
Round 3 (Petals): Sl st into first ch-3 sp. Ch 3 (counts as 1 dc), (2 dc, ch 3, 3 dc) in same ch-3 sp (first petal). Ch 1, sk next sc, (3 dc, ch 3, 3 dc) in next ch-3 sp. Repeat from * to * 6 more times. Ch 1, sl st to top of ch 3 to join. (8 petals, 8 ch-1 sps between petals)
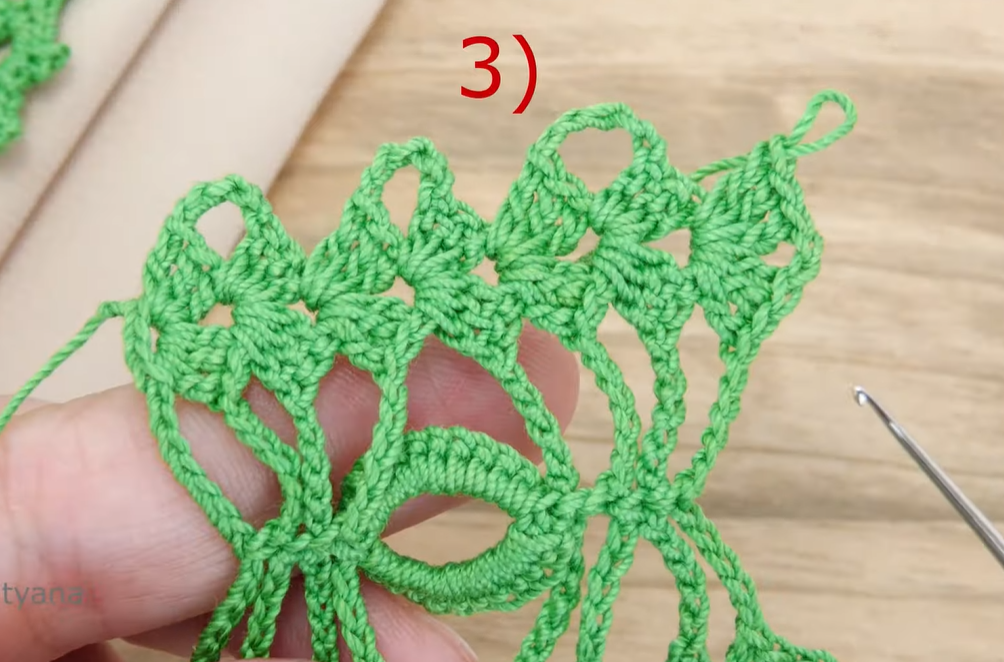
Row 4 (Developing the Lace & Side Connections – This is where the magic happens!):
This round will connect one flower to the next and create the side lace. You will effectively be working back and forth in rows from here on for the length of your ribbon.
- Sl st into the first ch-3 sp of a petal.
- Ch 1, (sc, picot, sc) in same ch-3 sp. (This creates the top point of your first petal).
- Ch 5, sc in next ch-1 sp (between petals).
- Ch 5, (sc, picot, sc) in next ch-3 sp of a petal.
- Ch 5, sc in next ch-1 sp.
- Ch 5, (sc, picot, sc) in next ch-3 sp of a petal. (This is the third petal from the start of the row).
- Now, we prepare to extend the ribbon and connect to the next motif.
- Ch 7 (this chain will serve as the base for the next flower’s center).
- Turn your work.

Row 5 (Building the next flower’s foundation and returning along the row):
- Working into the 7 chains you just made: sl st into the 3rd ch from hook to form a small loop (this is the center of your new flower).
- Ch 3 (counts as 1 dc), 15 dc into the small loop you just formed. Sl st to top of ch 3 to join. (16 dc – this is the center of your second flower).
- Now, you will connect this new flower back to the previous one and continue the lace along the side.
- Ch 1, sc in first st of new flower. Ch 3, sk 1 st, sc in next st. Repeat from * to * 6 more times. Ch 3, sk 1 st, sl st to first sc to join. (8 sc, 8 ch-3 sps)
- Connect to previous motif: Ch 1, sl st into the center picot of the 3rd petal of the previous motif (from Row 4).
- Ch 1, sl st into the first ch-3 sp of the current motif (your new flower).
- Ch 3 (counts as 1 dc), (2 dc, ch 3, 3 dc) in same ch-3 sp. Ch 1, sk next sc, (3 dc, ch 3, 3 dc) in next ch-3 sp. Repeat from * to * 6 more times. Ch 1, sl st to top of ch 3 to join. (8 petals created around new flower center).
- Turn your work.
Repeat Rows 4 & 5 to extend the ribbon to your desired length:
Essentially, each “Row 4” establishes the side lace and sets up the chain for the next flower’s center. Each “Row 5” creates the new flower’s center and petals, and then connects it back to the previous row’s side lace, and sets up the new flower’s petals for the next “Row 4”.
For the next repeat: You’ll essentially be repeating the structure of Row 4, but instead of starting with a picot on the first petal, you’ll be working into the picots and ch-sp of the newly formed flower.
Let’s simplify the repeat after the first two “sets”:
Repeat Section (for continuous ribbon):
- Row A (Similar to Row 4, creating outer lace & next flower base):
- Sl st into the ch-3 sp of the petal that’s closest to the side where you’re working.
- Ch 1, (sc, picot, sc) in same ch-3 sp.
- Ch 5, sc in next ch-1 sp.
- Ch 5, (sc, picot, sc) in next ch-3 sp of a petal.
- Ch 5, sc in next ch-1 sp.
- Ch 5, (sc, picot, sc) in next ch-3 sp of a petal. (This is the petal that will connect to the next flower’s side).
- Ch 7 (base for next flower center).
- Turn.
- Row B (Similar to Row 5, creating new flower & connecting it):
- Working into the 7 chains you just made: sl st into the 3rd ch from hook to form a small loop (new flower center).
- Ch 3 (counts as 1 dc), 15 dc into the small loop. Sl st to top of ch 3 to join. (16 dc)
- Ch 1, sc in first st of new flower. Ch 3, sk 1 st, sc in next st. Repeat from * to * 6 more times. Ch 3, sk 1 st, sl st to first sc to join. (8 sc, 8 ch-3 sps)
- Connect to previous motif: Ch 1, sl st into the center picot of the corresponding petal on the previous motif (from Row A).
- Ch 1, sl st into the first ch-3 sp of the current motif (your new flower).
- Ch 3 (counts as 1 dc), (2 dc, ch 3, 3 dc) in same ch-3 sp. Ch 1, sk next sc, (3 dc, ch 3, 3 dc) in next ch-3 sp. Repeat from * to * 6 more times. Ch 1, sl st to top of ch 3 to join. (8 petals created around new flower center).
- Turn.
Continue repeating Row A and Row B until your ribbon reaches the desired length.
Finishing End of Ribbon:
Once you’ve made your final flower and completed its Round 3 (petals), you’ll need to finish off that end of the ribbon so it matches the beginning.
- Sl st into the ch-3 sp of the petal that would be the “starting” point of Row 4.
- Ch 1, (sc, picot, sc) in same ch-3 sp.
- Ch 5, sc in next ch-1 sp.
- Ch 5, (sc, picot, sc) in next ch-3 sp of a petal.
- Ch 5, sc in next ch-1 sp.
- Ch 5, (sc, picot, sc) in next ch-3 sp of a petal.
- FO, leaving a long tail for weaving in. Weave in all ends neatly.
Blocking:
Blocking is crucial for this type of lace! Gently stretch and pin your finished ribbon to a blocking mat, ensuring the flowers are open and the lace arches are symmetrical. Mist generously with water until damp, and allow to dry completely. This will make your lace lay flat and truly showcase its intricate design.
Video tutorial
Tips for Success:
- Visual Guide: Keep the image handy as you work. It will be your best friend in understanding how the motifs connect.
- Stitch Markers: Use stitch markers to mark the ‘turning’ points or the center of the next flower’s chain base until you get the hang of it.
- Consistent Tension: This is key for uniform motifs and a straight, even ribbon.
- Practice Makes Perfect: Don’t be discouraged if the first few repeats are tricky. You’ll quickly get into a rhythm!
- Yarn Choice: Fine cotton yarn provides the best definition for lace.
I hope you enjoy creating this beautiful Evergreen Elegance Lace Ribbon! It’s a wonderful project for honing your lace crochet skills and producing something truly special. Please share your finished ribbons in the comments below!
Happy Crocheting!