Hello, creative crafters!

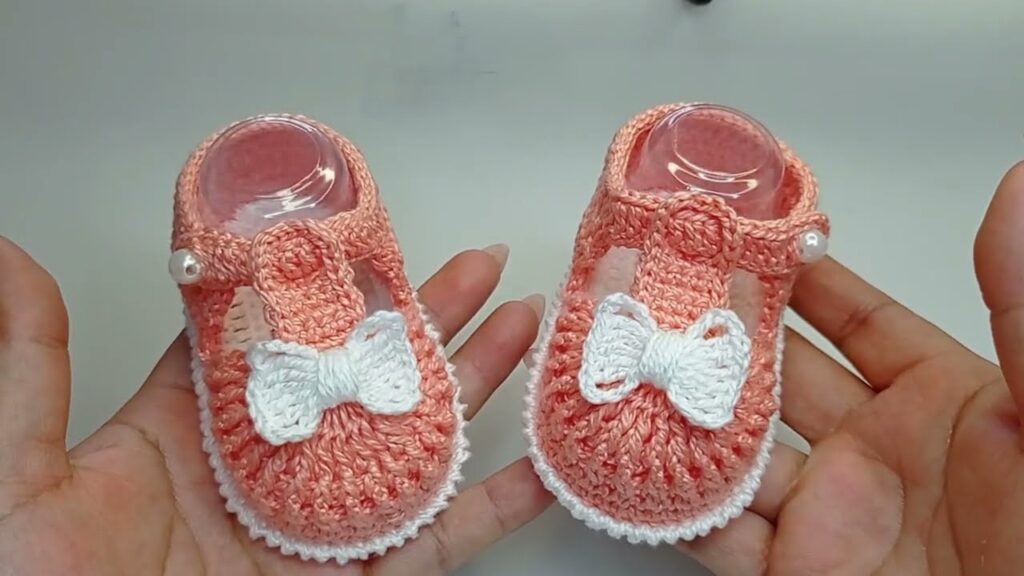
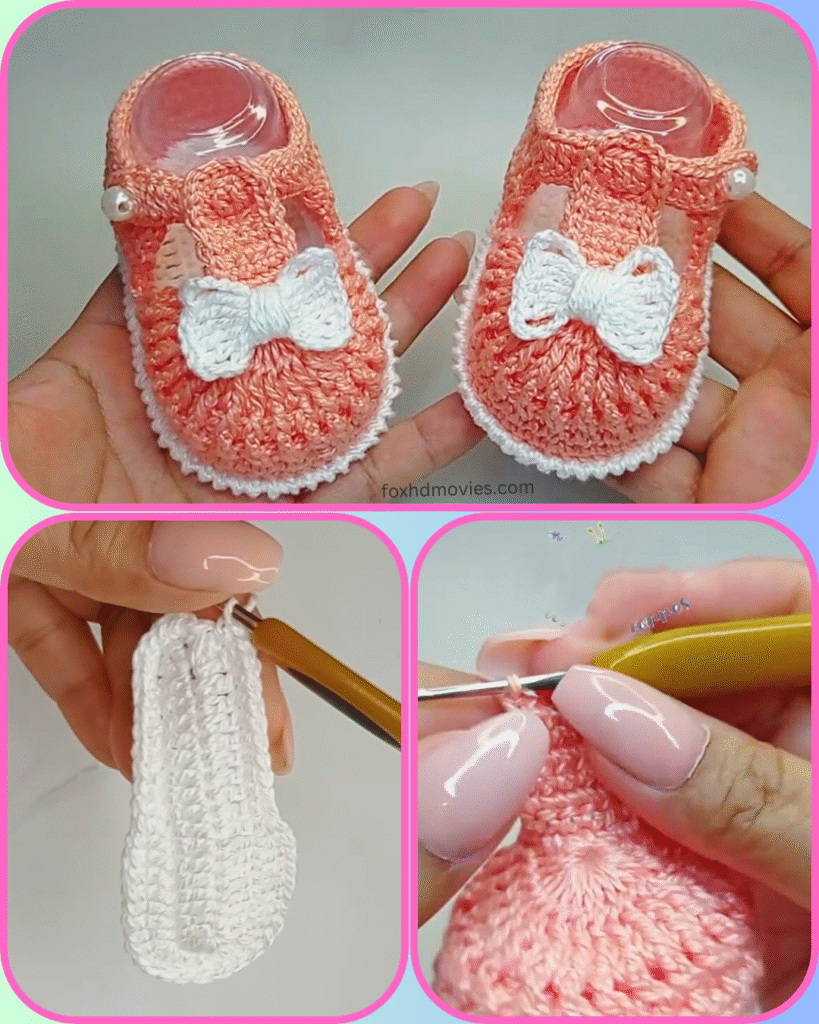
Get ready to adorn tiny feet with the most adorable handmade shoes! These charming baby Mary Jane shoes, featuring a beautiful textured stitch, a delicate crocheted bow, and a crisp white scalloped edge, are utterly irresistible. Perfect for any occasion, from playdates to special outings, they add a touch of handcrafted love to any baby’s outfit.
The peach/coral color in the picture is wonderfully cheerful, but imagine these in soft pastels, vibrant hues, or even classic white for a truly versatile pair!

Before we grab our hooks, let’s get ready:
- Skill Level: Intermediate. This pattern involves shaping the sole, working a textured stitch, and assembling multiple smaller components.
- Yarn Choice: For a baby’s delicate skin, choose a soft, lightweight baby yarn such as baby-weight acrylic (DK or Sport weight), cotton, or a cotton blend. You’ll need two contrasting colors (e.g., peach/coral for the main shoe and white for the details).
- Hook Size: This will depend on your chosen yarn. Aim for a hook size that creates a firm fabric for the sole and allows the textured stitch to be well-defined. (e.g., 3.0mm – 4.0mm).
- Gauge is Crucial! For baby shoes, gauge determines the finished size. Make a swatch of the sole section to ensure your booties will fit those precious little feet!
Let’s Gather Our Supplies!
Materials You’ll Need:
- Approx. 30-50 grams of baby yarn in your main color (e.g., peach/coral)
- Approx. 10-20 grams of baby yarn in your contrasting color (e.g., white)
- Crochet hook (e.g., 3.5mm, adjust for gauge)
- Stitch markers (helpful for sole shaping!)
- Yarn needle
- Scissors
- 2 small pearl beads (for the straps)
- Sewing needle and thread (to attach pearls)
Crochet Language Decoder (Abbreviations):
- ch: chain
- st(s): stitch(es)
- sl st: slip stitch
- sc: single crochet
- hdc: half double crochet
- dc: double crochet
- sk: skip
- sp: space
- BLO: back loop only
- sc2tog: single crochet 2 stitches together (decrease)
- V-st: V-stitch (dc, ch 1, dc) in indicated stitch or space
- [ ]: repeat instructions within brackets
- ( ): number of stitches at the end of the round/row
Gauge:
- Work the first few rounds of the sole with your main color yarn.
- Example Gauge: 16 sc and 16 rows = 4 inches (10 cm). Adjust hook size to match gauge.
Pattern Instructions (Bottom-Up Construction):
This pattern starts with the sole and works upwards. Size: 0-3 Months (Approx. 3.5 – 3.75 inches / 9-9.5 cm sole length) (Adjust starting chain and increase rounds for larger/smaller sizes)
Part 1: The Sole (Main Color Yarn – e.g., Peach/Coral)
- Ch 13.
- Rnd 1: Sc in 2nd ch from hook. Sc in next 10 ch. 3 sc in last ch. Working along the other side of the starting chain: Sc in next 10 ch. 2 sc in last ch. Join with sl st to first sc. (26 sts)
- Rnd 2: Ch 1 (does not count as st). 2 sc in first st. Sc in next 10 sts. 2 sc in next 3 sts. Sc in next 10 sts. 2 sc in next 2 sts. Join with sl st to first sc. (32 sts)
- Rnd 3: Ch 1. Sc in first st. 2 sc in next st. Sc in next 11 sts. 2 sc in next st. Sc in next st. 2 sc in next st. Sc in next 11 sts. 2 sc in next st. Sc in next st. Join with sl st to first sc. (38 sts)
- Rnd 4: Ch 1. Sc in first 2 sts. 2 sc in next st. Sc in next 12 sts. [2 sc in next st, sc in next 2 sts] twice. 2 sc in next st. Sc in next 12 sts. 2 sc in next st. Sc in last st. Join with sl st to first sc. (44 sts)
- Check your sole length here. It should be approximately 3.5 inches for 0-3 months.
- Do NOT fasten off.

Part 2: The Shoe Body (Main Color Yarn – e.g., Peach/Coral)
- Rnd 1 (Sides Set-up): Ch 1. Sc in the back loop only (BLO) of each st around. Join with sl st to first sc. (44 sts)
- This creates a neat ridge separating the sole from the upper.
- Rnd 2 (Textured Stitch): Ch 3 (counts as dc). Sk 1 st. [V-st (dc, ch 1, dc) in next st. Sk 2 sts]. Repeat [ ] around. Adjust skips at the end to fit the pattern (you might need to sk more or less at the very end). Join with sl st to top of beg ch 3.
- You should have approx. 14 V-stitches.
- Rnd 3: Ch 3. Work V-st into each ch-1 sp of V-st from previous round. Join with sl st.
- Rnd 4 (Toe Shaping): Ch 1. Sc in next 12 sts. [Sc2tog over V-st] 6 times (working over the entire V-stitch or into the ch-1 sp). Sc in next 12 sts. Join with sl st. (38 sts)
- The sc2tog stitches will decrease the bulk over the toe.
- Rnd 5: Ch 1. Sc in each st around. Join with sl st. (38 sts)
- Fasten off main color yarn. Weave in ends.

Part 3: The Strap (Main Color Yarn – e.g., Peach/Coral)
- Ch 15.
- Row 1: Sc in 2nd ch from hook, sc in next 12 ch. Ch 3 (this forms the button loop). Sk next 2 ch. Sl st in last ch. (13 sc + ch-3 loop)
- Adjust ch length for loop if your pearl bead is larger/smaller.
- Fasten off, leaving a long tail for sewing.
Part 4: The Crocheted Bow (White Yarn)
- Ch 10.
- Row 1: Hdc in 2nd ch from hook, hdc in each ch across. Ch 2, turn. (9 hdc)
- Rows 2-5 (or until desired bow height): Hdc in each hdc across. Ch 2, turn.
- Fasten off, leaving a long tail.
- Assemble Bow: Pinch the center of the rectangle tightly. Use the long tail to wrap around the pinched center several times, cinching it into a bow shape. Secure with a knot.
Part 5: The White Scalloped Edging (White Yarn)
- Attach white yarn with a sl st to the back center of the sole (Rnd 4 of sole).
- Rnd 1 (Scallops): Ch 1. Sc in same st. [Sk 1 st, (sc, 3 dc, sc) in next st, sk 1 st, sc in next st]. Repeat [ ] around. Adjust skips at the end if needed to finish the last scallop. Join with sl st to first sc.
- Fasten off white yarn. Weave in ends.

Part 6: Finishing & Assembly
- Attach the Strap:
- Place the shoe on a flat surface. Position the strap across the top of the foot, with the button loop end on the outside of the shoe.
- Using your yarn needle, securely sew the non-loop end of the strap to the inside top edge of the shoe on one side.
- Using a sewing needle and matching thread, securely sew a small pearl bead to the opposite side of the shoe, aligning with the strap’s loop.
- Attach the Crocheted Bow:
- Securely sew the white crocheted bow to the center top of the shoe’s toe, above the textured stitch.
- Weave in all remaining loose ends neatly.
- Repeat all steps for the second shoe!
Video tutorial
Your Sweet Mary Jane Booties Are Ready!
Congratulations! You’ve just created an absolutely charming pair of handmade baby shoes. These delicate little beauties are sure to be a treasured addition to any baby’s wardrobe.
Feel free to personalize your booties by choosing different yarn colors, adding a different type of bead or button, or even a tiny ribbon for a different look!
Don’t forget to share your finished booties! I’d love to see your unique color combinations and how you’ve made them your own. Tag me on social media or send me a picture!
Happy crocheting!


