by
by Hello, lovely crafters!
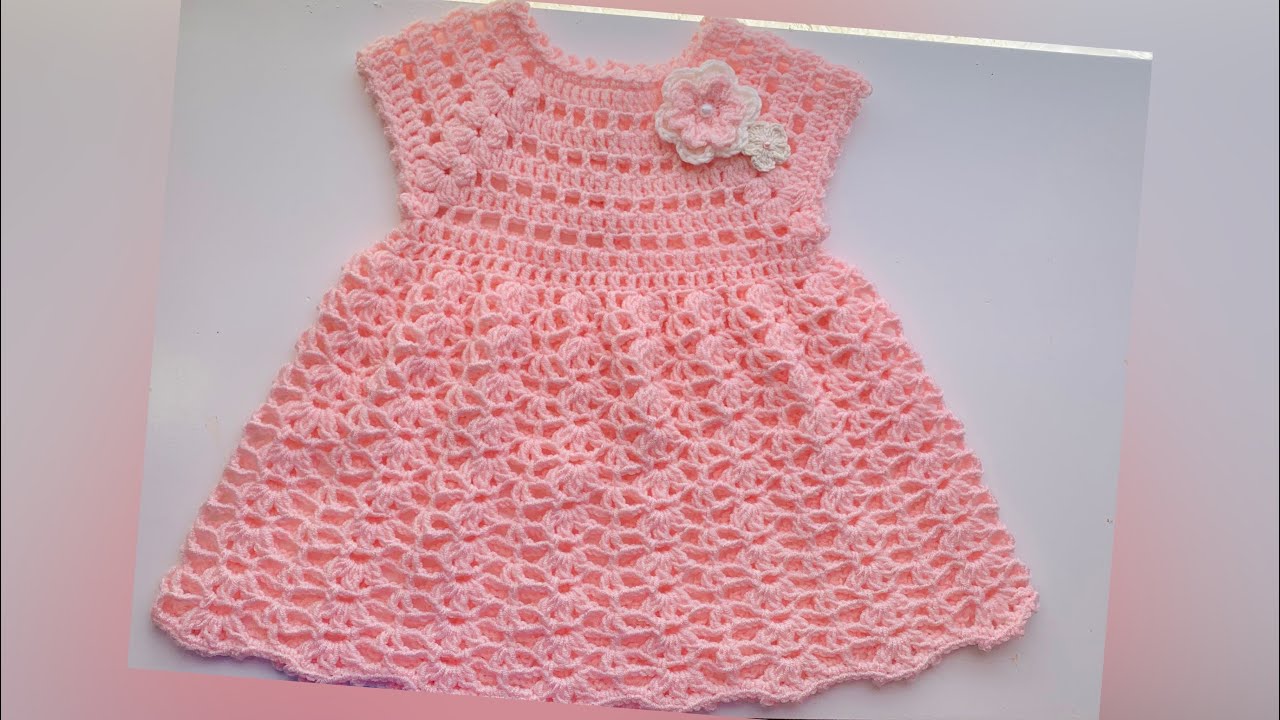
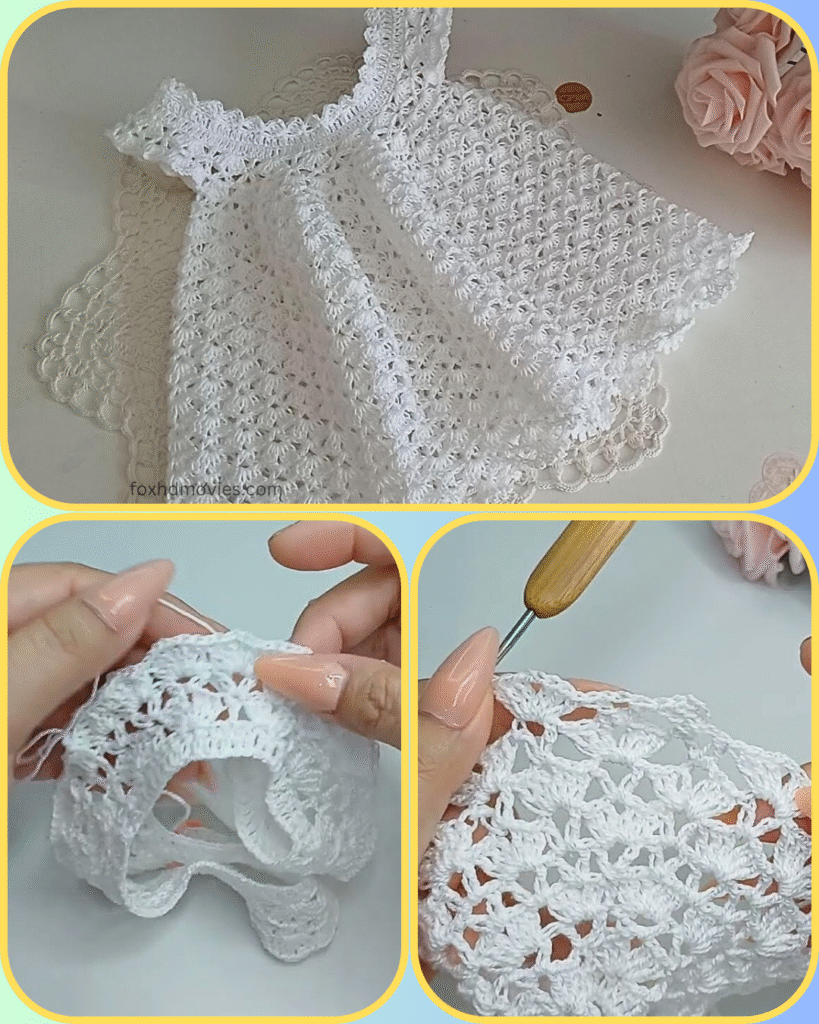
There’s nothing quite as precious as a handmade gift for a little one, and this delicate lacy baby dress is pure sweetness! With its intricate yet easy-to-learn stitch pattern and airy design, it’s perfect for baptisms, special occasions, or just because your little darling deserves something beautiful and soft.
Before we begin, here are a few important notes:
- Skill Level: Intermediate. While the main stitch is repetitive, shaping the yoke and working the lace pattern requires a bit of attention.
- Yarn Choice: For a baby dress, softness is key! Opt for a lightweight, soft yarn like baby-weight acrylic (DK or Sport weight), baby cotton, cotton blends, or bamboo yarn. These will be gentle on baby’s skin and create that lovely drape.
- Hook Size: This will depend on your yarn and desired fabric. For a lacy look, you might go up half a size from the yarn’s recommendation. Aim for a hook that gives you an open, airy fabric. (e.g., 3.0mm – 4.0mm).
- Gauge is Crucial! Especially for baby garments, getting the right gauge ensures the dress fits the intended size. Make a swatch!
Let’s Gather Our Supplies!
Materials You’ll Need:
- Approx. 150-250 grams of baby-weight yarn (DK or Sport weight) in your chosen color.
- Crochet hook (e.g., 3.5mm or 3.75mm, adjust as needed for gauge)
- Stitch markers (essential for the yoke!)
- Yarn needle
- Scissors
- 1-2 small buttons (for the back neck closure)
Crochet Language Decoder (Abbreviations):
- ch: chain
- st(s): stitch(es)
- sl st: slip stitch
- sc: single crochet
- hdc: half double crochet
- dc: double crochet
- sk: skip
- sp: space
- [ ]: repeat instructions within brackets
- ( ): number of stitches at the end of the row/round
Gauge:
- Work a swatch of the main lace pattern (after the yoke) to measure.
- Example Gauge: 5 V-stitches (or shells) and 7 rows = 4 inches (10 cm). Adjust hook size to match gauge.
Key Stitch Patterns:
A. Lace Shell/Fan Stitch (for Body & Sleeves): This stitch creates the lovely open pattern seen on the dress. The pattern in the image appears to be a (2 dc, ch 1, 2 dc) shell worked into chain spaces from the previous row/round.
Shell (2 dc, ch 1, 2 dc): Work 2 double crochet, chain 1, then 2 more double crochet all into the same stitch or chain space.
B. Neckline/Hem Edging: A simple small shell edging: (2 sc, ch 1, 2 sc) in a stitch, or (sc, ch 1, sc) as a small picot. For this dress, a simple shell or picot around the neckline looks perfect.

Pattern Instructions (Top-Down Construction):
This pattern starts from the neckline and works downwards. We’ll work the yoke flat initially to create a back opening for easy dressing, then join to work the body in the round.
Suggested Sizes (Newborn / 3-6 Months / 6-12 Months) This pattern is a general guide; adjust chain counts and increase rates for different sizes and to match your gauge.
1. The Yoke (Worked Flat)
- Starting Chain: Ch 56 (64 / 72).
- Row 1 (RS): Sc in 2nd ch from hook, sc in next ch. [Hdc in next ch, dc in next 2 ch, hdc in next ch, sc in next 2 ch]. Repeat [ ] 5 (6 / 7) more times. End with hdc in last ch. Ch 2 (counts as first hdc), turn. (55 / 63 / 71 sts)
- This first row creates a slight texture on the neckline edge. You can also just sc or hdc across.
- Row 2: Hdc in each st across. Ch 2, turn.
- Row 3 (Increase Row): Hdc in first st, [2 hdc in next st, hdc in next st] repeat to 2 sts before end, 2 hdc in next st, hdc in last st. Ch 2, turn. (Approx. 75 / 85 / 95 sts, depending on exact repeats).
- Alternatively, divide your stitches into sections for front, back, and sleeves, placing increases strategically at these points (e.g., [hdc until marker, (hdc, ch 1, hdc) in marker st] 4 times for corner increases).
- Continue working hdc rows, with increases on specific rows to shape the yoke. The image suggests a solid yoke. Work until the yoke measures approx. 3.5 (4 / 4.5) inches from the neckline, or until it can comfortably wrap around the baby’s chest and shoulders, with armholes open. Ensure your final row count allows for easy division.
- Typically, increases are done on every 2nd or 3rd row, distributing them evenly.
- Example Yoke Increases (simplified – adjust counts for your size):
- Row 3: Increase by approx. 20-24 sts
- Row 5: Increase by approx. 20-24 sts
- Row 7: Increase by approx. 20-24 sts
- End with an even number of stitches for the body.

2. Dividing for Body and Sleeves
This creates the armholes.
- Next Row (Joining): Ch 1 (does not count as st).
- Work hdc (or sc) across the stitches for the first back panel.
- Skip stitches for armhole: Ch 3 (4 / 5) (this will be the underarm chain). Sk the next X stitches (these are for the first sleeve).
- Work hdc (or sc) across the stitches for the front panel.
- Skip stitches for armhole: Ch 3 (4 / 5). Sk the next X stitches (for the second sleeve).
- Work hdc (or sc) across the stitches for the second back panel.
- Join with a sl st to the first st of the row to form a circle.
- Place a stitch marker at the beginning of this joined round.
3. The Body of the Dress (Lace Pattern)
Now we work in rounds to create the lacy skirt.
- Rnd 1 (Lace Set-up): Ch 3 (counts as first dc). Dc in same st. Ch 1, dc in next st. Sk 3 sts, (2 dc, ch 1, 2 dc) in next st (this is your first Shell). Repeat [Sk 3 sts, (2 dc, ch 1, 2 dc) in next st] around, working your shells into the hdc stitches and the underarm chains as needed. Join with a sl st to top of beg ch 3.
- Alternatively, if your stitch count is not perfectly divisible by 4, you might need to adjust the skips slightly to make it work.
- Make sure you have an even number of
(2 dc, ch 1, 2 dc)shells around the body.
- Rnd 2: Ch 3. Work (dc, ch 1, 2 dc) into the ch-1 sp of the first shell. [2 dc, ch 1, 2 dc] into the ch-1 sp of the next shell. Repeat [ ] around. Join with a sl st to top of beg ch 3.
- Rnds 3-X: Repeat Rnd 2 until the dress reaches your desired length (measure from shoulder to hem), leaving room for the final edging.
- The lace pattern in the image is quite dense. Ensure your shells are close enough to give that look.
- Fasten off.

4. The Sleeves (Lace Pattern)
Go back to each armhole.
- Attach yarn: Attach yarn with a sl st in the center of the underarm chain.
- Rnd 1 (Lace Set-up): Ch 3. Work (dc, ch 1, 2 dc) into the same chain space where you attached yarn. [Sk X sts, (2 dc, ch 1, 2 dc) in next st] around the armhole, working into the stitches of the yoke and the underarm chain. Join with a sl st to top of beg ch 3.
- Rnd 2: Ch 3. Work (dc, ch 1, 2 dc) into the ch-1 sp of the first shell. [2 dc, ch 1, 2 dc] into the ch-1 sp of the next shell. Repeat [ ] around. Join with a sl st to top of beg ch 3.
- Fasten off.
- Repeat for the second sleeve.
5. Edging (Neckline, Sleeves, Bottom Hem)
This adds a lovely finishing touch.
- Neckline: Attach yarn at the back opening of the neckline. Ch 1, sc evenly around the entire neckline, working 3 sc in the corners of the opening. Join with sl st.
- Next, add a picot or small shell edging: Ch 1, [sc in next st, ch 2, sl st in 2nd ch from hook (picot made)] repeat around. Or for a mini-shell: [Sk 1 st, (sc, ch 1, sc) in next st] repeat around. Join with sl st. Fasten off.
- Sleeves: Attach yarn at the underarm of each sleeve. Ch 1, sc evenly around. Join with sl st.
- Then add the same picot or mini-shell edging as the neckline. Fasten off.
- Bottom Hem: Attach yarn anywhere on the bottom hem. Ch 1, sc evenly around. Join with sl st.
- Then add the same picot or mini-shell edging as the neckline. Fasten off.
6. Finishing Touches
- Weave in all loose ends neatly using your yarn needle.
- Back Opening: Create a simple button loop with a ch 3-5 at the top corner of one back opening panel. Sew 1-2 small buttons onto the opposite back panel to align with the loop(s).
Video tutorial
Your Lacy Masterpiece is Complete!
Congratulations! You’ve just created a truly beautiful and delicate crochet baby dress. This timeless piece will be cherished for years to come.
Feel free to personalize your dress with a ribbon woven through the yoke, tiny beads (for older babies, securely sewn!), or even a small embroidered detail.
Don’t forget to share your finished dress! I’d love to see your color choices and how you’ve made it your own. Tag me on social media or send a picture!
Happy crocheting!