 by
by Hello fellow yarn enthusiasts!
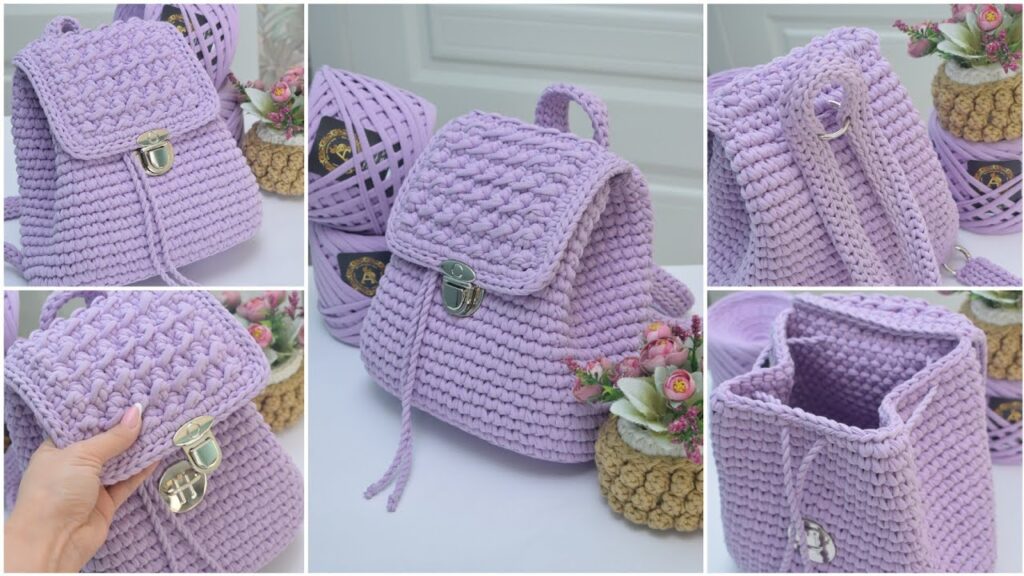
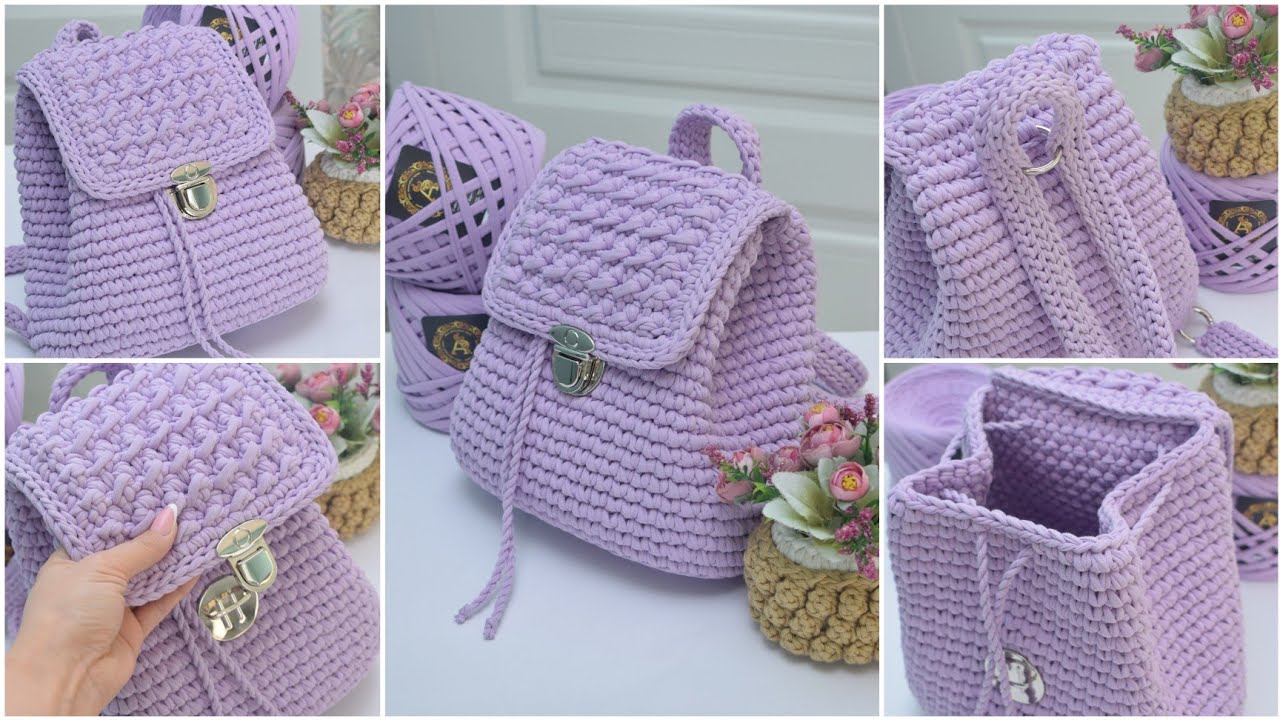
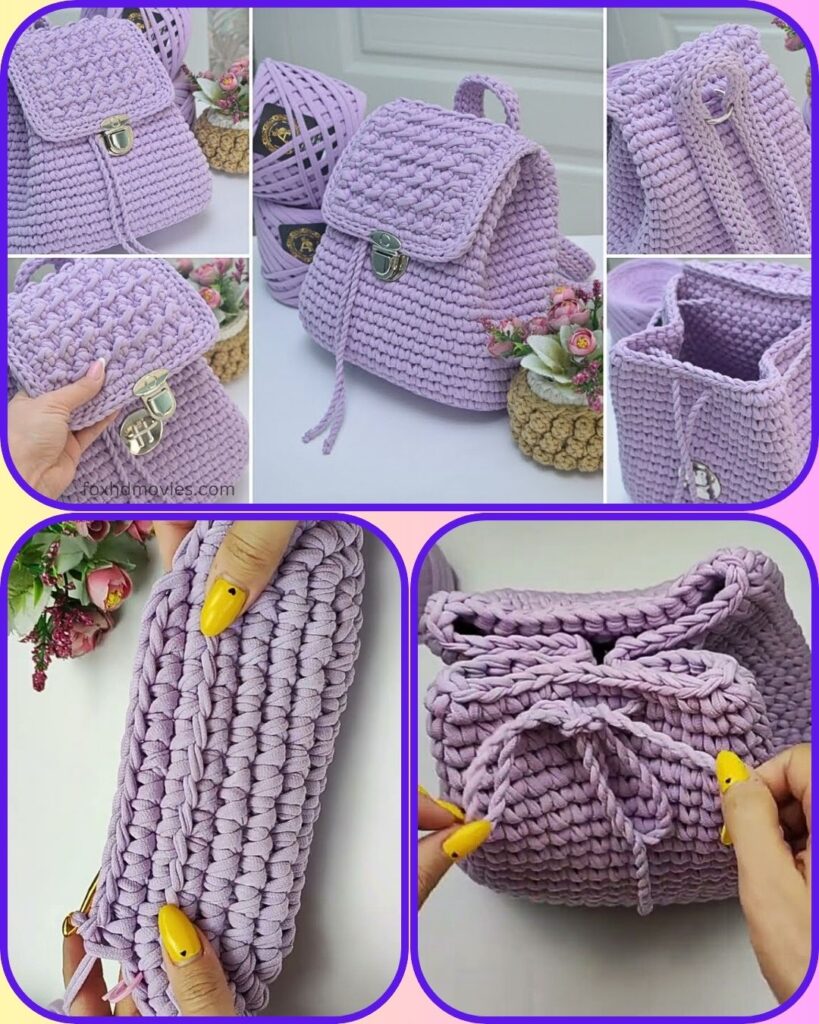
Get ready to carry your essentials in style with this absolutely charming crochet backpack! This “Lavender Dream Backpack” is not only beautiful but also incredibly practical, perfect for everyday use, a casual outing, or as a thoughtful handmade gift. The sturdy construction, delightful textured flap, and convenient drawstring closure make it a must-have accessory. Let’s dive in and create something truly special!
Difficulty Level: Intermediate (Adjust this based on the actual complexity of the flap stitch)
Materials You’ll Need:
- Yarn:
- Approx. [Yarn Quantity – e.g., 500-600g] of [Yarn Type, e.g., Super Bulky T-shirt Yarn] in your chosen color (e.g., Lavender)
- (Note: Yarn quantities can vary based on your tension and desired bag size. Always best to have a bit extra!)
- Crochet Hook: [Hook Size, e.g., 9.0mm (M/N)]
- Stitch Marker(s)
- Yarn Needle
- Scissors
- 1 Metal Turn Lock/Clasp (for the flap closure)
- 2 Metal D-rings or Rectangular Rings (for attaching backpack straps at the bottom)
- Optional: Fabric for lining, sewing needle and thread (if adding a lining).
Finished Dimensions (Approximate):
- Height: [e.g., 10 inches / 25 cm]
- Width: [e.g., 9 inches / 23 cm]
- Depth (Base): [e.g., 5 inches / 13 cm]
Gauge:
- Body: [e.g., 3 single crochets and 3 rows = 2 inches (5 cm) using a [Hook Size] hook.]
- Flap (textured stitch): [e.g., [X] of the textured stitch pattern = [Y] inches.] (Checking your gauge is crucial for your backpack to turn out the intended size and shape!)
Abbreviations (US Terms):
- ch – chain
- st(s) – stitch(es)
- sl st – slip stitch
- sc – single crochet
- inc – increase (2 sc in the same stitch)
- FO – fasten off
- rep – repeat
- BLO – back loop only
- FLO – front loop only
- [Specific Textured Stitch Abbreviation] – [Full description of your chosen textured stitch for the flap, e.g., “Puff st: (Yo, insert hook into st, yo, pull up loop) 3 times in same st, yo, pull through all 7 loops on hook.”]
Let’s Get Crocheting!
Notes:
- The main body of the backpack is worked in continuous rounds, from the bottom up. Do not join rounds unless specified. Use a stitch marker to keep track of your first stitch.
- [Add any other important notes about tension, stitch placement, or specific techniques for working with your chosen yarn type.]

Pattern:
1. Base of the Backpack (Worked in Main Color)
The base is typically an oval or rectangular shape.
- Chain: Ch [e.g., 18]
- Round 1: Sc in 2nd ch from hook, sc in next [e.g., 15] chs, 3 sc in last ch. Turn your work and continue on the other side of the chain: sc in next [e.g., 15] chs, 2 sc in last ch. (Total stitches: [e.g., 36])
- Round 2: 1 sc in first st, inc in next st, sc in next [e.g., 15] sts, inc in next 3 sts, sc in next [e.g., 15] sts, inc in last 2 sts. (Total stitches: [e.g., 42])
- Round 3: [e.g., Sc around, working 2sc in each of the 6 corner stitches from the previous round.] (Total stitches: [e.g., 48])
- Continue increasing in the corners as needed until your base reaches the desired length and width (e.g., 7-8 rounds). Ensure the final stitch count is suitable for the body.
- Last Base Round: Sc in the back loop only (BLO) around. This creates a neat ridge for the sides of the bag to build upon. (Total stitches: [Final stitch count from base])
2. Body of the Backpack (Worked in Main Color – Single Crochet)
Work the body in continuous rounds of single crochet.
- Round [e.g., 8]: Sc in each st around. (Total stitches: [Number of stitches from last base round])
- Repeat Round [e.g., 8] until the body of the backpack reaches your desired height before the drawstring channel, approximately [e.g., 8 inches / 20 cm] from the base.
3. Drawstring Channel and Top Edge
This section creates the openings for your drawstring.
- Round [e.g., 30 – Drawstring Channel]: Ch 1, (sc in next [e.g., 4] sts, ch 1, sk 1 st) repeat around. Join with sl st to first sc.
- Self-correction: The image shows small, evenly spaced holes for the drawstring.
- Round [e.g., 31]: Ch 1, sc in each sc and 1 sc in each ch-1 space around. Join with sl st to first sc.
- Round [e.g., 32]: Ch 1, sc in each st around. Join with sl st. FO.
4. Backpack Flap
This is the eye-catching part of the bag!
- Start: Ch [e.g., 20] (or desired width of flap, ensuring it’s slightly wider than the backpack opening).
- Row 1: Sc in 2nd ch from hook, sc in each ch across. (19 sts)
- Row 2: Ch 1, turn, [Begin working your specific textured stitch here. E.g., Work (sc, puff st) across, ending with sc. / Or simply work your specific textured stitch consistently across.]
- Row 3: Ch 1, turn, [Work next row of textured stitch pattern, or a plain sc row if your stitch pattern requires alternating.]
- Repeat these rows (Row 2 & 3, or consistent textured stitch rows) until the flap reaches your desired length, approximately [e.g., 6 inches / 15 cm].
- Edging (Optional but recommended for a clean finish): Ch 1, sc evenly around the entire flap, working 3 sc in each corner. Sl st to join. FO.
- Attach Flap: Using your yarn needle, securely sew the top edge of the flap to the top back of the backpack, just below the drawstring channel. Ensure it’s centered.

5. Top Handle
A small handle for easy grabbing.
- Ch [e.g., 15] (or desired length).
- Sc in 2nd ch from hook, sc in each ch across. (14 sts)
- Ch 1, turn, sc in each st across. (14 sts)
- Repeat last step for 1-2 more rows for desired thickness and sturdiness. FO.
- Securely sew the ends of the handle to the inside top back of the backpack, on either side of where the flap is attached, ensuring even spacing.
6. Backpack Straps (Make 2)
These straps look like dense, flat crocheted straps.
- Ch [e.g., 6] (or desired width for the strap).
- Row 1: Sc in 2nd ch from hook, sc in each ch across. (5 sts)
- Row 2: Ch 1, turn, sc in each st across. (5 sts)
- Repeat Row 2 until the strap reaches your desired length, approximately [e.g., 30-35 inches / 75-90 cm] for a comfortable fit. FO.
- Attachment:
- Top: Securely sew one end of each strap to the top back of the backpack, just beneath the flap attachment points, ensuring they are evenly spaced and reinforced.
- Bottom: Sew the D-rings (or rectangular rings) to the bottom corners of the bag’s back. Then, sew the other end of the strap to the D-ring, reinforcing well with extra stitches to ensure durability for carrying weight.

7. Drawstring Cord
This cord cinches the top of your backpack.
- Using your main color, create a long crocheted chain: Ch [e.g., 120-150] or desired length for your drawstring. Make it long enough to tie a secure knot or bow.
- Weaving: Starting from the front center of your bag, weave the crocheted chain through the holes created in the drawstring channel (Round [e.g., 30]). Weave in and out all the way around.
- Pull the ends even. You can tie a simple knot at each end to prevent fraying.
8. Hardware Attachment (Clasp)
- Following the manufacturer’s instructions, attach your chosen bag clasp (turn lock, push lock, etc.) to the center of the flap and the corresponding spot on the front body of the backpack. Ensure it’s centered and securely fastened.
Finishing Touches:
- Weave in all remaining loose ends securely on the inside of the backpack.
- Consider adding a fabric lining to your backpack for extra durability, to prevent small items from slipping through stitches, and to give it a more finished, professional look.