by
by 
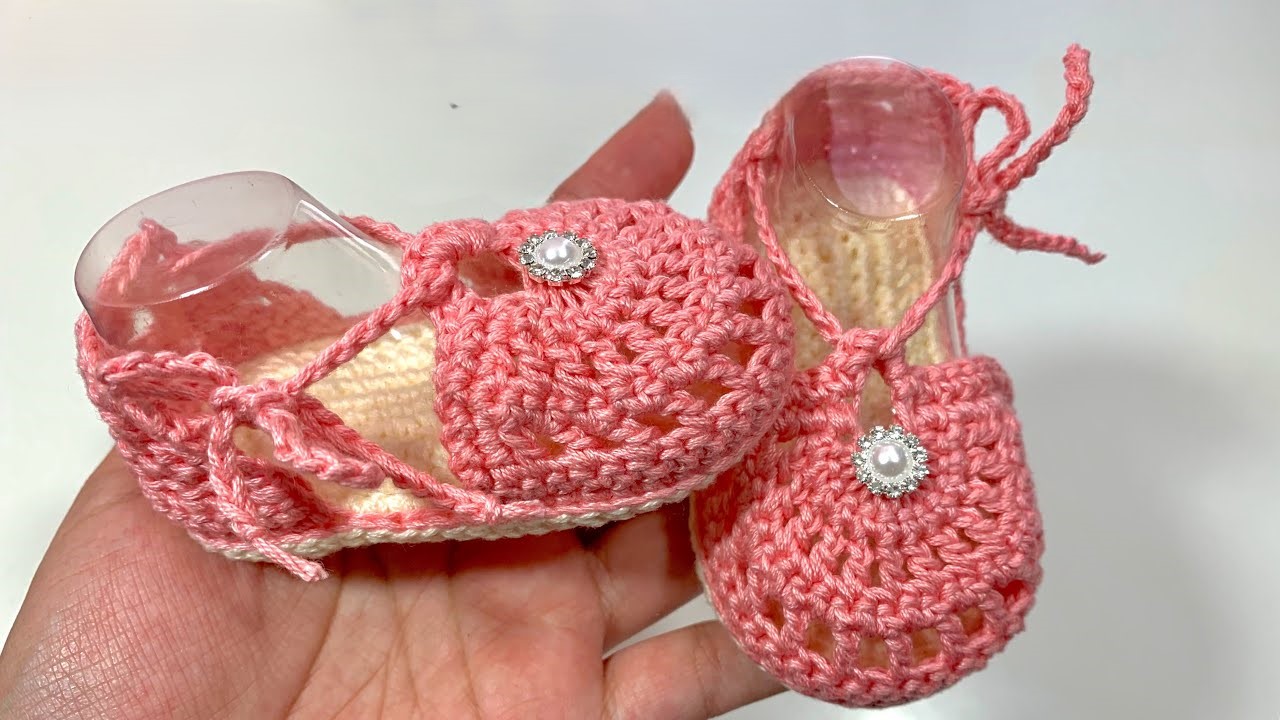
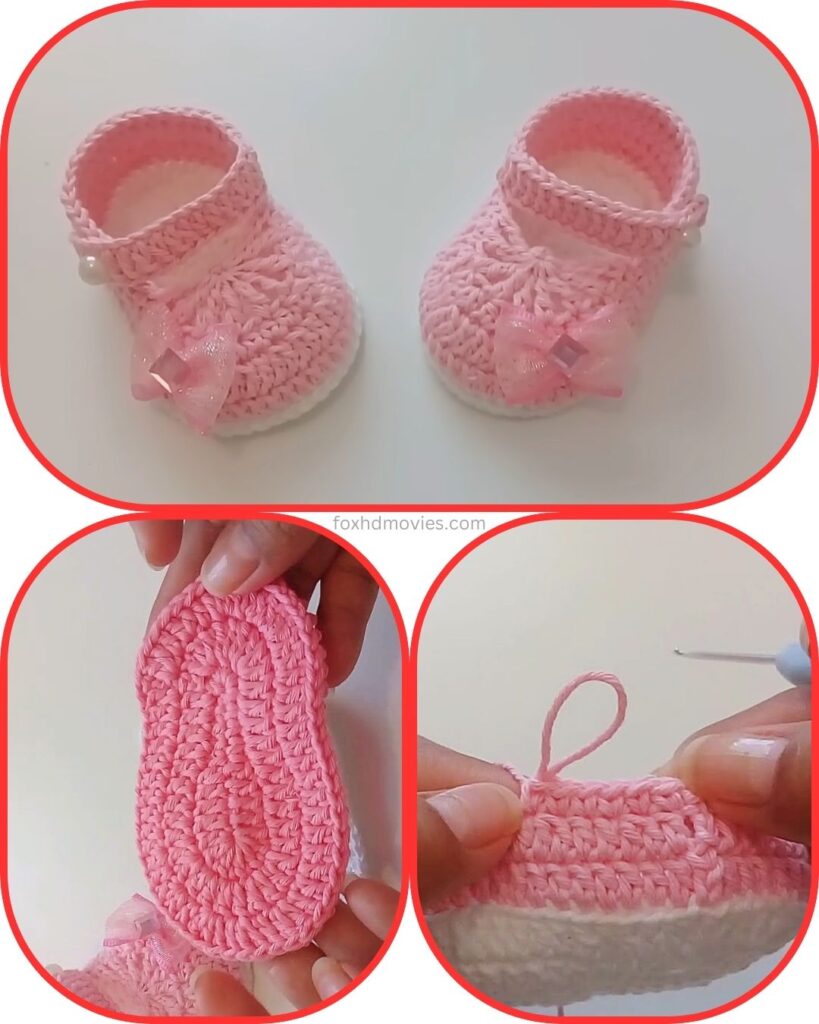
Welcome a new little one with these utterly adorable crochet baby booties! Featuring a beautiful textured stitch that resembles little ‘daisies’ or puffs, a delicate strap, and a sweet bow, these booties are the epitome of handmade charm. Perfect for baby showers, coming-home outfits, or just keeping tiny feet cozy and cute.
Skill Level: Easy to Intermediate (Familiarity with basic stitches, working in rounds, and simple increases/decreases is helpful.)
Materials:
- Yarn: DK (Light Worsted) weight yarn. Cotton or a soft acrylic yarn is recommended for baby comfort.
- Main Color (MC): Pink (or your chosen color) – approx. 40-60 yards.
- Sole Color (SC): White (or a contrasting color for the sole) – small amount, approx. 10-15 yards.
- Crochet Hook: Size G/6 (4.0 mm) or size needed to obtain gauge.
- Yarn Needle: For weaving in ends and attaching strap/bow.
- Scissors
- Stitch Markers: Very helpful for marking the start of rounds and increase points on the sole.
- Small Buttons or Pearl Beads: 2 for the straps (approx. 8-10 mm).
- Small Bows: 2 pre-made sheer bows or ribbon to tie your own.
Gauge (Crucial for Sizing!):
It is very important to achieve the correct sole length for your desired size. The stitch gauge for the upper isn’t as critical as the sole.
- Sole Gauge: After completing the sole section, measure its length. Adjust your hook size to meet the desired length from the sizing chart below.
- Example: For 0-3 months, your finished sole should measure around 3.5 inches.
Sizing Chart (Approximate Finished Sole Length):
| Size | Approx. Sole Length (inches) | Approx. Sole Length (cm) | Initial Chain (suggested) |
|---|---|---|---|
| 0-3 Months | 3.5 | 9 | Ch 10 |
| 3-6 Months | 4 | 10.5 | Ch 12 |
| 6-9 Months | 4.5 | 11.5 | Ch 14 |
Export to Sheets
- Note: If you want a larger size, increase your initial chain length by 2 stitches per size increment, and you may need to add an extra round to the sole and/or upper sections.

Abbreviations (US Crochet Terms):
- ch: chain
- sl st: slip stitch
- sc: single crochet
- hdc: half double crochet
- dc: double crochet
- inc: increase (work 2 sts in the same st)
- dec: decrease (work 2 sts together)
- BLO: back loop only
- FLO: front loop only
- sk: skip
- sp: space
- st(s): stitch(es)
- beg: beginning
- rep: repeat
- Puff St: Puff Stitch (see special stitch instructions below)
- MC: Main Color
- SC: Sole Color
- ( ): repeat instructions in parentheses a specified number of times
- [ ]: total stitches at the end of the round
Special Stitch: Puff Stitch (Puff St)
(YO, insert hook into st, YO, pull up a loop) 3 times in the same stitch (7 loops on hook). YO, pull through all 7 loops on hook. Ch 1 to secure (this securing chain often counts as part of the stitch for spacing).
Pattern for Darling Daisy Baby Booties (Make 2)
Part 1: The Sole (Make 2 per pair)
Work in continuous rounds, using a stitch marker to mark the first stitch of each round.
Using Sole Color (SC):
Round 1: Ch (refer to Sizing Chart for initial chain). Hdc in 3rd ch from hook. Hdc in next (initial chain – 3) stitches. In the last ch, work 3 hdc (this turns the corner). Now working down the other side of the chain, hdc in next (initial chain – 3) stitches. In the very last ch (where you worked your first hdc), work 2 hdc. [Total stitches will vary based on initial chain]. Place stitch marker in the first hdc of the next round.

Round 2: 2 hdc in the first st (inc). Hdc in each st along the side of the sole until you reach the 3 hdc you worked in the last chain. (2 hdc in next st) 3 times (inc for the toe end). Hdc in each st along the other side until you reach the 2 hdc at the heel end. (2 hdc in next st) 2 times (inc for the heel end). Move stitch marker to the first st of the current round.
Round 3: (2 hdc in next st) 2 times (inc). Hdc in each st along the side. (2 hdc in next st, hdc in next st) 3 times (inc for the toe end). Hdc in each st along the other side. (2 hdc in next st, hdc in next st) 2 times (inc for the heel end). Move stitch marker to the first st of the current round.
Check your sole length against the Sizing Chart. If it’s too small, you may need an additional increase round, similar to Round 3, but with more stitches between increases. If too large, consider a smaller hook or fewer initial chains.
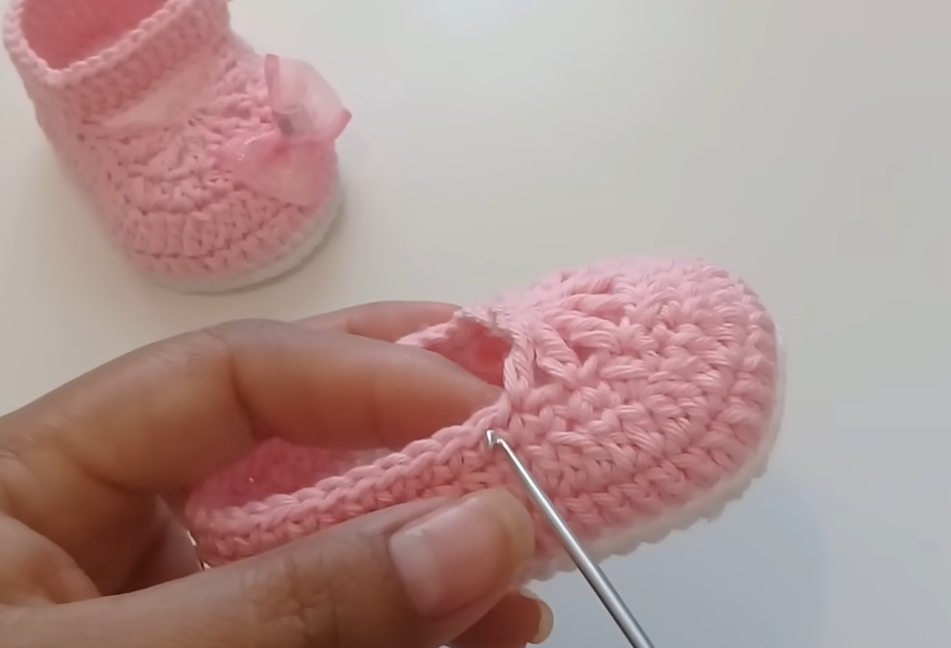
Sl st to the first hdc of your last sole round to join. Fasten off and weave in ends for one sole. For the second sole, do not fasten off; you’ll continue with the upper.
Part 2: Building the Sides & First Upper Row
Using Main Color (MC), continuing from the second sole:
Round 1 (Creating the “Wall”): Ch 1. Sc in the BLO of each st around. Sl st to the first sc to join. This round creates a nice, defined edge that makes the slipper stand up.
Round 2: Ch 1. Sc in each st around. Sl st to the first sc to join. This forms the solid base before the decorative stitch.

Part 3: The Daisy/Puff Stitch Top
This is the beautiful textured part of the slipper. You’ll need to define the front toe section.
Finding the Toe Section: Count the total stitches in your current round. Find the center stitch at the toe end. For example, if you have 40 stitches, the center toe might be around stitch 20. Mark about 10-12 stitches centered around this point. This will be your “toe section” where you work the puff stitches.
Round 3 (Puff Stitch Row): Ch 1. Sc in each st until you reach the beginning of your marked toe section (e.g., 14-16 sc). *Puff St in next st, sk next st.* Repeat from * to * across the marked toe section. (You should have approximately 5-6 puff stitches, depending on your size and chosen toe width). Sc in each remaining st around the back and sides of the slipper until you reach the beginning of the round. Sl st to the first sc to join. This round creates the delightful texture on the top of the foot.
Round 4 (Solid Row above Puffs): Ch 1. Sc in each sc until you reach the Puff Stitch section. Sc in the top of each Puff St (the stitch where you pulled through all loops) and in each ch-1 space between the puff stitches. Sc in each remaining sc around the back and sides of the slipper. Sl st to the first sc to join. This round provides a solid base for the next step.
Part 4: Shaping the Foot Opening & Strap Base
Now we’ll shape the opening for the foot and start creating the strap.
Round 5 (Toe Decreases & Opening): Ch 1. Sc in each sc until you reach the center front of the slipper (where the toe puffs are). This will be roughly 15-18 sc from the start of the round. Now, work decreases across the front toe for shaping: (Sc2tog) 3-4 times. Sc in each remaining sc around the slipper. Sl st to the first sc to join. This round starts to close the front opening and curves the toe.
Round 6 (Top Edge): Ch 1. Sc in each st around the entire opening of the shoe (including the decreased toe section). Sl st to the first sc to join. This creates a neat edge for the foot opening.
Part 5: The Ankle Strap
This strap goes across the top of the foot.
Attaching the Strap: The strap is created and then attached. Look at your shoe; decide which side the strap will come from (usually the outer side) and which side the button will be sewn to (inner side).
Strap (Using MC): With the correct side of the shoe facing you (where the strap will originate), count back a few stitches from the center back of the shoe opening (approximately 5-7 stitches). Attach MC yarn with a sl st. Ch 15-20 (adjust length to comfortably reach the other side of the foot when pulled across). Sc in 2nd ch from hook and in each ch across. [14-19 sc] Fasten off, leaving a long tail for sewing.
Attaching the Strap: Sew the other end of the strap securely to the corresponding point on the opposite side of the slipper, ensuring it’s not too tight or too loose across the baby’s foot. Sew a small button or pearl bead onto the side of the slipper where the strap will fasten. The picture shows a pearl bead on the strap itself, which is then looped over the button. You can also create a small ch loop at the end of the strap to go over the button.
Part 6: Finishing Touches
- Weave in all remaining yarn ends securely.
- Attach the pre-made sheer bows or ribbon bows to the center front of the slipper, over the toe puff section, as seen in the picture. Sew them on securely with your yarn needle.
- Make sure both shoes are as identical as possible.
Video tutorial
Congratulations! You’ve just created an absolutely darling pair of crochet baby booties. These are sure to be a treasured item for any little one!