by
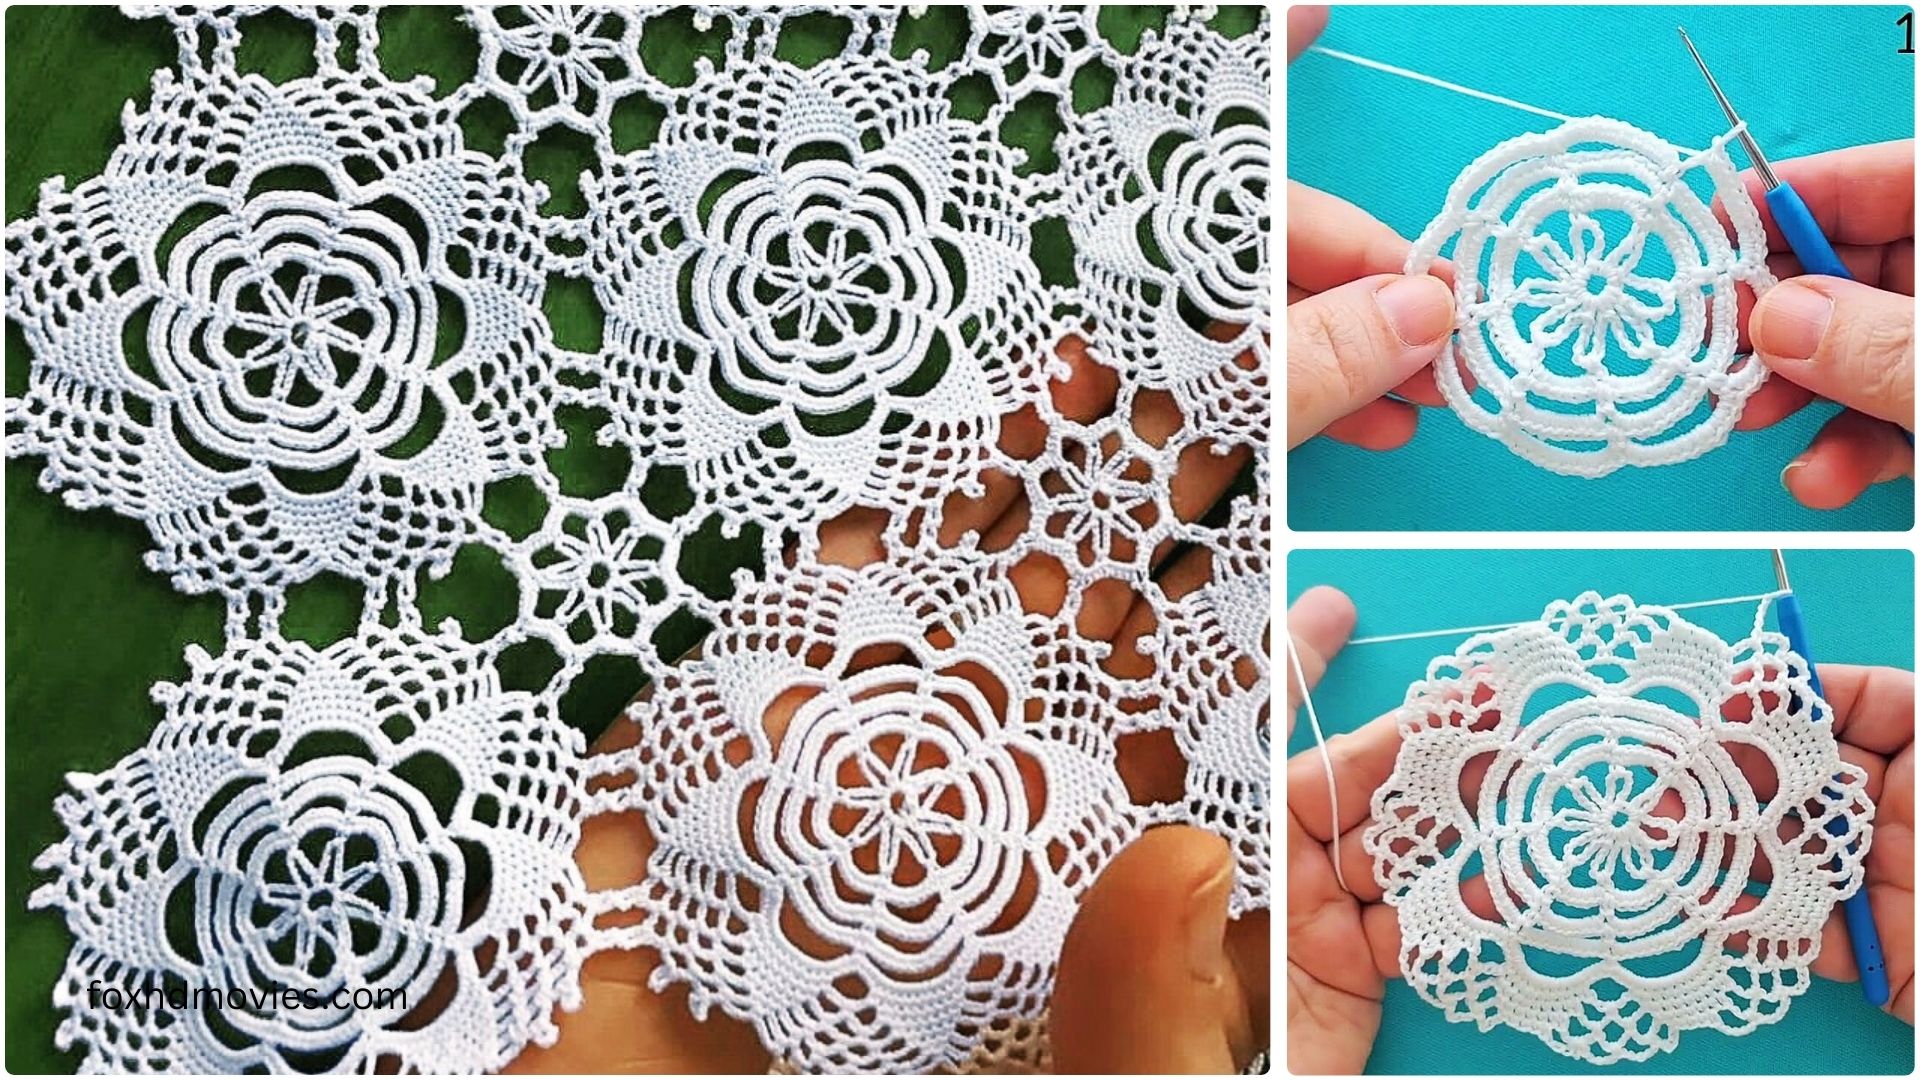
by Looking to elevate your crochet projects with a touch of modern elegance? This “Tile Square Motif” pattern is your answer! Unlike traditional granny squares, this design creates a beautiful, raised texture that resembles intricate tiles, making it perfect for stylish blankets, cushion covers, bags, and more. It combines simple stitches in a clever way to achieve its unique look.

Skill Level: Intermediate Beginner / Easy (requires careful stitch placement)
Materials:
- Worsted weight yarn in your desired colors. A solid color will highlight the texture, but a variegated yarn could also be interesting. For the example look, choose a main color and a contrasting color if you want to emphasize the “grout” lines.
- Crochet hook size H/8 (5.0 mm) or size needed to obtain gauge
- Yarn needle for weaving in ends
- Scissors
- Stitch markers (highly recommended for marking corners and beginning of rounds)
Gauge:
After Round 5, your motif should measure approximately 5 inches square. Adjust your hook size if needed. Achieving gauge is important for consistent sizing if you plan to join multiple squares.
Abbreviations (US Crochet Terms):
- ch: chain
- sl st: slip stitch
- sc: single crochet
- hdc: half double crochet
- dc: double crochet
- tr: treble crochet (or triple crochet)
- FPdc: front post double crochet (worked around the post of the specified stitch from the front)
- BPdc: back post double crochet (worked around the post of the specified stitch from the back)
- sp: space
- st(s): stitch(es)
- beg: beginning
- rep: repeat
- YO: yarn over
Let’s Create a Stylish Tile!
Part 1: The Foundation (Color A – Inner Tile)
We’ll start with the central “tile” element.
Round 1: With Color A, ch 4, sl st to join into a ring. (Alternatively, use a magic ring for a tighter center.) Ch 3 (counts as first dc), 15 dc in the ring. Sl st to the top of the beg ch-3 to join. (16 dc)
Round 2: Ch 3 (counts as first dc). Dc in the same st. (This is your first increase). *2 dc in next st.* Repeat from * to * 14 more times. Sl st to the top of the beg ch-3 to join. (32 dc)
Fasten off Color A and weave in the ends.
Part 2: Defining the Tile Edges (Color B – “Grout” Lines)
Now we’ll introduce a contrasting color to create the distinctive “grout” or outline effect. This round will also start shaping our square.
Round 3: Join Color B with a sl st into any dc of Round 2. Ch 1 (does NOT count as a stitch). Sc in the same st. *Ch 2. Skip next st, sc in next st.* Repeat from * to * around. Sl st to the first sc to join. (16 sc, 16 ch-2 sps)
Round 4: Sl st into the first ch-2 sp. Ch 3 (counts as first dc). In the same ch-2 sp, work (2 dc, ch 3, 3 dc). This is your first corner! Place a stitch marker in the ch-3 corner space. *Ch 1. In the next ch-2 sp, work 3 dc. Ch 1. In the next ch-2 sp, work 3 dc. Ch 1. In the next ch-2 sp, work (3 dc, ch 3, 3 dc). This is your next corner! Place a stitch marker in the ch-3 corner space.* Repeat from * to * two more times. Ch 1. In the next ch-2 sp, work 3 dc. Ch 1. In the last ch-2 sp, work 3 dc. Ch 1. Sl st to the top of the beg ch-3 to join. Fasten off Color B and weave in ends. You should have 4 corners (3dc, ch 3, 3dc) and 8 sets of 3dc along the sides.

Part 3: Building the Raised Texture (Color A – Outer Tile)
Switch back to Color A to build the raised “tile” effect. This is where the magic happens with front post stitches!
Round 5: Join Color A with a sl st into any ch-3 corner sp. Ch 3 (counts as first dc). In the same ch-3 sp, work (2 dc, ch 3, 3 dc). This is your first corner! Move your stitch marker to the new ch-3 corner space. *Dc in next dc (of the 3dc cluster). FPdc around the post of the next dc (of the 3dc cluster). Dc in the next dc (of the 3dc cluster). Ch 1. Dc in next dc (of the 3dc cluster). FPdc around the post of the next dc (of the 3dc cluster). Dc in the next dc (of the 3dc cluster). Ch 1. In the next ch-3 corner sp, work (3 dc, ch 3, 3 dc). This is your next corner! Move your stitch marker to the new ch-3 corner space.* Repeat from * to * two more times. Dc in next dc. FPdc around the post of the next dc. Dc in the next dc. Ch 1. Dc in next dc. FPdc around the post of the next dc. Dc in the next dc. Ch 1. Sl st to the top of the beg ch-3 to join.

You should now see the distinct raised texture on the 2nd dc of each 3dc cluster along the sides.
Part 4: Finalizing the Square (Color A – Outer Tile)
One more round to solidify the square shape and prepare it for joining.
Round 6: Sl st into the next 2 dc and into the first ch-3 sp (corner). Ch 3 (counts as first dc). In the same ch-3 sp, work (2 dc, ch 3, 3 dc). This is your new corner! Move your stitch marker to the new ch-3 corner space. *Dc in each of the next 3 dc (of the corner group). Ch 1. Dc in each of the next 3 sts (over the FPdc cluster). Ch 1. Dc in each of the next 3 sts (over the FPdc cluster). Ch 1. Dc in each of the next 3 dc (of the next corner group). In the next ch-3 corner sp, work (3 dc, ch 3, 3 dc). This is your next corner! Move your stitch marker to the new ch-3 corner space.* Repeat from * to * two more times. Dc in each of the next 3 dc. Ch 1. Dc in each of the next 3 sts. Ch 1. Dc in each of the next 3 sts. Ch 1. Sl st to the top of the beg ch-3 to join.
Fasten off and weave in all remaining ends securely. Give your square a gentle block if needed to help the texture pop and ensure it lays flat.
Congratulations! You’ve created a unique and stylish Crochet Tile Square Motif!
Video Tutorial
Tips for Perfect Tiles & Project Ideas:
- Blocking is Key: Especially with textured squares, blocking will help your motif lay flat, square up perfectly, and truly show off the raised texture.
- Yarn Choice: Smooth, mercerized cotton or acrylic yarns will best show off the stitch definition for this pattern.
- Color Play:
- Using a light color for the inner tile (Rounds 1, 2, 5, 6) and a slightly darker, contrasting color for the “grout” (Rounds 3, 4) will really make the tile effect pop.
- For a subtle look, use just one color throughout. The texture will still be beautiful.
- Experiment with a variegated yarn for the “tile” parts and a solid for the “grout.”
- Joining Methods:
- Invisible Join: A mattress stitch or slip stitch join through the back loops only will create very subtle seams, making your joined squares truly look like a tiled surface.
- Single Crochet Join: Creates a slightly raised “grout” line between squares, which can further enhance the tile effect.
- Project Ideas:
- Modern Afghan/Throw: Join multiple squares for a contemporary blanket.
- Cushion Cover: Make two squares and join them for a stylish pillow.
- Wall Hanging: Create a few squares and join them with a simple border.
- Table Runner/Placemats: A series of squares can make elegant dining accessories.
Enjoy creating your stunning “tiled” crochet projects! Happy hooking!