by
by 
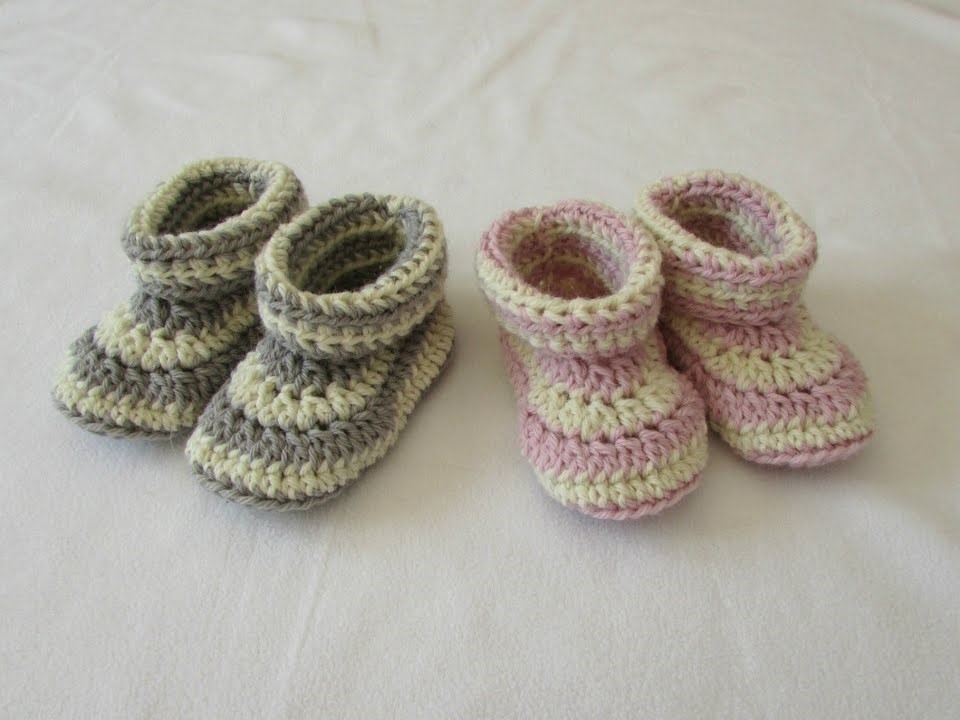
These delightful crochet baby shoes, crafted with the warmth of wool, are perfect for keeping little feet cozy and comfortable. The natural fibers of wool provide excellent insulation and breathability, making them ideal for delicate skin. This pattern is designed to be achievable for crocheters of various skill levels, resulting in a truly special handmade item.
Skill Level: Easy to Intermediate (depending on chosen stitch details)
Materials:
- DK or worsted weight wool yarn in your desired colors (ensure it’s a soft wool suitable for baby wear) – you’ll need small amounts.
- Crochet hook size G/6 (4.0 mm) or size recommended for your chosen yarn weight. Adjust if needed to obtain gauge.
- Yarn needle for weaving in ends.
- Scissors.
- Stitch markers (optional, but helpful for keeping track of rounds).
- Optional: Small buttons, decorative wooden beads, or leather cord for fastening.
Gauge:
While gauge isn’t strictly critical for baby shoes, it’s helpful to have a general idea. Aim for approximately 18-20 stitches and 24-26 rows in single crochet (sc) or half double crochet (hdc) to measure 4 inches square. Adjust your hook size if needed to match this gauge.
Finished Size:
This pattern is written for approximately 0-3 months (sole length around 3 inches). Adjustments for slightly larger sizes will be noted.
Important Note on Wool: When choosing your wool yarn, opt for superwash merino or other wools specifically labeled as soft and suitable for babies. Avoid scratchy or heavily textured wools.
Abbreviations (US Crochet Terms):
- ch: chain
- sl st: slip stitch
- sc: single crochet
- hdc: half double crochet
- dc: double crochet (used for shaping or decorative elements)
- st(s): stitch(es)
- beg: beginning
- rep: repeat
- inc: increase (work 2 stitches in the same stitch)
- dec: decrease (work 2 stitches together)
- BLO: back loop only
- FLO: front loop only
Video tutorial
Let’s Get Started on these Woolen Treasures!
Part 1: Crafting the Woolen Sole (Make 2)
We’ll begin by creating the foundation of our cozy shoes – the woolen sole.
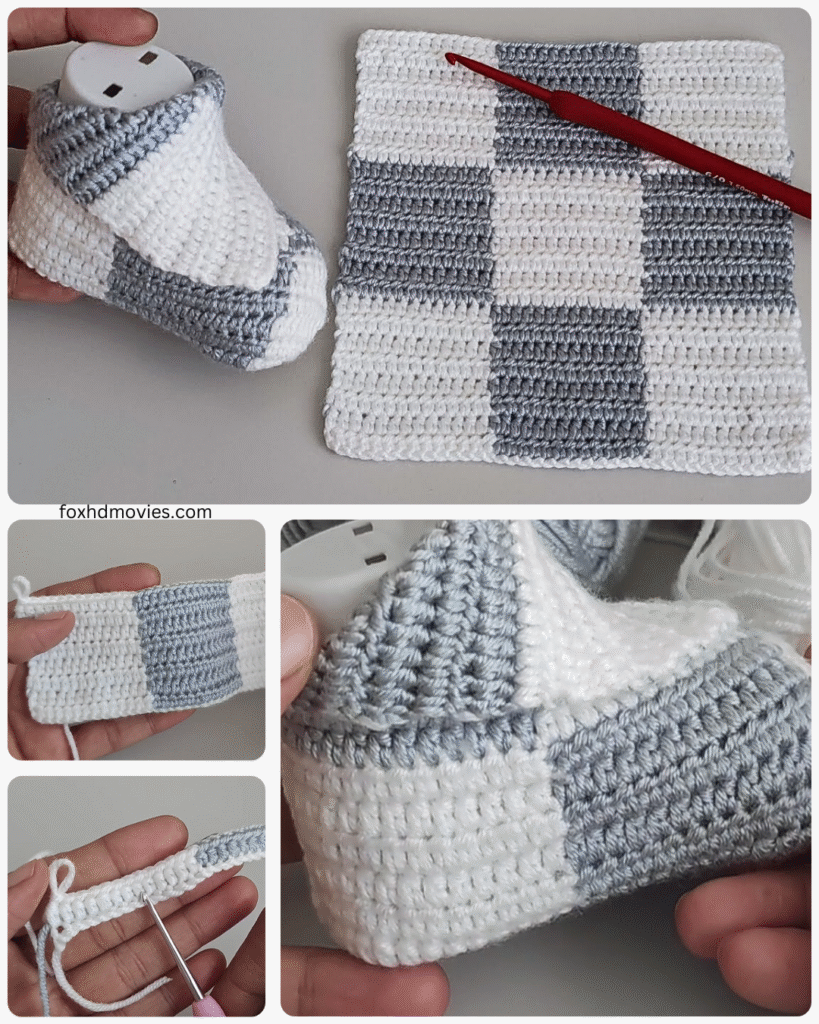
Round 1: Ch 9. In the 2nd ch from the hook, sc 1. Sc in the next 6 ch. In the last ch, work 3 sc. Now working on the other side of the chain, sc in the next 6 ch. Sc in the last ch (where you started the first sc). Sl st to the first sc. (18 sts)
Round 2: Ch 1, sc in the same st. Sc in the next 7 sts. Inc in the next 3 sts. Sc in the next 7 sts. Inc in the last 2 sts. Sl st to the first sc. (23 sts)
Round 3: Ch 1, sc in the same st. Sc in the next 8 sts. (Sc 1, inc) repeat 3 times. Sc in the next 8 sts. (Inc, sc 1) repeat 2 times. Sl st to the first sc. (28 sts)
Round 4: Ch 1, sc in the same st. Sc in the next 9 sts. (Sc 2, inc) repeat 3 times. Sc in the next 9 sts. (Inc, sc 2) repeat 2 times. Sl st to the first sc. (33 sts)
For a slightly larger sole (approx. 3-6 months, 3.5 inches): Add one more round, following the increasing pattern: Ch 1, sc in the same st. Sc in the next 10 sts. (Sc 3, inc) repeat 3 times. Sc in the next 10 sts. (Inc, sc 3) repeat 2 times. Sl st to the first sc. (38 sts)
Fasten off the first woolen sole and weave in the end. Make a second woolen sole, but do not fasten off after the last round.
Part 2: Building the Woolen Sides of the Shoe
Now, using the second sole, we’ll create the upward curve of the shoe sides, working with the lovely texture of our wool yarn.
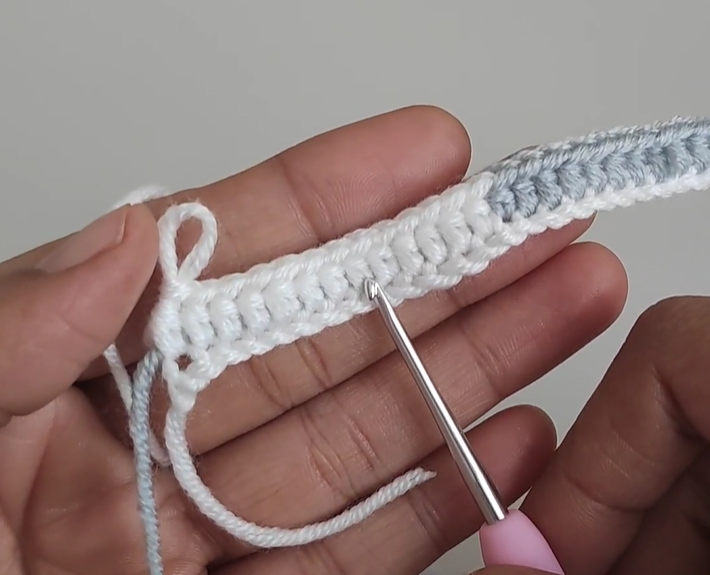
Round 1: Ch 1, sc in the BLO of each st around. Sl st to the first sc. (33 or 38 sts) – Working in the back loops creates a nice ridge and helps form the shape.
Round 2: Ch 1, sc in each st around. Sl st to the first sc. (33 or 38 sts)
Rounds 3-6 (or until desired height): Repeat Round 2. The number of rounds here will determine how high the sides of your woolen shoe will be. Adjust to your preference. If you’re incorporating color changes, do so at the beginning of a new round after the slip stitch.
Optional Woolen Texture: For added warmth and a beautiful texture, you can work these rounds in half double crochet (hdc) instead of single crochet.
Part 3: Shaping the Woolen Toe
Let’s shape the front of our woolen shoe to create a comfortable and rounded toe.

Round 7: Ch 1, sc in the next 10 (or 12 for larger size) sts. Now we’ll work decreases to shape the toe. (Sc 1, dec 1) repeat 4 times. Sc in the remaining 11 (or 13 for larger size) sts. Sl st to the first sc. (29 or 34 sts)
Round 8: Ch 1, sc in the next 9 (or 11 for larger size) sts. (Dec 1) repeat 4 times. Sc in the remaining 10 (or 12 for larger size) sts. Sl st to the first sc. (25 or 30 sts)
Round 9: Ch 1, sc in the next 8 (or 10 for larger size) sts. (Dec 1) repeat 3 times. Sc in the remaining 8 (or 10 for larger size) sts. Sl st to the first sc. (22 or 27 sts)
Fasten off and weave in the end of the second woolen shoe.
Part 4: Crafting a Woolen Ankle Strap (Make 2)
To ensure a secure and cozy fit, we’ll create woolen ankle straps.
- With your chosen wool yarn, ch 20 (adjust the length as needed to comfortably wrap around the baby’s ankle).
- Starting in the 2nd ch from the hook, sc in each ch across. (19 sc)
- Fasten off and weave in the ends.
- Repeat to make a second woolen strap.

Alternative Woolen Strap: For a softer, more flexible strap, you can work a chain of the desired length and then single crochet back down the chain.
Part 5: Attaching the Woolen Straps
- Position the woolen strap on the side of the shoe, towards the back. Ensure it will comfortably wrap around the ankle without being too tight.
- Using your yarn needle and wool yarn, securely sew one end of the strap to the side of the shoe.
- Repeat on the other side of the same shoe.
- Do the same for the second woolen shoe.

Part 6: Choosing and Adding Woolen Fasteners (Optional)
Here are some lovely woolen-friendly options for fastening:
- Woolen Button Loops and Buttons: Crochet a small loop at the end of the strap using chain stitches and a slip stitch. Sew a complementary button (wooden or a cute baby-safe button) to the opposite side of the shoe.
- Woolen Ties: Instead of a solid strap, create two sets of chains (using your wool yarn) on each side of the shoe opening. These can be tied together to secure the shoe. You can add small woolen pom-poms to the ends of the ties for a sweet touch.
- Leather Cord: For a rustic and natural look, you can sew small loops onto the sides of the shoe and use a soft leather cord to lace them up.
Finishing Touches for Your Woolen Creations:
- Weave in all yarn ends securely, ensuring they are hidden within the woolen fabric.
- You can add small, securely attached woolen embellishments like tiny crocheted flowers, leaves, or simple embroidered details using your wool yarn.
Caring for Your Woolen Baby Shoes:
- Hand wash gently in cool water with a mild detergent specifically designed for wool.
- Avoid harsh squeezing or twisting.
- Roll in a towel to remove excess water and lay flat to dry away from direct heat.

Tips for Awesome Woolen Baby Shoes:
- Yarn Choice is Key: Select a soft, baby-friendly wool that won’t irritate delicate skin. Superwash wool is a good option as it’s easier to care for.
- Tension: Maintain even tension throughout your project to ensure a consistent and professional look.
- Seams: When joining pieces or changing colors, strive for neat and inconspicuous seams.
- Symmetry: Take your time to ensure both woolen shoes are as identical as possible.
- Safety First: Double-check that any fasteners or embellishments are securely attached and pose no risk to the baby.
Congratulations on creating your very own awesome pair of woolen crochet baby shoes! These warm and snuggly wonders will keep those little feet happy and cozy in style. Enjoy the rewarding process and the adorable result!