by
by 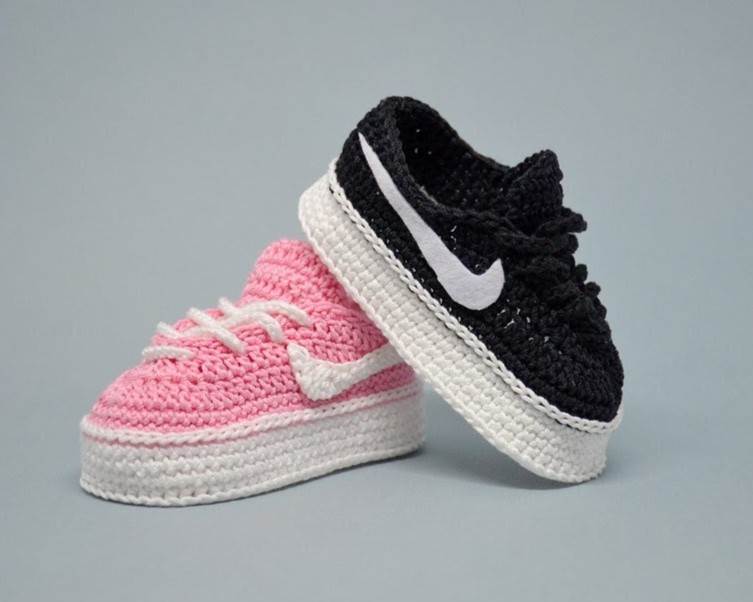
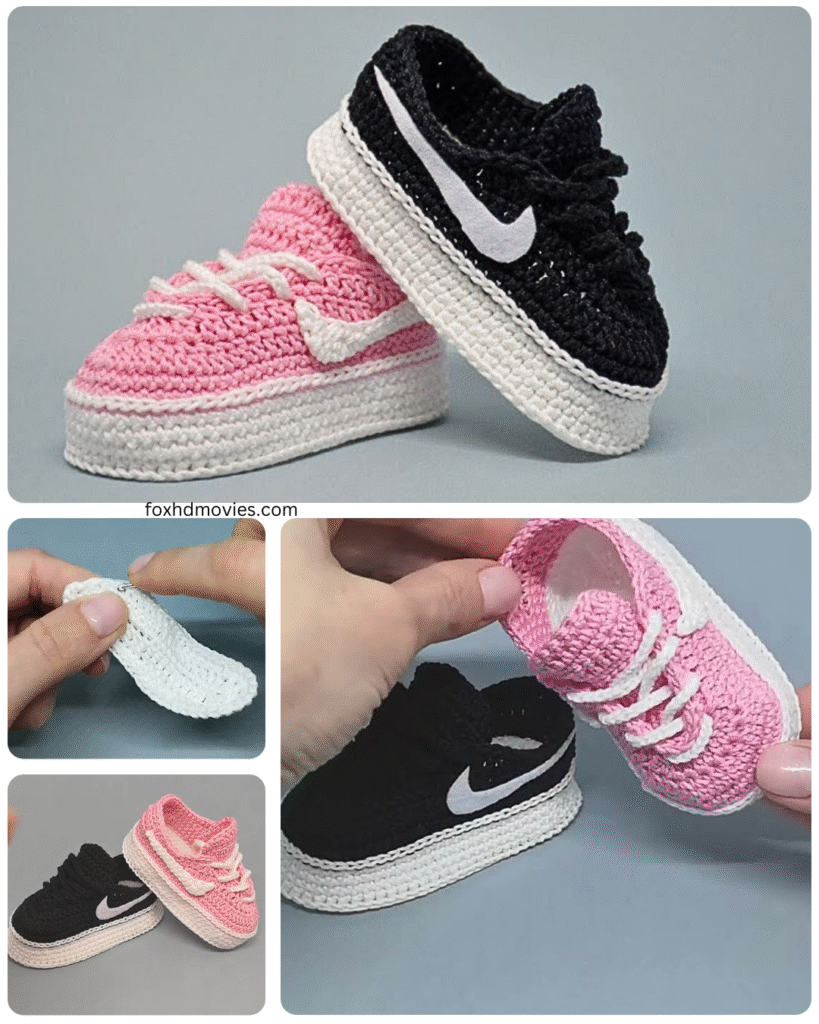
Hey there, fellow yarn enthusiasts! If you’re looking for a project that’s equal parts adorable and rewarding, you’ve come to the right place. Today, we’re diving into the wonderful world of miniature footwear and learning how to crochet the most charming baby sneakers you’ve ever seen.
Whether you’re a seasoned crocheter or just dipping your toes into the craft, this detailed pattern will guide you step-by-step to create these tiny treasures for the little one in your life (or perhaps as a heartwarming gift!). Get ready to unleash your creativity and make something truly special.
Why Crochet Baby Sneakers?
Before we jump into the nitty-gritty, let’s talk about why these little kicks are such a fantastic project:
- Unbeatable Cuteness: Seriously, is there anything sweeter than tiny shoes? They add an extra dose of charm to any baby outfit.
- Personalized Touch: You can customize the colors, stripes, and even add embellishments to match any style or preference.
- Thoughtful Gift: Handmade gifts carry a special sentiment. Crocheted baby sneakers are a unique and heartfelt present for baby showers, newborns, or just because.
- Satisfying Project: These work up relatively quickly and offer a great sense of accomplishment once you see those adorable little shoes taking shape.
- Perfect for Scraps: Got some leftover yarn from other projects? Baby sneakers are a fantastic way to use up those odds and ends.
What You’ll Need: Your Crochet Arsenal
Before we start stitching, let’s gather our supplies. Here’s what you’ll need:
- Yarn: Choose a soft and baby-friendly yarn in your desired colors. Cotton or a soft acrylic blend is ideal. You won’t need much – think small amounts of your main color, sole color, and any accent colors.
- Crochet Hook: The recommended hook size will depend on your yarn weight. Check your yarn label for guidance. A common size for baby items is around a 3.5mm (E/4) or 4mm (G/6) hook.
- Scissors: For snipping yarn ends.
- Tapestry Needle (Yarn Needle): For weaving in those loose ends neatly.
- Stitch Markers: These little helpers are crucial for keeping track of your rounds and stitches, especially when working in the round.
- Measuring Tape: To ensure your sizing is accurate.
- (Optional) Buttons or Small Decorative Elements: For adding extra flair to your sneakers.
Getting Started: Understanding the Anatomy of a Baby Sneaker
Our pattern will typically involve crocheting the following parts:
- Sole: The foundation of the sneaker.
- Upper: The main body that covers the foot.
- Toe Cap: The rounded front part of the shoe.
- Heel: The back part that supports the heel.
- Ankle Cuff: The part that goes around the baby’s ankle.
- Laces or Straps (Optional): For a more authentic sneaker look or to help keep the shoes on.
Video tutorial
The Pattern: Step-by-Step Instructions
(Remember to specify which size this pattern is for – e.g., Newborn to 3 months. Include notes on how to adjust sizing.)
Abbreviations (US Crochet Terms Used):
- ch = chain
- sl st = slip stitch
- sc = single crochet
- hdc = half double crochet
- dc = double crochet
- inc = increase (2 sc in the same stitch)
- dec = decrease 1 (sc2tog – single crochet two stitches together)
- BLO = back loop only
- FLO = front loop only
- rep = repeat
- rnd = round
1. The Sole (Make 2)
- Round 1: Ch 10 (or desired length for the sole). Sc in the 2nd ch from the hook and in the next 7 chs. 3 sc in the last ch. Working on the other side of the chain, sc in the next 7 chs. 2 sc in the last ch. Sl st to the first sc to join. (20 sts)
- Round 2: Ch 1. Inc in the first sc, sc in the next 7 sc, inc in the next 3 sc, sc in the next 7 sc, inc in the next 2 sc. Sl st to the first inc to join. (26 sts)
- Round 3: Ch 1. Sc in the first sc, inc in the next sc, sc in the next 8 sc, (sc, inc) rep 3 times, sc in the next 8 sc, inc in the next sc, sc in the last sc. Sl st to the first sc to join. (32 sts)
- (Continue increasing rounds as needed for your desired size. The goal is to create an oval shape for the sole.)
- Final Sole Round: Ch 1. Sc in each st around. Sl st to the first sc to join. Fasten off.

2. The Upper
- Join your main color yarn to any stitch on the last round of the sole.
- Round 1: Ch 1. Sc in BLO of each st around. Sl st to the first sc to join. (32 sts)
- Round 2: Ch 1. Sc in each st around. Sl st to the first sc to join. (32 sts)
- Round 3: Ch 1. Sc in the first 8 sts, hdc in the next 8 sts, dc in the next 8 sts, hdc in the next 8 sts. Sl st to the first sc to join. (32 sts)
- Round 4: Ch 1. Sc in the first 8 sts, hdc in the next 8 sts, dc in the next 8 sts, hdc in the next 8 sts. Sl st to the first sc to join. (32 sts)
- (Adjust the number of rounds here to achieve the desired height of the upper.)
3. Shaping the Toe
- Round 5: Ch 1. Sc in the first 8 sts. Now we’ll start decreasing to shape the toe. (Sc2tog) rep 8 times. Sc in the last 8 sts. Sl st to the first sc to join. (24 sts)
- Round 6: Ch 1. Sc in the first 6 sts, (sc2tog) rep 6 times, sc in the last 6 sts. Sl st to the first sc to join. (18 sts)
- Round 7: Ch 1. Sc in the first 5 sts, (sc2tog) rep 4 times, sc in the last 5 sts. Sl st to the first sc to join. (14 sts)
- Fasten off, leaving a long tail for sewing the toe closed.

4. Closing the Toe
- Thread your tapestry needle with the long tail. Weave the needle through the remaining stitches at the toe and pull tight to close the opening. Secure the yarn and weave in the end.
5. The Heel
- Join your main color yarn to the back of the upper (opposite the toe seam).
- Row 1: Ch 1. Sc in the next 10-12 sts (adjust for size). Turn.
- Row 2-X: Ch 1. Sc in each st across. Turn. (Repeat until the heel reaches your desired height.)
- Fold the heel flap in half and slip stitch the sides together to create the back of the sneaker. Fasten off and weave in the ends.
6. The Ankle Cuff (Optional)
- Join your main color or a contrasting color yarn to the top edge of the upper.
- Work a round of single crochet (or your preferred stitch) around the opening. You can add a few increases if needed for a comfortable fit.
- You can work a few more rounds for a taller cuff. Fasten off and weave in the ends.
7. Laces or Straps (Optional)
- Laces: Create a long chain with your desired color. Weave it through the front of the sneaker.
- Straps: Chain a desired length. Attach one end to the side of the sneaker with a slip stitch. Crochet back down the chain and attach the other end with a button or a secure stitch. You can add a loop on the other side for the button to fasten.
8. Embellishments (Optional)
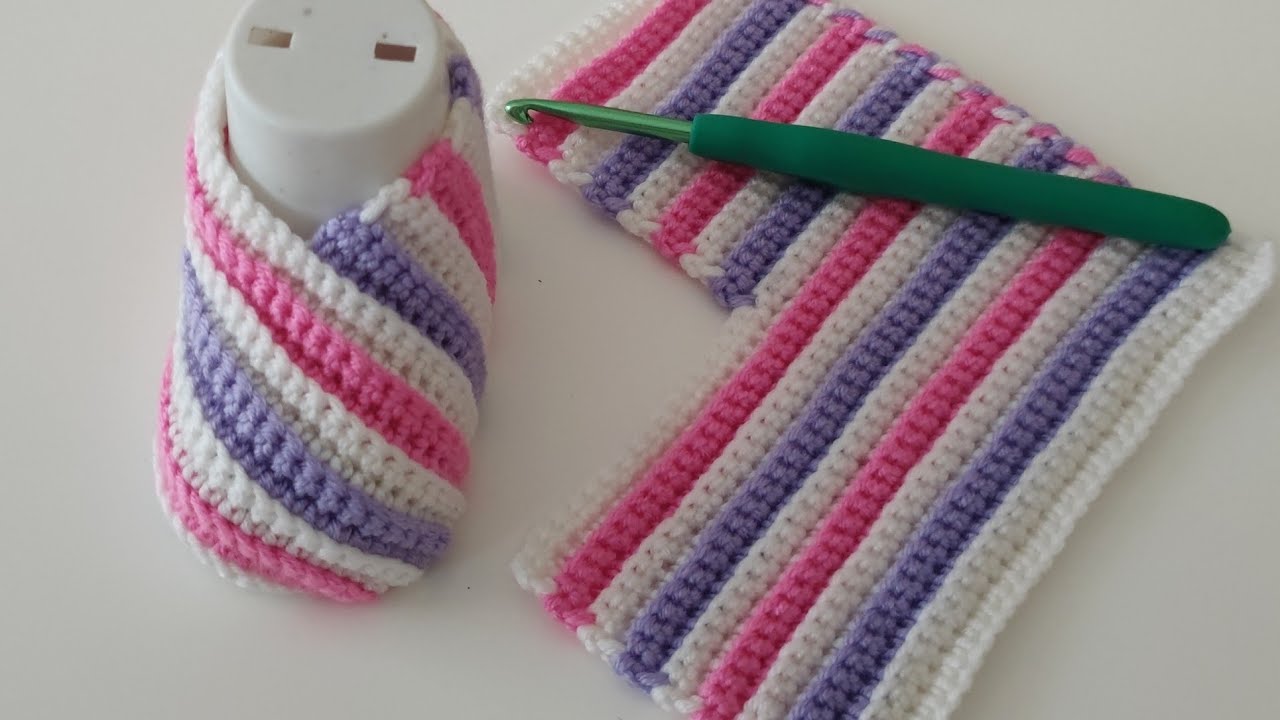
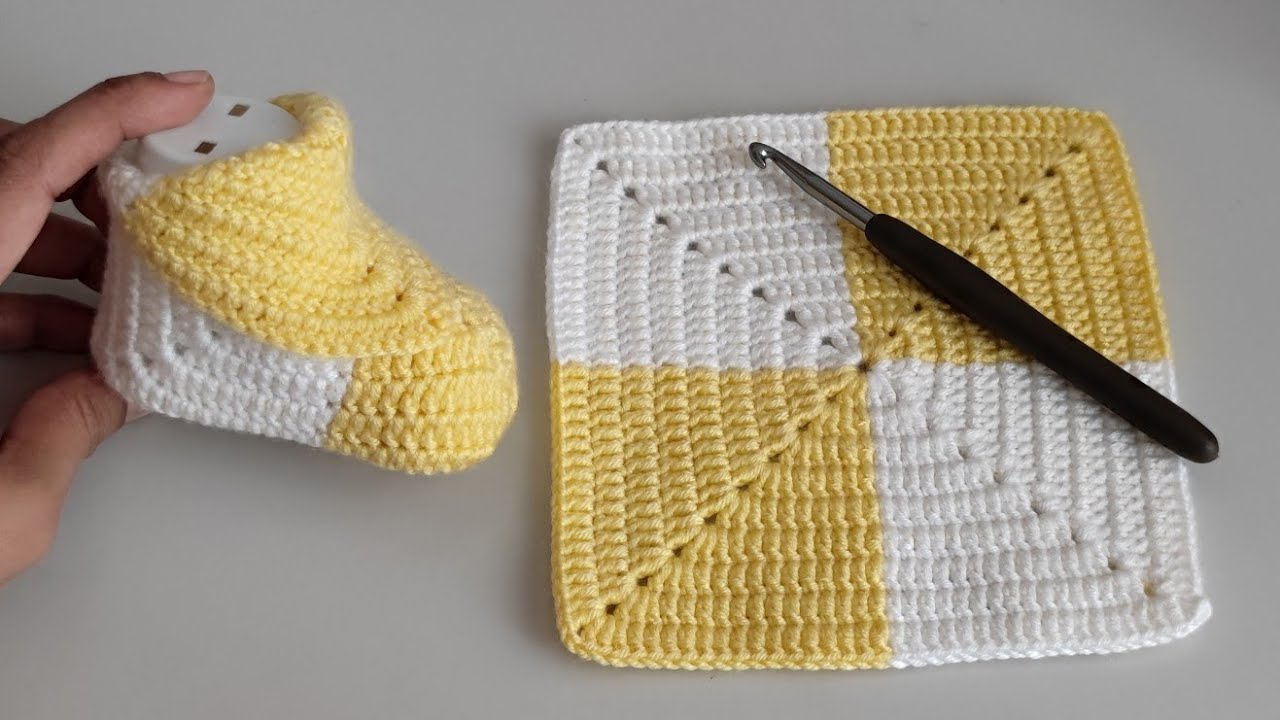
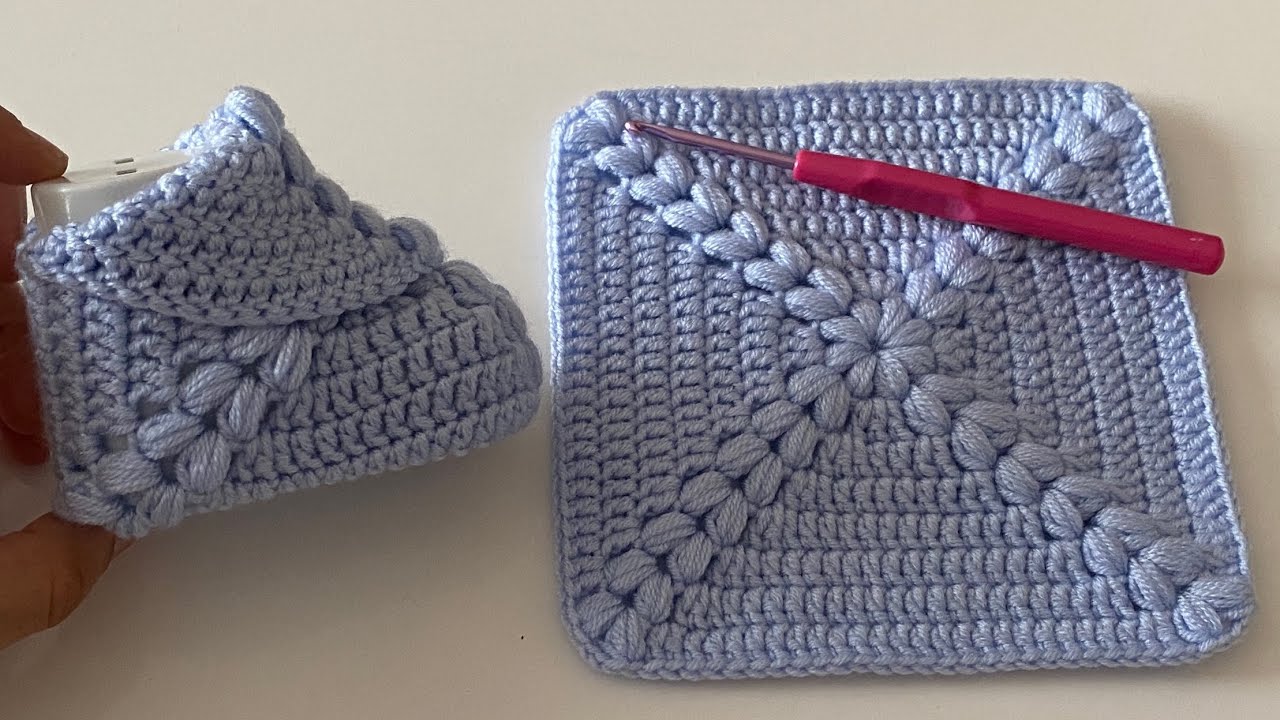
- Get creative! You can add stripes, appliques, embroidered details, or small buttons to personalize your baby sneakers.

Tips for Success:
- Gauge is Key: While exact gauge isn’t critical for baby items, try to maintain consistent tension throughout your work to ensure both sneakers are the same size.
- Use Stitch Markers: They are your best friend, especially when working in the round.
- Count Your Stitches: Double-checking your stitch counts at the end of each round will help prevent mistakes.
- Don’t Be Afraid to Adjust: Every baby is different! Feel free to adjust the number of rounds or stitches to achieve the perfect fit.
- Weave in Ends Securely: This will ensure your beautiful work doesn’t unravel.
Show Off Your Tiny Creations!
Congratulations, you’ve just crocheted a pair of adorable baby sneakers! Now it’s time to admire your handiwork. These little shoes make wonderful photo props, cherished keepsakes, and practical (yet oh-so-cute) footwear for little ones.
We’d love to see your creations! Share your finished baby sneakers on social media using #[YourBrandName]BabySneakers or tag us @[YourSocialMediaHandle].
Happy crocheting!