by
by 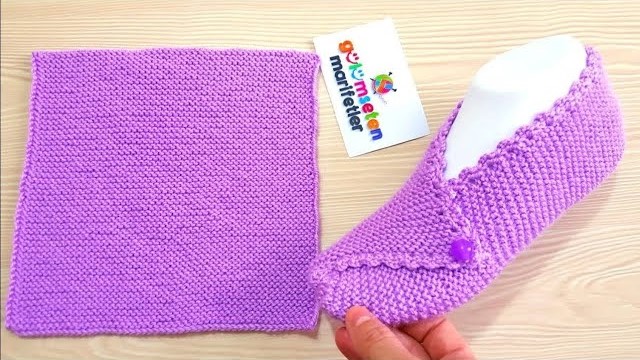
Hello fellow knitting enthusiasts! Are you craving warm, comfortable slippers but looking for a project that’s straightforward and satisfying? Look no further! Today, we’re diving into the wonderful world of knitting slippers from a simple rectangle. Yes, you read that right! By knitting a basic rectangle and with a few clever folds and seams, you can create a snug and stylish pair of slippers that will keep your toes toasty all season long.
This project is perfect for beginners who are comfortable with basic knit and purl stitches, as well as seasoned knitters looking for a quick and easy gift or personal treat. So, grab your favorite cozy yarn and let’s transform a humble rectangle into a haven for your feet!
What You’ll Need:
- Worsted Weight Yarn: Choose a yarn that feels soft and warm against your skin. Wool, a wool blend, or a sturdy acrylic will work well. You’ll need approximately 200-250 yards for a pair of average-sized women’s slippers.
- Knitting Needles: Size US 8 (5.0 mm) or the size needed to obtain the gauge.
- Scissors: For snipping your yarn.
- Tapestry Needle: For seaming the slippers.
- Measuring Tape: To ensure your rectangle is the correct size.
- Stitch Markers (optional but helpful): To mark the center point for folding.
Understanding the Construction: From Flat to Foot-Shaped
The beauty of these slippers lies in their simple construction. We’ll knit a rectangle, and then through strategic folding and seaming, we’ll shape it into a cozy foot covering. The key is to get the dimensions of your rectangle right, which will depend on your foot size.
Sizing Guide (Approximate):
These measurements are a guideline for an average women’s foot. It’s always best to measure your own foot for the most accurate fit.
- US Women’s Size 6-7: Rectangle approximately 20 inches long x 10 inches wide.
- US Women’s Size 8-9: Rectangle approximately 22 inches long x 11 inches wide.
- US Women’s Size 10-11: Rectangle approximately 24 inches long x 12 inches wide.
Gauge (Approximate):
While gauge isn’t critical for slippers, aiming for approximately 4 stitches and 6 rows in 1 inch in garter stitch will give you a slipper with a nice density. Adjust your needle size if needed.
Video tutorial
The Pattern: Knitting Your Cozy Rectangles (Make 2)
We’ll be working in garter stitch (knitting every row) for a squishy and comfortable fabric that won’t curl.
- Cast On: Cast on the number of stitches needed for the width of your rectangle based on your desired size and gauge. For example, if your gauge is 4 stitches per inch and you want a 10-inch wide rectangle, cast on 40 stitches.
- Knit Every Row (Garter Stitch): Knit every stitch on every row until your piece reaches the desired length according to the sizing guide for your foot. For example, for a US Women’s size 6-7, you’ll knit until your piece is approximately 20 inches long.
- Bind Off: Once your rectangle reaches the desired length, bind off all stitches loosely.
- Make Two: Repeat steps 1-3 to create a second identical rectangle for the other slipper.

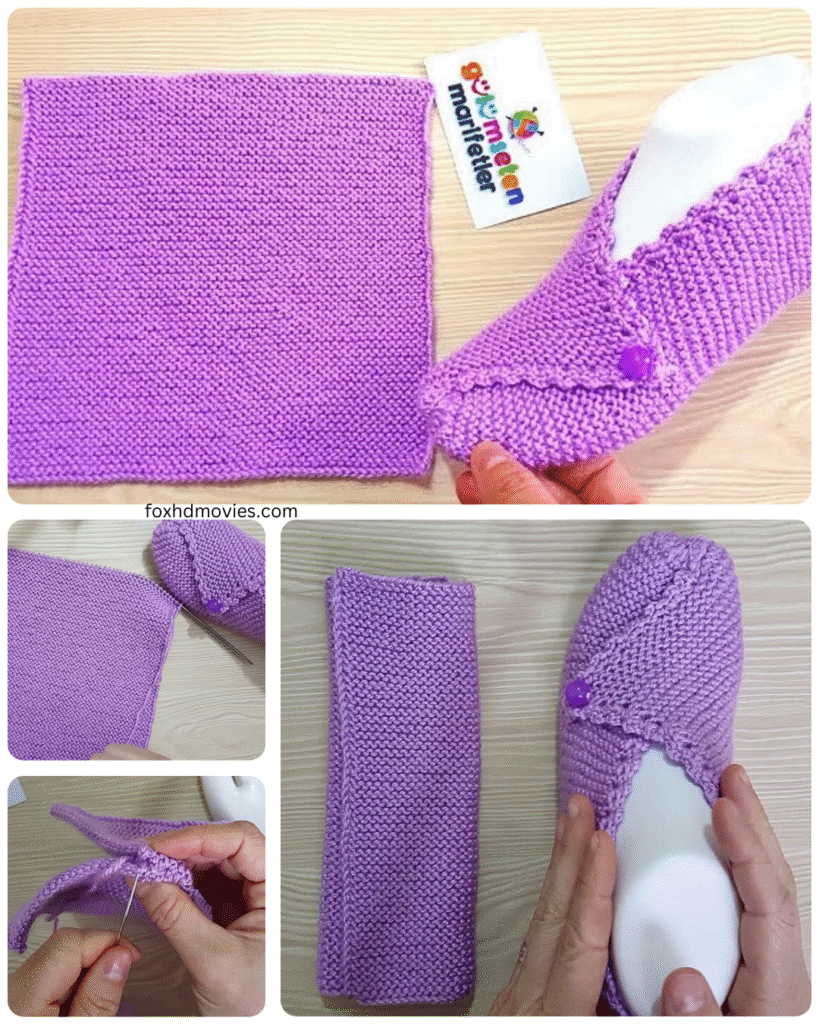
Shaping and Seaming: Bringing Your Slippers to Life
Now comes the fun part – transforming those flat rectangles into cozy footwear!
- Folding (Visualizing the Shape): Lay one of your knitted rectangles flat, with the wrong side facing up.
- Finding the Center (Optional): You can place a stitch marker at the halfway point along the length of your rectangle to help with even folding.
- Folding the Heel: Fold one short end of the rectangle inwards by approximately one-third of its length. This folded section will form the heel of your slipper.
- Folding the Toe: Fold the other short end of the rectangle inwards, overlapping the first folded section by about 2-3 inches. This overlap will create the toe box of your slipper.
- Seaming the Heel: Using your tapestry needle and yarn, sew the edges of the heel flap together securely. You can use a whip stitch or a mattress stitch for a neat finish.
- Seaming the Sole: Now, you’ll be seaming along the long edges of the overlapped section (the toe box and the top of the foot) and continuing down the sides towards the heel. Start at the toe and work your way down one side, around the curve of the heel, and up the other side. Leave an opening at the top of the slipper for your foot to slip in.
- Tip for a Snug Fit: As you seam along the sides of the foot, you can gently shape the fabric to create a more contoured fit around the arch of your foot.
- Securing and Weaving Ends: Once you’ve seamed the slipper, secure your yarn tightly and weave in all loose ends neatly.
- Repeat for the Second Slipper: Follow steps 1-7 with your second knitted rectangle to create the other slipper.

Adding Extra Touches (Optional):
- Cuffs: Before seaming the heel, you can fold down the top edge of the rectangle to create a small cuff.
- Non-Slip Soles: For added safety, you can purchase non-slip fabric paint or sew leather or suede scraps to the soles of your finished slippers.
- Embellishments: Add buttons, pom-poms, or crocheted flowers to personalize your slippers.
- Different Stitch Patterns: While garter stitch is simple and effective, you can experiment with other easy stitch patterns like seed stitch or simple ribbing for a different texture, just be sure to adjust your cast-on number and row count to achieve the desired dimensions.

Care Instructions:
Follow the care instructions for the yarn you used. Most hand-knitted items benefit from gentle hand washing and laying flat to dry.
Step into Comfort!
Congratulations! You’ve now transformed two simple knitted rectangles into a cozy and comfortable pair of slippers. Slip them on, feel the warmth, and enjoy the satisfaction of creating something beautiful and practical with your own two hands.
These rectangle knit slippers make wonderful gifts too! Customize the colors and sizes for your loved ones and spread the cozy comfort.
Happy knitting, and may your feet always be warm and happy!
Share Your Slipper Success!