by
by 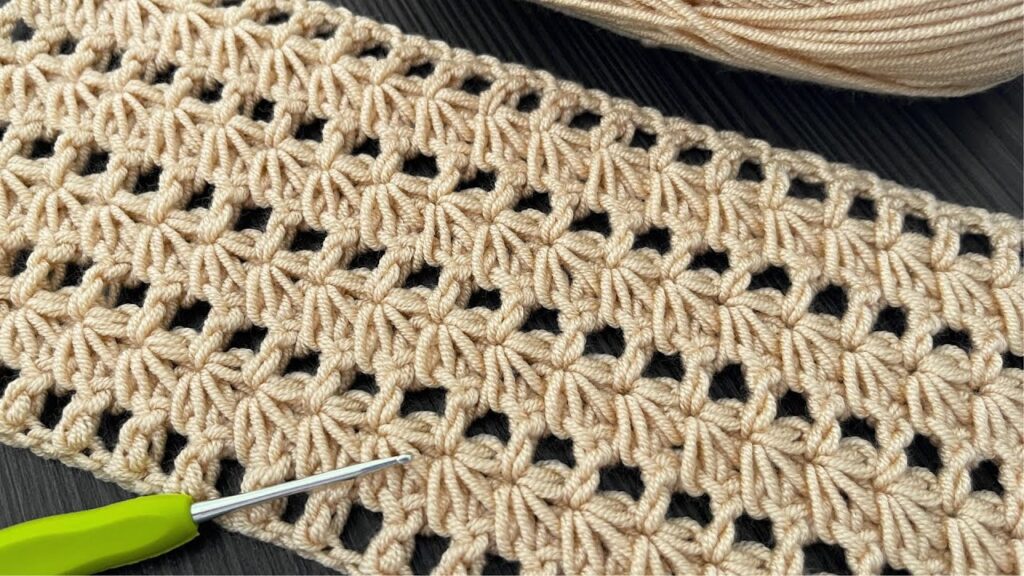
let’s get you crocheting some gorgeous star lace! This pattern creates a delicate, openwork fabric with little star-like motifs. It’s a bit more involved than basic stitches, but the result is so worth it.
Here’s a detailed pattern for the Crochet Star Lace Stitch:
Skill Level: Intermediate
Materials:
- Worsted weight yarn (or your preferred weight)
- Crochet hook appropriate for your yarn weight
- Scissors
- Tapestry needle for weaving in ends
Abbreviations (US Crochet Terms):
- ch = chain
- sl st = slip stitch
- sc = single crochet
- dc = double crochet
- tr = treble crochet
- sp = space
- sk = skip
- rep = repeat
- beg = beginning
Special Stitches:
- Star Stitch (st st): Yarn over, insert hook into the indicated stitch, yarn over, pull up a loop (2 loops on hook). Yarn over, insert hook into the next stitch, yarn over, pull up a loop (3 loops on hook). Yarn over, insert hook into the next stitch, yarn over, pull up a loop (4 loops on hook). Yarn over, insert hook into the next stitch, yarn over, pull up a loop (5 loops on hook). Yarn over, insert hook into the next stitch, yarn over, pull up a loop (6 loops on hook). Yarn over, pull through all 6 loops. Chain 1 to secure the star stitch.
- Picot: Chain 3, slip stitch into the first chain.

Pattern:
Foundation Chain: Chain a multiple of 6 + 3.
Row 1: Sc in the 2nd ch from the hook, *ch 3, sk next 2 ch, sc in next ch; rep from * to end. Turn.
Row 2: Ch 5 (counts as dc and ch 2), sk next sc, *dc in next ch-3 sp, ch 2; rep from * to last sc, dc in last sc. Turn.
Row 3: Ch 1, sc in first dc, *ch 3, st st (working into the next 5 ch-2 sps), ch 3, sc in the next dc; rep from * to last ch-2 sp, ch 3, st st (working into the next 4 ch-2 sps and the top of the turning ch), ch 3, sc in the top of the turning ch. Turn.
Row 4: Ch 5 (counts as dc and ch 2), sk next sc, *dc in the ch-1 sp of the st st, ch 2; rep from * to last sc, dc in last sc. Turn.
Row 5: Ch 1, sc in first dc, *ch 3, sc in the ch-2 sp, ch 3, sc in the next dc; rep from * to end. Turn.
Row 6: Ch 3 (counts as dc), *ch 2, dc in next sc; rep from * to last sc, ch 2, dc in last sc. Turn.
Row 7: Ch 1, sc in first dc, *ch 3, st st (working into the next 5 ch-2 sps), ch 3, sc in the next dc; rep from * to last ch-2 sp, ch 3, st st (working into the next 4 ch-2 sps and the top of the turning ch), ch 3, sc in the top of the turning ch. Turn.


Repeat Rows 4-7 for the desired length.
Edging (Optional):
You can add a simple edging to finish your piece. Here’s a suggestion:
Round 1: Ch 1, sc evenly around the entire piece, working 3 sc in each corner. Sl st to the first sc to join.
Round 2: Ch 1, sc in each sc around, *ch 3, sl st in first ch (picot), sk next sc, sc in next sc; rep from * around. Sl st to the first sc to join. Fasten off and weave in ends.
Video tutorial
Tips and Variations:
- Gauge: While not critical for all projects, maintaining a consistent tension will help your star lace look uniform.
- Yarn Weight and Hook Size: Experiment with different yarn weights and hook sizes to achieve different looks. Finer yarn and a smaller hook will create a more delicate lace.
- Color Changes: Introduce color changes every few rows for a striped or variegated effect.
- Picots: You can add picots to the top of the star stitches in Row 3 or 7 for an extra touch of detail. Simply ch 3 and sl st into the ch-1 space at the top of the star stitch.
- Applications: This stitch is beautiful for scarves, shawls, lightweight blankets, decorative edgings, and garment panels.