 by
by 
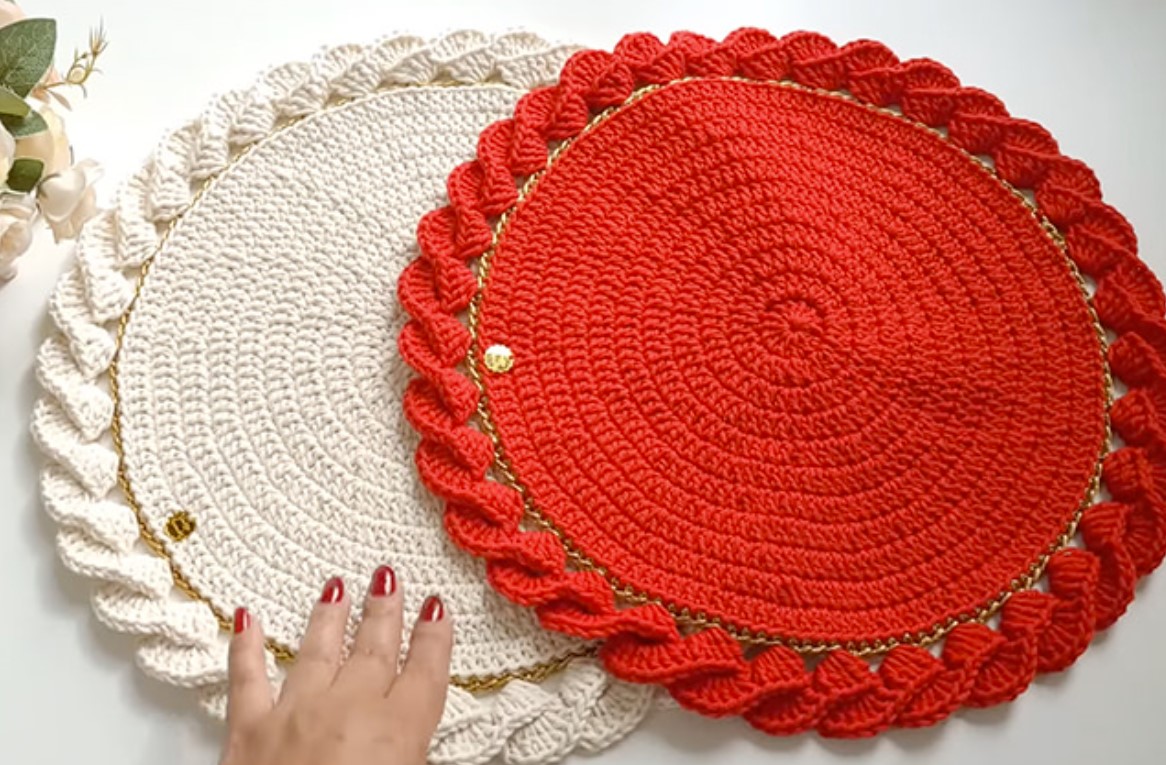
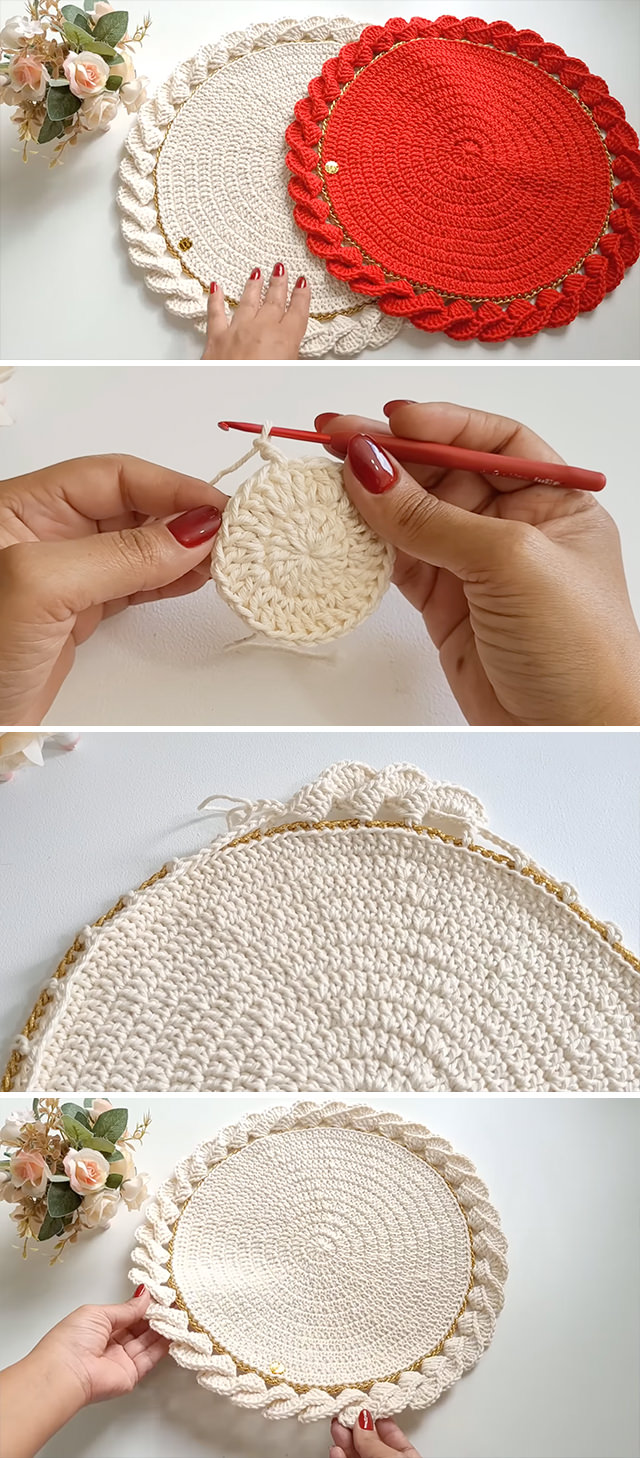
let’s get this placemat crocheted! Here’s a detailed pattern, designed to be clear and easy to follow. Feel free to adjust colors and yarn weight to match your style and needs.
Finished Size (Approximate): 12 inches wide x 16 inches long (adjust hook size and yarn for different dimensions).
Materials:
- Worsted weight cotton yarn (approximately 150-200 yards). Cotton is recommended for durability and washability.
- Crochet hook size H/8 (5.0 mm) or size appropriate for your yarn weight.
- Scissors
- Yarn needle for weaving in ends

Gauge (Optional but Recommended):
- 13 single crochet (sc) stitches and 14 rows = 4 inches in single crochet.
- Note: Gauge is not critical for a placemat, but it will affect the finished size and yarn usage.
Stitches Used (US Crochet Terms):
- ch = chain
- sl st = slip stitch
- sc = single crochet
- hdc = half double crochet
- dc = double crochet
Pattern:
Body of the Placemat:
- Foundation Chain: Chain 47 (for a 16-inch length). Adjust the number of chains to your desired length. Keep in mind that the starting chain will be slightly longer than the finished width due to the stitch height.
- Row 1: Sc in the second ch from the hook and in each ch across. (46 sc)
- Row 2: Ch 1 (does not count as a stitch), turn. Sc in each sc across. (46 sc)
- Rows 3-48 (or until desired width): Repeat Row 2. Continue working in single crochet rows until your piece measures approximately 12 inches wide. You can adjust the number of rows to achieve your desired width.
- Fasten off. Weave in the ends securely.

Border (Optional but Recommended for a Finished Look):
You can choose a simple single crochet border or something a little more decorative. Here are instructions for a simple single crochet border:
- Join yarn: With the right side facing you, join your yarn in any corner with a sl st.
- Round 1: Ch 1, sc evenly around the entire placemat.
- Work 1 sc in the end of each sc row along the sides.
- Work 3 sc in each corner to help the border lie flat.
- Join with a sl st to the first sc.
- Round 2: Ch 1, sc in each sc around.
- Work 3 sc in each corner sc from the previous round.
- Join with a sl st to the first sc.
- Repeat Round 2: Continue repeating Round 2 until your border reaches your desired width (usually 2-3 rounds is sufficient).
- Fasten off. Weave in all remaining ends securely.
Variations and Ideas:
- Color Blocking: Change colors every few rows or rounds for a striped or color-blocked effect.
- Textured Stitches: Experiment with using half double crochet (hdc) or double crochet (dc) for the main body or the border to create different textures. You might need to adjust your starting chain and the number of rows to achieve the desired size.
- Shell Stitch Border: For a more decorative border, try a shell stitch (e.g., *skip 2 sts, 5 dc in the next st, skip 2 sts, sl st in the next st*, repeat around).
- Lace Edging: Add a delicate lace edging after the main border for an elegant touch.
- Stripes: Create vertical stripes by changing colors every row.
- Mitered Corners: For a sharper corner in the border, you can decrease stitches at the corners instead of working 3 sc. Look up “mitered crochet corners” for a detailed tutorial.
Video tutorial
Tips for Success:
- Consistent Tension: Try to maintain consistent tension throughout your work to ensure an even fabric.
- Counting Stitches: Count your stitches at the end of each row, especially for the main body, to avoid accidental increases or decreases.
- Blocking (Optional): After finishing, you can gently block your placemat by dampening it and pinning it to a flat surface to help it hold its shape and even out any slight irregularities. Let it dry completely.


