by
by 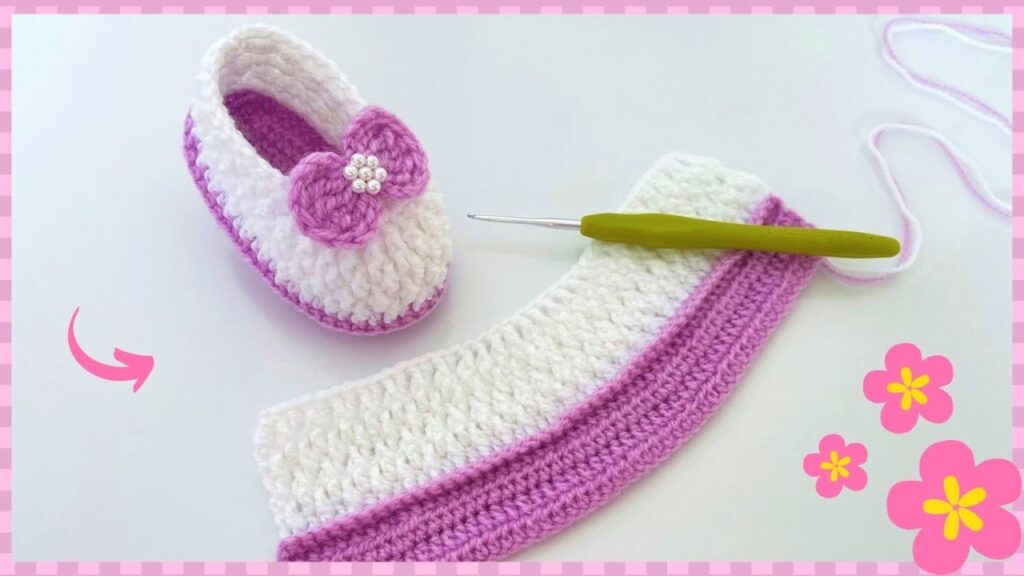
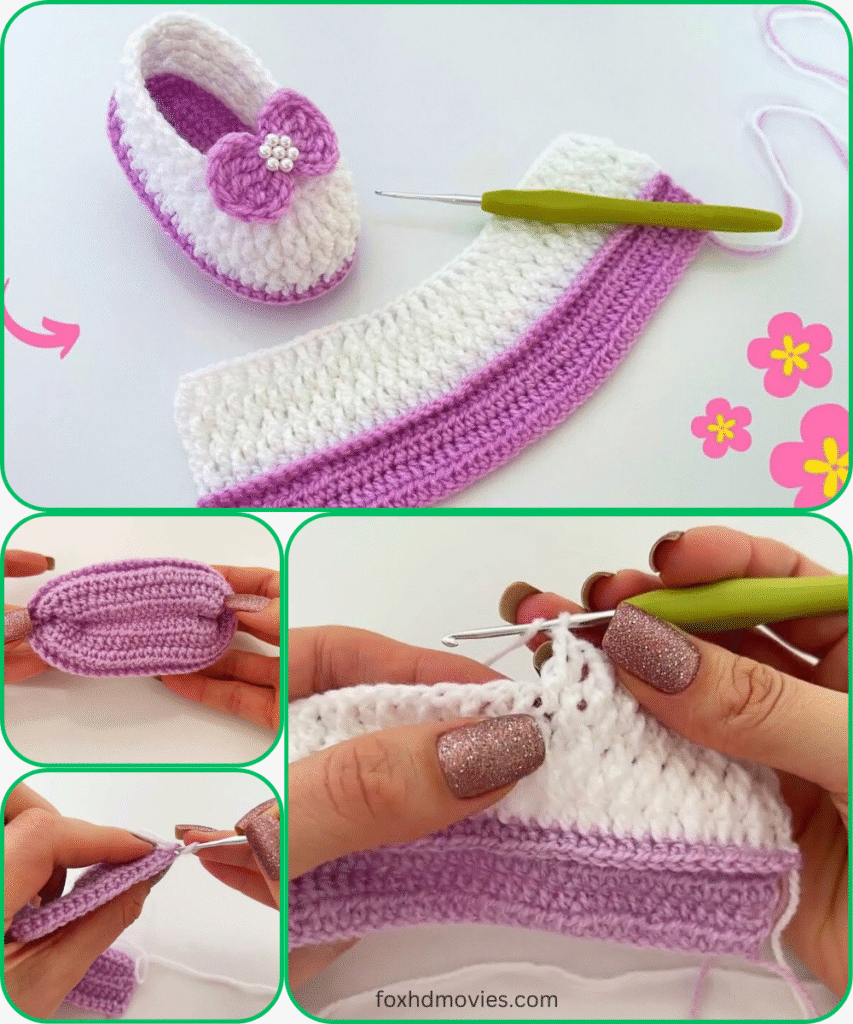
These charming handmade baby slippers are a vision of delicate elegance! Featuring a beautiful textured body in white, a contrasting beige sole and trim, and a stunning layered bow adorned with pearls, these slippers are perfect for any special occasion or for adding a touch of sophisticated cuteness to tiny outfits. The construction creates a sturdy yet soft fit, ideal for little feet.
This pattern is suitable for intermediate crocheters, or confident beginners comfortable with working in rounds, using back loop only stitches, and simple shaping.
Yarn:
- DK (Double Knit) or Light Worsted Weight yarn in:
- Main Color (MC): White, as pictured.
- Contrast Color (CC): Beige/Tan, as pictured.
- Choose a soft, baby-friendly yarn that is machine washable for easy care.
Hook:
- 3.5 mm (US E/4) crochet hook (adjust hook size if necessary to achieve desired fabric and tension).
Notions:
- Tapestry needle for weaving in ends
- Scissors
- 5-7 small white pearls or beads (for the center of the bow, as pictured).
Gauge (Important for Sizing!):
- For the Sole (HDC): 16 HDC and 10 rows = 4 inches (10 cm).
- For the Upper (SC in BLO): 18 SC and 20 rows = 4 inches (10 cm).
- Always make a small swatch to check your gauge, as it’s crucial for the finished size of the slippers!
Size:
- Newborn to 3 months (approximately 3.75 – 4 inches / 9.5-10 cm sole length when finished).
- To adjust for larger sizes, you will need to increase the initial chain and rows for the sole, and then proportionally increase stitches/rounds for the upper section.
Abbreviations (US Crochet Terms):
- Ch: Chain
- Sl St: Slip Stitch
- SC: Single Crochet
- HDC: Half Double Crochet
- DC: Double Crochet
- St(s): Stitch(es)
- BLO: Back Loop Only (insert hook only into the back loop of the stitch)
- FO: Fasten Off
- SC2tog: Single Crochet 2 stitches together (decrease)
Pattern Instructions:
These slippers are constructed by first making the sole, then working the upper directly into the sole, and finally adding the decorative bow.

Part 1: The Sole (Contrast Color – Beige)
The sole is worked in continuous rounds to create a sturdy oval base.
- Ch 14.
- Round 1: HDC in 3rd Ch from hook (counts as 1st HDC). HDC in next 10 Ch. 5 HDC in last Ch. (Work around the end of the chain). Working along the other side of the starting chain: HDC in next 10 Ch. 3 HDC in the very last Ch (this is the same ch as your very first HDC). Sl St to top of beginning Ch 3 to join. (29 HDC)
- Round 2: Ch 2 (does not count as a stitch). 2 HDC in first HDC. HDC in next 10 HDC. 2 HDC in next 5 HDC. HDC in next 10 HDC. 2 HDC in last 3 HDC. Sl St to top of beginning Ch 2 to join. (38 HDC)
- Round 3: Ch 2. 2 HDC in first HDC. HDC in next 13 HDC. 2 HDC in next 5 HDC. HDC in next 13 HDC. 2 HDC in last 4 HDC. Sl St to top of beginning Ch 2 to join. (48 HDC)
- This completes the sturdy sole. Do NOT FO.
Part 2: The Upper Body (Main Color – White & Contrast Color – Beige Trim)
The upper is worked directly into the sole. The textured body is created by working SC in the back loop only.

- Round 1 (White – Set Up for Upper): With CC yarn still on hook, Ch 1. SC in BLO in each HDC around the entire sole. Sl St to first SC to join. (48 SC). Change to Main Color (MC – White) on the last Sl St. Ch 1, turn.
- Working in BLO here creates a nice, defined edge for the sole.
- Round 2 (MC – Textured Body): SC in BLO in each SC around. Sl St to first SC to join. Ch 1, turn.
- Repeat Round 2 for 4 more rounds. (Total 5 rounds of MC SC in BLO).
- This forms the main body and the lovely horizontal ribbed texture.
Shaping the Toe:
- Round 7 (MC – Toe Decrease Round): SC in BLO in next 16 SC. SC2tog in BLO 8 times. SC in BLO in remaining 16 SC. Sl St to first SC to join. Ch 1, turn. (40 SC)
- Round 8 (MC – Toe Decrease Round): SC in BLO in next 12 SC. SC2tog in BLO 8 times. SC in BLO in remaining 12 SC. Sl St to first SC to join. Ch 1, turn. (32 SC)
- Round 9 (MC – Last Upper Round): SC in BLO in each SC around. Sl St to first SC to join. FO, leaving a short tail to weave in.
Part 3: The Top Edge Trim (Contrast Color – Beige)
This creates the neat contrasting rim around the ankle opening.
- Join Contrast Color (CC – Beige) yarn with a Sl St to any stitch on the last round of the white upper (Round 9).
- Round 1 (Trim): Ch 1. SC in each SC around. Sl St to first SC to join. FO, weaving in all ends.

Part 4: The Layered Bow Embellishment (White & Beige)
Make 2 bows (one for each slipper), as pictured. This is a two-layered bow with pearls.
A. Larger Bow (Main Color – White):
- Ch 16.
- Row 1: DC in 4th Ch from hook (counts as 1st DC). DC in each Ch across. (14 DC). Ch 3 (counts as 1st DC), turn.
- Row 2: DC in each DC across. (14 DC). FO, leaving a long tail for assembly.
B. Smaller Bow (Contrast Color – Beige):
- Ch 12.
- Row 1: DC in 4th Ch from hook (counts as 1st DC). DC in each Ch across. (10 DC). Ch 3 (counts as 1st DC), turn.
- Row 2: DC in each DC across. (10 DC). FO, leaving a long tail.
Assemble the Bow:
- Lay the larger white rectangle flat. Place the smaller beige rectangle on top, centered.
- Using the long tail from the smaller beige bow, pinch the center of both rectangles. Wrap the tail tightly around the pinched center a few times to cinch both rectangles and form a layered bow shape. Secure with a knot on the back.
- Stitch the 5-7 small white pearls/beads securely to the center of the bow, covering the wrapped yarn.
Video tutorial
Finishing Your Slipper:
- Weave in all remaining loose ends neatly with your tapestry needle.
- Attach Bow: Position the completed layered bow decoratively on the front top of the slipper, over the toe, as shown in the image. Securely stitch it in place.
- Make a Second Slipper: Repeat all steps to create a matching pair!
- Optional Blocking: Gently wet the finished slippers, reshape them, and let them air dry to set the stitches and give them a professional finish.
And there you have it! Beautiful, elegant, and handmade baby slippers that are sure to be a cherished item for your little one or a thoughtful gift!
Happy crocheting!