by
by 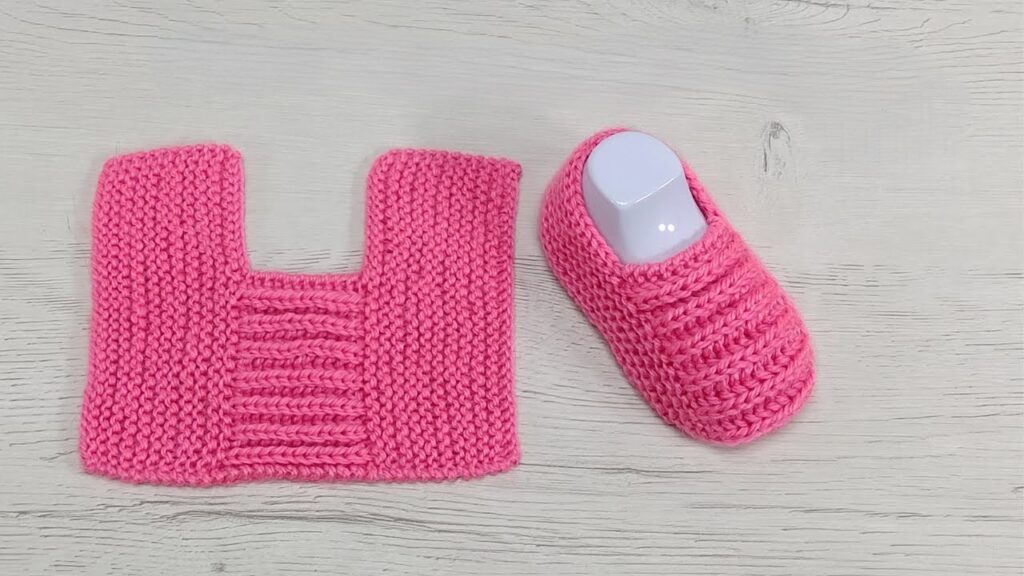
There’s nothing quite as comforting as slipping your feet into a pair of warm, handmade slippers. This free knitting pattern creates a simple yet stylish slipper sock, perfect for keeping your toes toasty around the house. The design features a textured ribbed panel on the instep, making it both comfortable and visually appealing.
This pattern is designed to be knitted flat and then seamed, making it a great project for knitters of all skill levels, even those new to garment construction. The featured size is for a small adult/teen, but instructions for adjusting the size are provided.
Skill Level:
Easy
Materials:
- Yarn: Worsted weight (Aran / 10 ply) yarn (approximately 100-150g, depending on size). The slipper in the image uses a bright pink acrylic yarn.
- Needles: 4.0 mm (US 6) straight knitting needles or circular needles (for working flat)
- Tapestry needle (for seaming and weaving in ends)
- Scissors
Abbreviations (US Terms):
- CO: Cast On
- K: Knit
- P: Purl
- st(s): stitch(es)
- RS: Right Side
- WS: Wrong Side
- garter stitch: every row knit
- ribbing: alternating knit and purl stitches (e.g., K1, P1 rib)
Gauge:
20 stitches and 40 rows = 4 inches (10 cm) in garter stitch
(It’s important to check your gauge to ensure your slippers turn out the correct size. If your gauge is different, adjust your needle size accordingly.)
Pattern Notes:
- These slippers are knit flat as a single piece and then seamed.
- The entire slipper is worked in garter stitch (knit every row) except for the ribbed instep section.
- The ribbed section creates a stretchy and comfortable fit over the top of the foot.
- The pattern is written for a women’s small (approx. US shoe size 5-7 / EU 35-37). See “Sizing Adjustments” below for other sizes.
Pattern Instructions
Part 1: The Sole and Heel
Using 4.0 mm (US 6) needles and worsted weight yarn, CO 40 stitches.
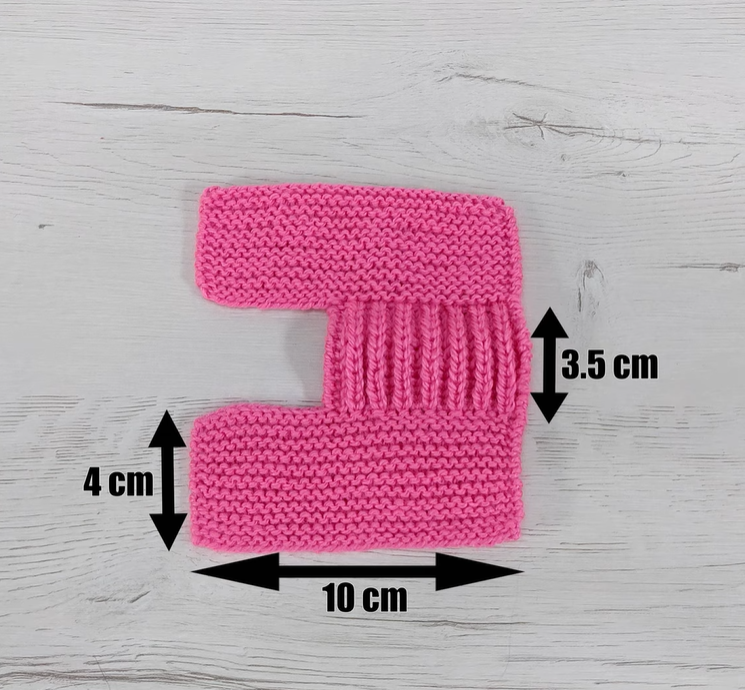
Work in garter stitch (knit every row) for 40 rows. (This section forms the sole of the slipper and part of the heel. The piece should measure approximately 4 inches wide and 4 inches long.)
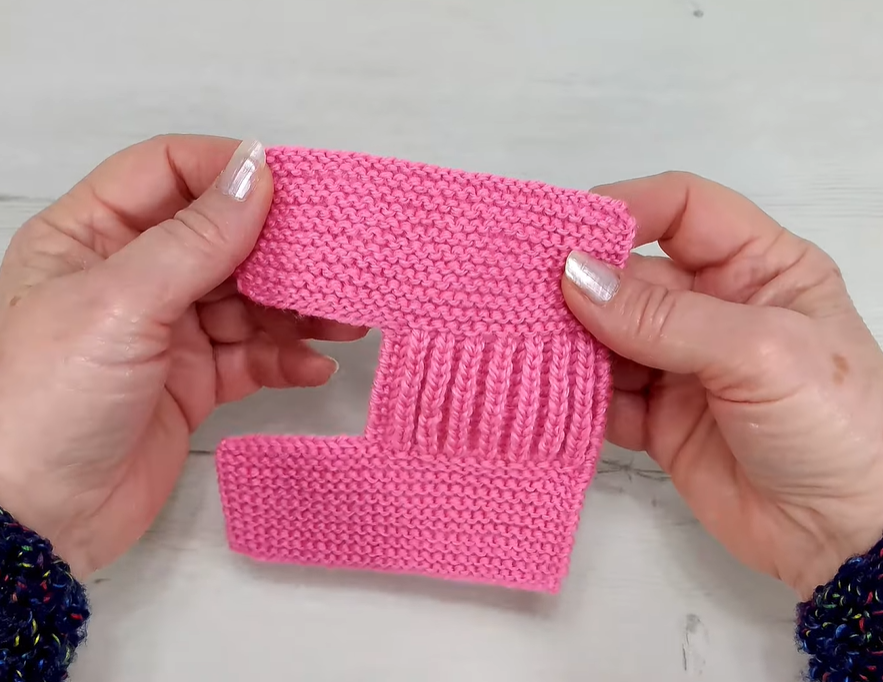
Part 2: Shaping the Heel
This section will create the “U” shape for the heel and the beginning of the instep.
Row 41 (RS): K 15 sts, bind off 10 sts, K to end of row (15 sts remaining on right needle, 15 sts on left needle). (30 sts total)
Row 42 (WS): K across all 30 stitches.
Row 43 (RS): K across all 30 stitches.
Repeat Row 42 and Row 43 for a total of 10 more rows (Rows 44-53). (You should now have a rectangular piece of garter stitch with a “U” shaped cutout in the center.)
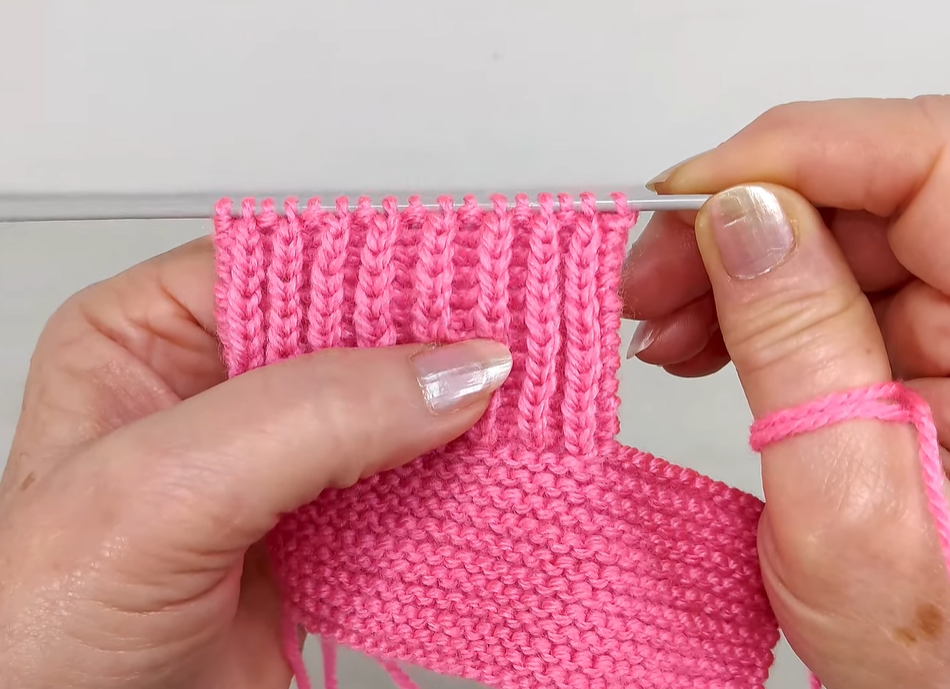
Part 3: The Instep (Ribbed Section)
Now we will introduce the ribbed texture for the top of the foot. This section will be worked on the central 10 stitches that were bound off earlier. You’ll pick up stitches to bridge the gap.
Row 54 (WS): K 15 sts (these are the stitches on the left side of the “U”), pick up and knit 10 stitches along the bound-off edge of the “U”, K 15 sts (these are the stitches on the right side of the “U”). (40 sts total)
Now, we will start the ribbing pattern on the central 10 stitches.
Row 55 (RS – Ribbing Set Up): K 15 sts, (K1, P1) 5 times, K 15 sts.
Row 56 (WS): K 15 sts, (P1, K1) 5 times, K 15 sts.
Repeat Row 55 and Row 56 for a total of 20 rows of ribbing (10 repeats of the 2-row pattern). (This ribbed section will be approximately 4 inches long and will form the top of the foot.)
Part 4: The Toe
Now we transition back to garter stitch to form the toe.
Row 75 (RS): K across all 40 stitches.
Row 76 (WS): K across all 40 stitches.
Repeat Row 75 and Row 76 for a total of 20 rows (ending on a WS row). (This section will be approximately 4 inches long and will form the top of the toe.)
Part 5: Finishing
Bind off all 40 stitches loosely.
Assembly:
- Fold and Seam: Lay your knitted piece flat. Fold the piece in half lengthwise, bringing the cast-on edge up to meet the bound-off edge.
- Toe Seam: Using your tapestry needle and a length of yarn, seam the bound-off edges together from the toe upwards for about 2-3 inches, creating the top of the toe. Use the mattress stitch for an invisible seam, or simply whip stitch.
- Heel Seam: Now, starting from the cast-on edge, seam the side edges of the garter stitch section together to form the heel. This will be the back of the slipper. Continue seaming until you reach the start of the ribbed section.
- Instep Seam: Continue seaming the side edges along the ribbed section, which will form the sides of the slipper over the arch of your foot.
- Weave in Ends: Securely weave in all remaining loose ends.
Repeat for the second slipper!
Video tutorial
Sizing Adjustments:
- For a larger size:
- Length: Add more rows to the garter stitch sections (Part 1 and Part 4) to make the slipper longer.
- Width: Cast on more stitches in multiples of 2 for the overall width, and adjust the number of knit stitches on the sides of the ribbed section accordingly.
- Heel cutout: You may need to increase the number of stitches bound off for the heel opening (e.g., bind off 12 or 14 stitches instead of 10) and then pick up the corresponding number.
- For a smaller size:
- Length: Subtract rows from the garter stitch sections.
- Width: Cast on fewer stitches in multiples of 2, and adjust the side stitches.
- Heel cutout: Bind off fewer stitches (e.g., 8 stitches).
Enjoy your new cozy knitted slippers! They make fantastic gifts or a treat for your own feet.
Happy knitting!