by
by 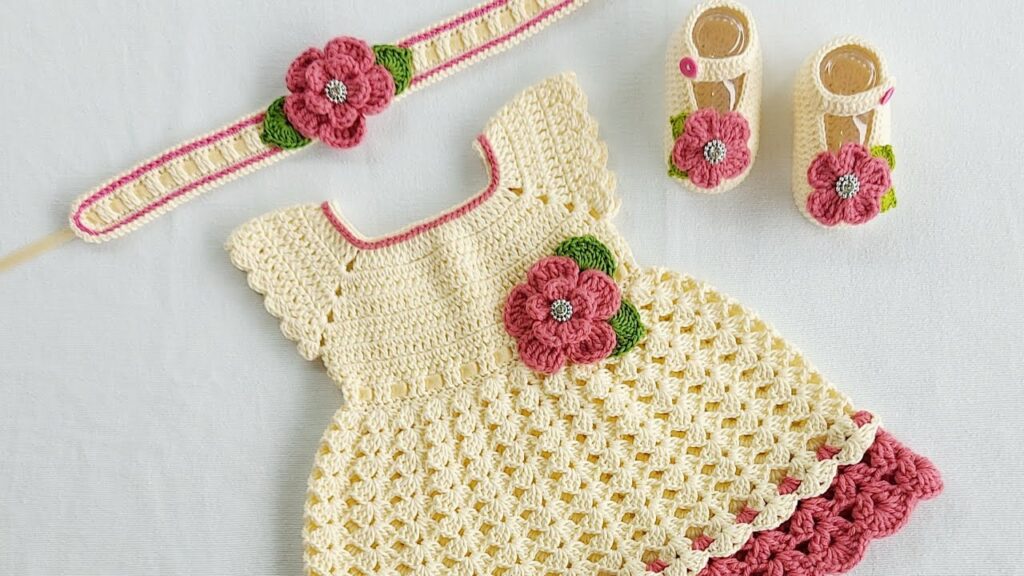
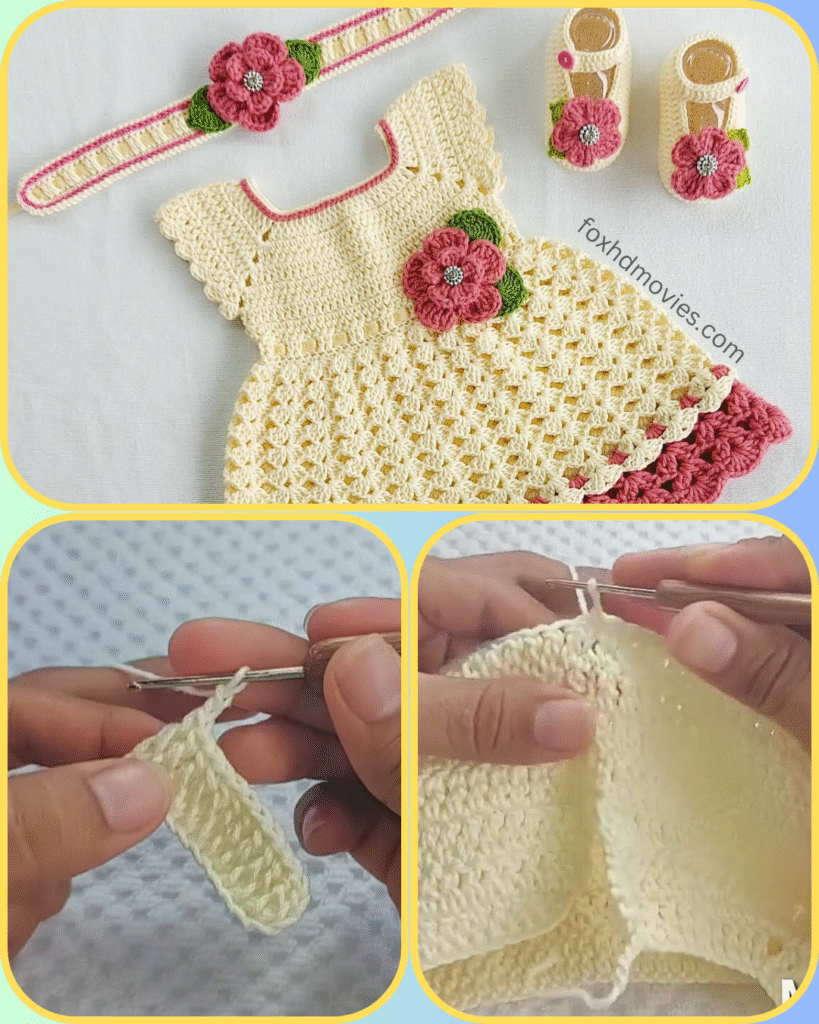
Hello, lovely crocheters! Prepare to fall in love with this exquisite “Vintage Rose Petal” baby set. This complete ensemble features an adorable dress, matching headband, and sweet little booties, all adorned with beautiful crocheted flowers. The classic cream base paired with soft pink and a touch of green creates a timeless and elegant look, perfect for bringing home baby, special occasions, or simply making every day a little more beautiful.
This pattern is a wonderful project for those comfortable with basic stitches and shaping. Let’s gather our supplies and create this truly special handmade treasure!
Materials You’ll Need:
- Yarn: DK (Light Worsted / 8 ply) weight yarn.
- Main Color (MC): Approx. 150-200g in Cream/Light Ecru (for dress, booties, headband).
- Contrast Color 1 (CC1): Approx. 50g in Rose Pink (for skirt trim, flowers, bootie trim).
- Contrast Color 2 (CC2): Small amount of Green (for flower leaves).
- Crochet Hook: 4.0mm (G-6 US) or size needed to obtain gauge.
- Small Button/Bead: One small decorative button or rhinestone for the center of each large flower (3 total).
- Yarn Needle: For weaving in ends and assembling pieces.
- Stitch Markers: Very helpful for marking beginnings of rounds or increase points.
- Scissors
- Elastic Hair Tie/Thin Elastic Cord: For the end of the headband (optional, for secure fit).
Abbreviations Used (US Terms):
- ch: chain
- sl st: slip stitch
- sc: single crochet
- hdc: half double crochet
- dc: double crochet
- tr: treble crochet (or triple crochet)
- sk: skip
- st(s): stitch(es)
- sp: space
- rnd(s): round(s)
- fo: fasten off
- V-st: (dc, ch 1, dc) in same st/space
- Shell: (2 dc, ch 1, 2 dc) in same st/space
- Picot: Ch 3, sl st into 3rd ch from hook
Gauge (Crucial!):
16 dc x 8 rows = 4 inches (10 cm) using a 4.0mm hook.
- Make a swatch to check your gauge. If your swatch is smaller, go up a hook size; if it’s larger, go down a hook size.
Pattern Notes:
- The dress is worked seamlessly from the top down.
- Chains at the beginning of rounds typically do not count as a stitch unless otherwise specified.
- Join rounds with a sl st to the first stitch of the round (not the beginning chain).
- The yoke is designed to be slightly stretchy to fit over the head.
- For sizing adjustments, you will modify the initial chain and the number of increase rounds in the yoke.
The Pattern: “Vintage Rose Petal” Baby Ensemble (Newborn – 3 Months)
Part 1: The Dress
A. Yoke (MC – Cream Yarn)
- Initial Chain: Ch 72. Join with a sl st to the first ch, being careful not to twist. (72 sts)
- Rnd 1 (Neckline Scallop): Ch 1, sk 2 sts, (sc, hdc, dc, hdc, sc) in next st. Repeat from * around. Join with sl st to first sc. (24 scallops)
- This creates the lovely scalloped edge seen in the image.
- Rnd 2: Ch 2 (does not count as st), dc in each sc/hdc/dc around. (This will be approximately 72 dc, adjust to work 3 dc into the center of each scallop). Join with sl st. (72 dc)
- You’ll be working into the stitches of the previous round’s scallops, aiming for an even stitch count for the next rounds.
- Rnd 3 (Increase Round): Ch 2, dc in next 5 sts, 2 dc in next st. Repeat from * 12 times around. Join with sl st. (84 dc)
- Rnd 4: Ch 2, dc in each st around. Join with sl st. (84 dc)
- Rnd 5 (Increase Round): Ch 2, dc in next 6 sts, 2 dc in next st. Repeat from * 12 times around. Join with sl st. (96 dc)
- Rnd 6: Ch 2, dc in each st around. Join with sl st. (96 dc)
- Rnd 7 (Armhole Round): Ch 2, dc in next 16 sts (front body). Ch 2, sk next 16 sts (sleeve). Dc in next 32 sts (back body). Ch 2, sk next 16 sts (sleeve). Dc in last 16 sts (front body). Join with sl st to first dc. (64 dc + 4 ch-2 spaces)
- You’ve now created the armholes!
- Rnd 8: Ch 2, dc in each dc and 2 dc in each ch-2 space around. Join with sl st. (64 + 8 = 72 dc)
- Rnd 9 (Last Yoke Round): Ch 2, dc in each st around. Join with sl st. (72 dc)
B. Skirt (MC – Cream Yarn)
The skirt appears to be a V-stitch or open shell pattern. We’ll use a simple V-stitch for the main body. This pattern requires a multiple of 2 stitches. 72 stitches is perfect.
- Rnd 1 (Skirt Foundation): Ch 3 (counts as 1 dc). Dc in same st. Sk 1 st, (dc, ch 1, dc) in next st (V-st). Repeat from * around, ending with sk 1 st, then join with sl st to 3rd ch of beginning ch 3. (36 V-sts)
- Rnd 2: Ch 3 (counts as 1 dc). Work (dc, ch 1, dc) in the ch-1 space of the first V-st from the previous round. Work (dc, ch 1, dc) in the ch-1 space of the next V-st. Repeat from * around. Join with sl st to 3rd ch of beginning ch 3. (36 V-sts)
- Rnd 3 – 10 (or until desired length before trim): Repeat Rnd 2.
- Continue repeating this round until the skirt reaches the desired length before the pink trim. The V-stitches will cause the skirt to flare naturally.
C. Skirt Trim (CC1 – Rose Pink Yarn)
- Rnd 1 (Transition to Pink): Attach CC1 to any ch-1 space. Ch 1, sc in same ch-1 space. Sc in each of the 2 dc of the V-st, sc in the next ch-1 space. Repeat from * around. Join with sl st to first sc. (Approx. 108 sc, depending on previous rnd’s V-sts)
- Rnd 2 (Scallop Edge): Ch 1, sk 2 sts, (sc, hdc, dc, hdc, sc) in next st. Repeat from * around. Join with sl st to first sc.
- Fo CC1. Weave in ends.

Part 2: The Flower (Make 3 – 2 for booties, 1 for dress, 1 for headband)
Use CC1 (Rose Pink) and CC2 (Green).
A. Flower Petals (CC1)
- Make a magic ring.
- Rnd 1: Ch 1, 6 sc into ring. Join with sl st to first sc. (6 sc)
- Rnd 2 (Petals): Ch 2, (dc, tr, dc) into same st, ch 2, sl st into same st. Repeat from * into each of the 6 sc around. (6 petals formed).
- Fo, leaving a tail for sewing. Pull magic ring tight.
B. Leaves (CC2 – Make 2 per flower, so 6 total)
- Ch 5.
- Sl st in 2nd ch from hook, sc in next ch, hdc in next ch, sl st in last ch.
- Fo, leaving a tail for sewing.
C. Flower Assembly:
- Arrange two green leaves at the back of each pink flower, and sew them in place with the green yarn tail.
- Sew a small decorative button or rhinestone into the center of each flower using your sewing needle and thread.
Part 3: The Booties (Make 2)
Start with MC (Cream) yarn.
A. Sole:
- Ch 12.
- Rnd 1: 2 hdc in 3rd ch from hook, hdc in next 8 ch, 5 hdc in last ch. Working down other side of chain: hdc in next 8 ch, 2 hdc in last ch. Join with sl st to first hdc. (25 hdc)
- Rnd 2: Ch 2, 2 hdc in first 2 sts, hdc in next 8 sts, 2 hdc in next 5 sts, hdc in next 8 sts, 2 hdc in last 2 sts. Join with sl st. (36 hdc)
- Rnd 3: Ch 2, hdc in next st, 2 hdc in next st. Repeat from * 2 times. Hdc in next 8 sts. Hdc in next st, 2 hdc in next st. Repeat from * 5 times. Hdc in next 8 sts. Hdc in next st, 2 hdc in next st. Repeat from * 2 times. Join with sl st. (48 hdc)
- This forms the oval sole. Exact counts may vary slightly, aim for flat.
B. Sides of Bootie:
- Rnd 4: Ch 2, hdc in BLO of each st around. Join with sl st. (48 hdc)
- This creates the ridge for the sole.
- Rnd 5-7: Ch 2, hdc in each st around. Join with sl st. (48 hdc)
C. Toe Shaping:
- Rnd 8: Ch 2, hdc in next 14 sts. Hdc dec 10 times. Hdc in remaining 14 sts. Join with sl st. (38 hdc)
- Rnd 9: Ch 2, hdc in next 12 sts. Hdc dec 7 times. Hdc in remaining 12 sts. Join with sl st. (31 hdc)
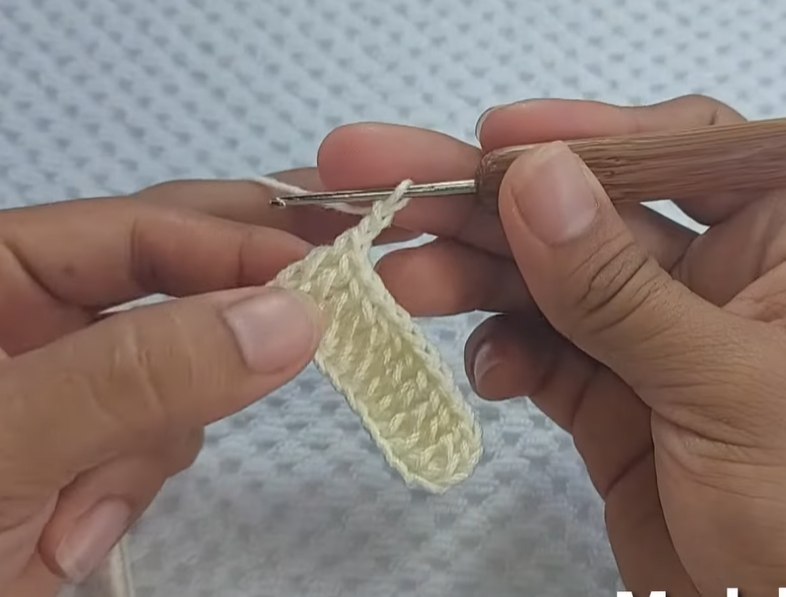
D. Ankle & Strap:
- Rnd 10 (Pink Trim): Attach CC1. Ch 1, sc in each st around. Join with sl st. (31 sc)
- Rnd 11 (Strap – optional, you can just sew a separate strap): Ch 1, sc in next 4 sts. Ch 10 (for strap). Sk 10 sts (for buckle opening). Sc in remaining sts around. Join with sl st.
- Alternatively, just work sc in each st around, then create a separate small chain of about 15-20 sts, sc across, and sew to the side of the bootie.
- Rnd 12: Sc in each sc and in each ch of the strap. Join with sl st.
- Fo CC1. Weave in ends.

E. Bootie Flower Assembly:
- Sew one completed flower onto the top of the toe section of each bootie.
Part 4: The Headband
Start with MC (Cream) yarn.
- Ch 70 (or desired length to fit baby’s head, minus a small stretch).
- Row 1: Sc in 2nd ch from hook and in each ch across. Ch 1, turn. (69 sc)
- Row 2: Sc in each st across. Ch 1, turn. (69 sc)
- Fo MC, leaving a long tail for sewing.
Headband Assembly:
- Sew one completed flower to the center of the headband.
- Option 1 (Simple): Sew the ends of the headband together to form a circle.
- Option 2 (Adjustable): If using elastic, fold one end of the headband over about 1/2 inch, insert the elastic, and sew securely. Thread the elastic through the other end of the headband, pull to desired tightness, and sew that end securely, trimming excess elastic.
Part 5: Final Assembly & Finishing
- Weave in All Ends: This is the most crucial part for a tidy finish! Take your time to meticulously weave in all loose yarn ends from all sections securely into the stitches of the garment.
- Attach Embellishments: Ensure all flowers are securely sewn on. If using, secure any tiny buttons/rhinestones to the center of the flowers.
Video tutorial
Your “Vintage Rose Petal” Baby Ensemble is Complete!
Congratulations! You’ve just crocheted a truly exquisite and complete baby set. This beautiful ensemble is sure to be cherished and admired. Don’t forget to snap a picture and share your finished creation! I’d love to see your little “Vintage Rose Petal” shine.
Happy crocheting!