 by
by 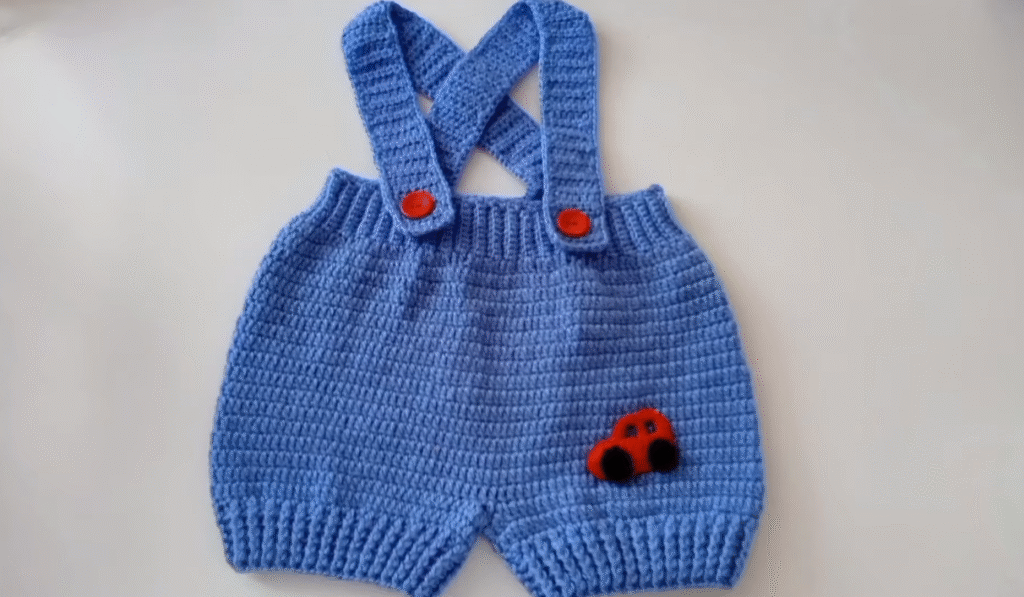
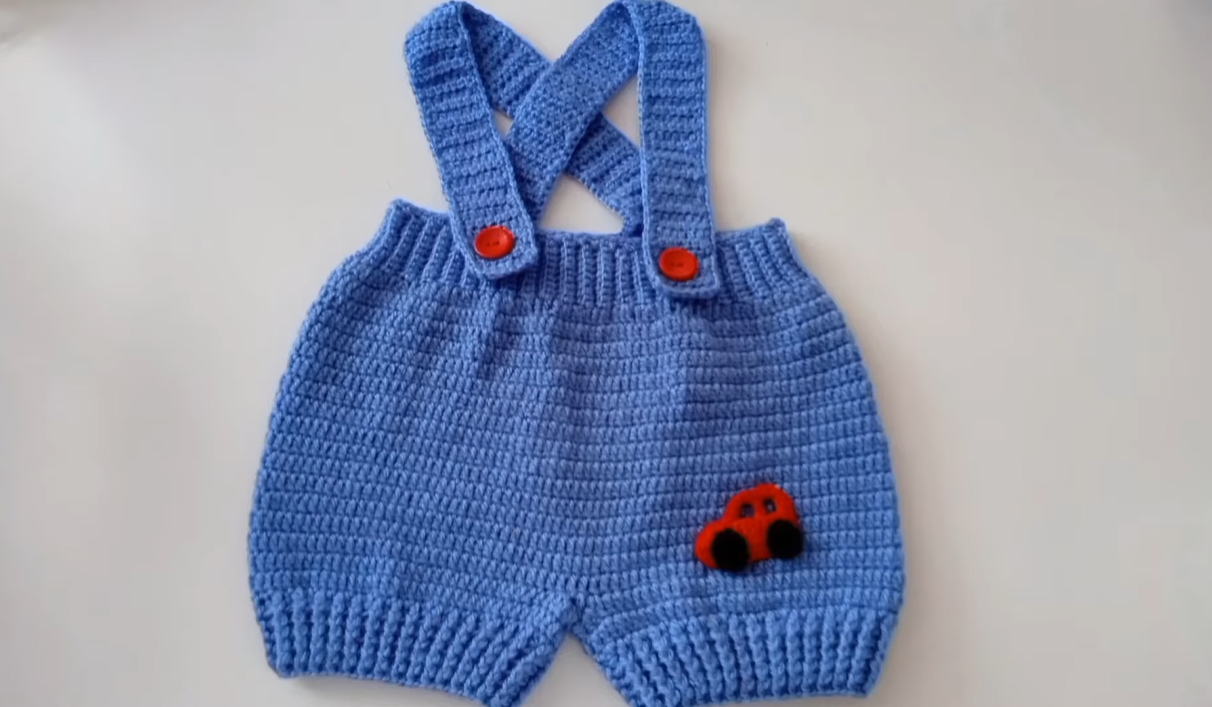
Hello, fellow yarn lovers! Today, I’m absolutely thrilled to share a pattern for these irresistibly cute baby suspender shorts. The moment I saw them, I knew I had to figure out how to make them, and now you can too! Perfect for your little one, a baby shower gift, or just because – these shorts with their sweet little car appliqué are sure to melt hearts.
They’re worked primarily in simple stitches, making them a satisfying project for advanced beginners and beyond. Let’s gather our supplies and get ready to create something truly special!

Materials You’ll Need:
- Yarn: DK (Light Worsted / 8 ply) weight yarn.
- Main Color (MC): Approx. 100-120g in Blue (as pictured).
- Contrast Color 1 (CC1): Small amount of Red (for car body).
- Contrast Color 2 (CC2): Small amount of Black (for car wheels).
- Crochet Hook: 4.0mm (G-6 US) or size needed to obtain gauge.
- Buttons: Two (2) 15-20mm buttons (e.g., red as pictured).
- Yarn Needle: For weaving in ends and sewing on pieces.
- Stitch Markers: Very helpful for keeping track of rounds and leg divisions.
- Scissors
Abbreviations Used (US Terms):
- ch: chain
- sl st: slip stitch
- sc: single crochet
- hdc: half double crochet
- dc: double crochet
- hdcblo: half double crochet in back loop only
- inc: increase (2 stitches in the same stitch)
- dec: decrease (working 2 stitches together)
- sk: skip
- st(s): stitch(es)
- rnd(s): round(s)
- fo: fasten off
- MC: Main Color
- CC1: Contrast Color 1
- CC2: Contrast Color 2
Gauge (Crucial!):
16 hdc x 12 rows = 4 inches (10 cm) using a 4.0mm hook. Make a swatch to check your gauge. If your swatch is smaller, go up a hook size; if it’s larger, go down a hook size.
Pattern Notes:
- This pattern is worked in rounds from the top down.
- Chains at the beginning of rounds typically do not count as a stitch unless otherwise specified.
- Join rounds with a sl st to the first stitch of the round (not the beginning chain).
- For sizing adjustments, you can modify your initial chain in multiples of 2, and adjust increase rounds.
The Pattern: Baby Suspender Shorts (Newborn – 3 Months)
Part 1: The Shorts Body (Top Down)
Start with MC yarn.
- Initial Chain/Waistband (Ribbed):
- Ch 60. Join with a sl st to the first ch, being careful not to twist. (60 sts)
- Rnd 1 (Waistband Rib): Ch 1 (does not count as st here or throughout), sc in each ch around. Join with sl st to first sc. (60 sts)
- Rnd 2-5 (Waistband Rib): Ch 1, hdcblo in each st around. Join with sl st to first hdc. (60 sts)
- This creates a stretchy, defined ribbed waistband.
- Body of Shorts (Half Double Crochet):
- Rnd 6: Ch 2 (does not count as st), hdc in each st around. Join with sl st. (60 hdc)
- Rnd 7 (Increase Round): Ch 2, hdc in next 9 sts, inc (2 hdc in next st). Repeat from * 6 times around. Join with sl st. (66 hdc)
- Rnd 8-10: Ch 2, hdc in each st around. Join with sl st. (66 hdc)
- Rnd 11 (Increase Round): Ch 2, hdc in next 10 sts, inc (2 hdc in next st). Repeat from * 6 times around. Join with sl st. (72 hdc)
- Rnd 12-16: Ch 2, hdc in each st around. Join with sl st. (72 hdc)
- You should now have a tube shape, ready to divide for the legs.

Part 2: Dividing for Legs
- Lay your work flat with the join seam at the back. Place a stitch marker on the 36th stitch from the join (this marks the halfway point at the front).
- You will now work the first leg. We’ll be joining the current working yarn to the opposite side of the body to form the leg opening.
- First Leg:
- Rnd 1 (Leg Opening): Ch 2, hdc in the next 36 sts. Join with a sl st to the first hdc of this round (this connects the front and back, forming the first leg hole). (36 hdc)
- Rnd 2-8 (Leg Length): Ch 2, hdc in each st around. Join with sl st. (36 hdc)
- Rnd 9 (Leg Cuff Rib): Ch 1, sc in each st around. Join with sl st. (36 sc)
- Rnd 10-12 (Leg Cuff Rib): Ch 1, hdcblo in each st around. Join with sl st. (36 hdc)
- Fo. Weave in ends.
- Second Leg:
- Attach MC yarn with a sl st to the next unworked stitch of the body (the first stitch of the remaining 36 stitches).
- Repeat all steps for “First Leg” above.
- Fo. Weave in ends.

Part 3: The Suspenders (Make 2)
Start with MC yarn.
- Ch 52 (adjust length as needed, depending on desired fit).
- Row 1: Sc in 2nd ch from hook and in each ch across. Ch 1, turn. (51 sc)
- Row 2-3: Sc in each st across. Ch 1, turn. (51 sc)
- Row 4 (Buttonhole): Sc in first 3 sts, ch 2, sk 2 sts (this creates the buttonhole), sc in remaining sts across. Ch 1, turn. (49 sc, 1 ch-2 space)
- Row 5: Sc in first 3 sts, 2 sc in ch-2 space, sc in remaining sts across. (51 sc)
- Fo, leaving a long tail for sewing.
Part 4: The Car Appliqué
Car Body (CC1 – Red):
- Ch 10.
- Row 1: Sc in 2nd ch from hook, sc in next 2 ch, hdc in next 3 ch, dc in next 3 ch. Ch 1, turn. (9 sts)
- Row 2: Sc in first 3 sts, hdc in next 3 sts, sc in next 3 sts. Ch 1, turn. (9 sts)
- Row 3: Sl st in first 2 sts, sc in next 5 sts, sl st in last 2 sts. Fo. (5 sc, 4 sl sts)
- This creates the basic car shape, wider at the back and tapering to the front.
Wheels (CC2 – Black): (Make 2)
- Make a magic ring.
- Ch 1, 6 sc into ring. Join with sl st to first sc. Pull ring tight.
- Fo, leaving a tail for sewing.
Assembly of Car:
- Using your yarn needle and the black yarn tails, sew the two wheels onto the bottom edge of the red car body. Weave in ends.
Part 5: Assembly
- Attach Suspenders:
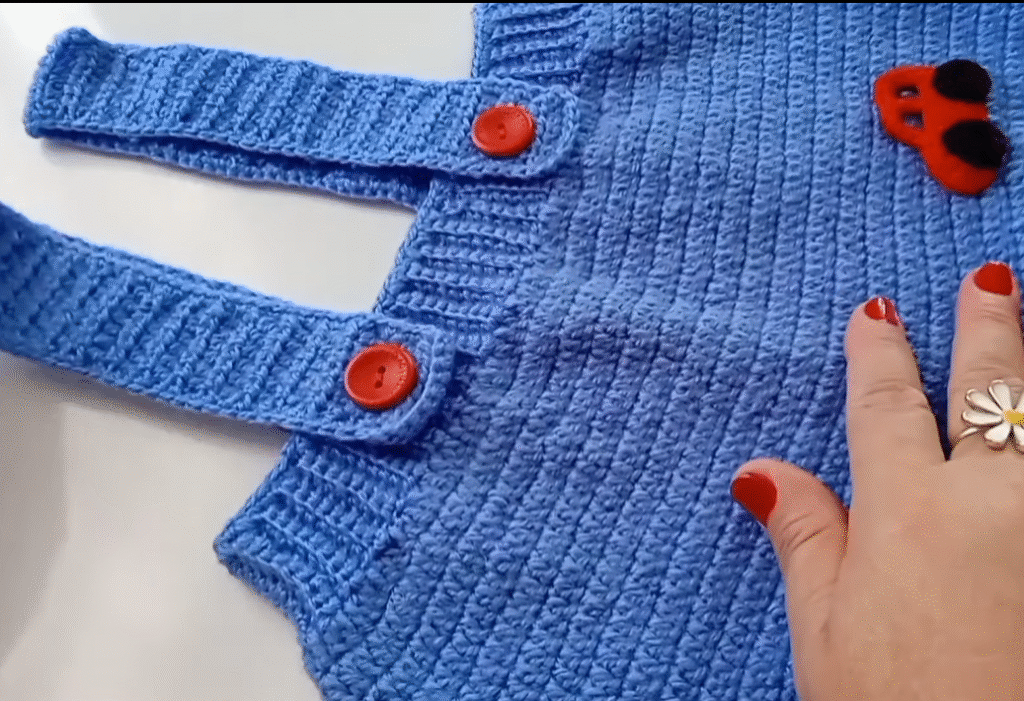
- Lay the shorts flat. Attach one end of each suspender to the back of the shorts, centered over the ribbing (waistband). Use the long tail and your yarn needle to securely sew them on. You can either sew them flat or crossed over (as pictured) at the back. For the crossed look, attach the left suspender to the right side of the back waistband, and vice versa.
- Bring the suspenders over the shoulders to the front of the shorts.
- Sew the two red buttons onto the front waistband of the shorts, positioning them so the suspender buttonholes fit neatly over them.
- Attach Car Appliqué:
- Position the completed car appliqué onto one of the legs (as pictured, usually the right leg for aesthetic balance).
- Using your yarn needle and matching yarn, carefully sew the appliqué onto the shorts, making sure it’s flat and secure.
- Weave in All Ends: This is the most crucial part for a tidy finish! Take your time to weave in all loose yarn ends securely into the stitches of the garment.
Video tutorial
Your Adorable Suspender Shorts Are Complete!
You’ve just crafted a truly special and unique garment for a little one. These handmade shorts are not just cute, they’re made with love! Don’t forget to snap a picture and share your finished project. I’d love to see your color choices and how they turn out.
Happy crocheting!