 by
by 
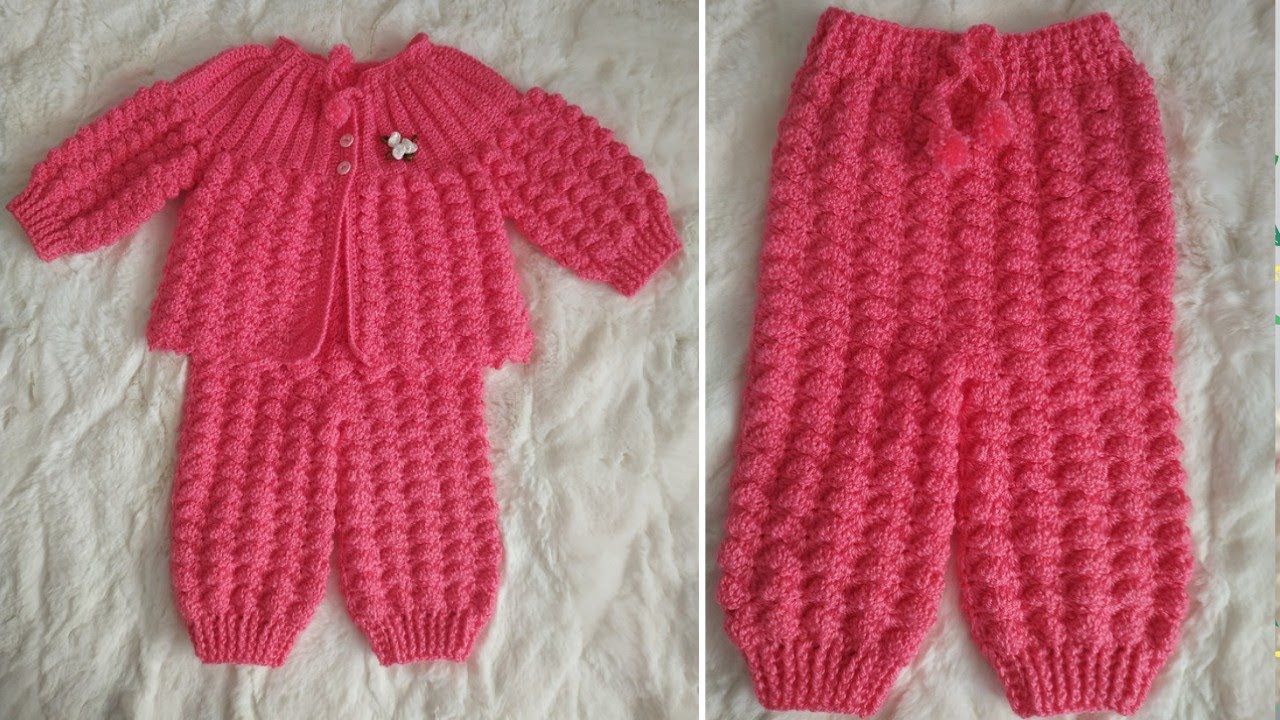
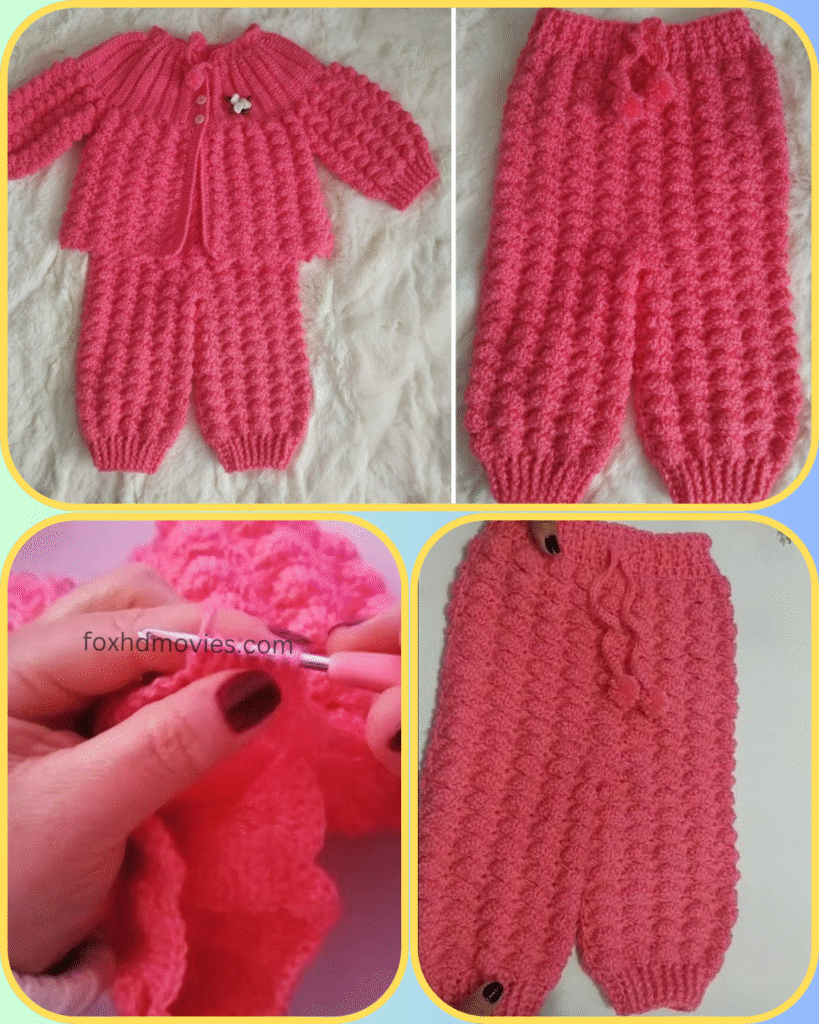
Keep your little one warm and stylish with these adorable handmade crochet baby pants! Featuring a delightful all-over textured stitch and a comfortable ribbed waistband, these pants are both practical and incredibly cute. They’re perfect for everyday wear, keeping tiny legs snug and cozy.
This pattern is designed for a baby size (approximately 6-12 months), but I’ll include notes on how to adjust it for a larger fit.
Difficulty Level: Intermediate (familiarity with basic crochet stitches and textured stitches)
Materials You’ll Need:
- Yarn: DK weight (Category 3) yarn in Main Color (MC – Pink in the example) – approx. 200-250 yards
- Suggestions: A soft, baby-friendly acrylic for easy care and warmth, or a cotton blend for breathability.
- Crochet Hook: 3.5mm (E/4) or size needed to obtain gauge
- Tapestry Needle: For weaving in ends and seaming
- Scissors
- Stitch Markers (optional, but helpful for marking repeats or the start of rounds)
Gauge (worked in DC): 5 DC and 3 rows = 1 inch (2.5 cm) Always check your gauge! Adjust hook size if necessary to achieve the correct sizing.
Abbreviations (US Crochet Terms):
- ch: chain
- sl st: slip stitch
- sc: single crochet
- hdc: half double crochet
- dc: double crochet
- inc: increase (2 stitches in the same stitch)
- dec: decrease (dc2tog or preferred decrease method)
- st(s): stitch(es)
- rep: repeat
- RS: right side
- WS: wrong side
- MC: Main Color
- fpdc: front post double crochet
- bpdc: back post double crochet
Special Stitch: Puff/Bobble Stitch
The textured stitch in the pants looks like a variation of a puff or bobble stitch. Here’s a common way to make it that creates a lovely pop:
4-DC Puff (4-DCP): Yarn over, insert hook into stitch, yarn over, pull up a loop, yarn over, pull through 2 loops (2 loops on hook). Yarn over, insert hook into same stitch, yarn over, pull up a loop, yarn over, pull through 2 loops. Repeat from * 2 more times (5 loops on hook). Yarn over, pull through all 5 loops on hook.
To create the textured rows: You will typically work a row of SC or DC, then a row with (DC, 4-DCP) repeated, then another row of SC/DC. This pushes the puff to the right side of the work. For this pattern, we’ll use a (DC, 4-DCP) repeat, offset to create the staggered look.
Pattern Instructions
These pants are worked in two separate leg panels, which are then joined to create the body, and finally, the waistband is added.
Part 1: The Legs (Make 2 – MC)
Each leg is worked from the bottom cuff up.
Cuff:
- Ch 25. (Adjust chain for desired ankle circumference. This will be the cuff height).
- Row 1 (RS): Sc in 2nd ch from hook and in each ch across. (24 sc) Turn.
- Row 2 (Ribbing): Ch 1, working in back loops only (BLO) sc in each st across. Turn.
- Repeat Row 2 until the ribbing measures approximately 1.5 – 2 inches (or desired cuff height).
Joining Ribbing and Starting Leg:
- Do NOT fasten off. Turn your ribbing sideways.
- Next Row (RS): Ch 3 (counts as 1st dc), work 1 dc into the end of each ribbing row evenly across the long edge of the cuff. (You should have approximately 20-25 dc, adjust to your liking for leg width). Turn.
Leg Body (Textured Stitch):
- Row 1 (WS): Ch 1, sc in each st across. Turn.
- Row 2 (RS – Textured Row): Ch 3 (counts as 1st dc), 4-DCP in next st, dc in next st. Repeat from * across, ending with dc in last st if needed to balance the pattern. Turn.
- Row 3: Ch 1, sc in each st and on top of each puff st across. Turn.
- Repeat Rows 2 and 3 until the leg measures approximately 6-7 inches from the top of the cuff (or desired length to crotch).
Shape Crotch (Inner Leg):
- Next Row (RS): Ch 3 (counts as 1st dc), dc in next st, inc in next st, continue textured pattern across to last 3 sts, inc in next st, dc in next 2 sts. Turn. (2 sts increased)
- Next Row (WS): Ch 1, sc in each st across. Turn.
- Repeat these 2 rows 1-2 more times, or until the inner leg curve is formed. (The leg will widen at the top).
- Fasten off. Make 2 Leg Panels.
Part 2: Joining the Legs and Body
- Lay one leg panel flat with RS facing. Lay the second leg panel flat with RS facing.
- Join at the crotch: Attach MC yarn to the inner side of one leg panel (the side that will become the crotch seam). Ch 1, sc across the top stitches of that leg panel. Ch 3 (this forms the crotch joining chain). Sc across the top stitches of the second leg panel. Turn.
- You’ve now connected the two legs, creating the space for the crotch.
Working in Rounds for the Body:
- Round 1 (RS – Textured Row): Ch 3 (counts as 1st dc), work textured pattern (4-DCP, dc) around the entire opening, including working into the ch-3 space of the crotch joining chain. Sl st to join to top of ch 3. (Ensure your puff stitches are on the outside).
- Round 2: Ch 1, sc in each st around. Sl st to join to first sc.
- Repeat Rounds 1 and 2 for 2-3 more rounds, creating the main body/diaper area of the pants.
Part 3: The Waistband (MC)
The waistband is worked in rounds directly onto the top of the body.
- Next Round (Waistband Setup): Ch 2 (counts as hdc), hdc in each st around. Sl st to join.
- Next Round (Ribbing): Ch 2, fpdc around next st, bpdc around next st. Repeat from * around. Sl st to join.
- Repeat Ribbing Round 3-4 more times for desired waistband height (approx. 1.5 – 2 inches).
- Fasten off.
Part 4: Finishing Touches
- Seam the inner leg seams: Using a tapestry needle and whip stitch or mattress stitch, sew the inner leg seams of each leg panel from the cuff up to the crotch.
- Weave in all loose ends.
- Drawstring (Optional): Ch a long chain (approx. 40-50 chains) and thread it through the fpdc/bpdc spaces of the top ribbing row. Tie knots at the ends or attach small crochet pom-poms (as seen in the image) for decoration.
- Block your pants gently to shape and set the stitches.
Video tutorial
Sizing Adjustments:
- For a larger size:
- Cuff: Increase the initial chain for the cuff.
- Leg Width: Increase the number of dc stitches in the row where you join the ribbing to the leg body.
- Leg Length: Work more rows for the leg body section before shaping the crotch.
- Crotch Shaping: Add more increase rows for a wider/deeper crotch area.
- Body & Waistband: Ensure you have enough stitches when joining the legs, and work more rounds for the body and waistband if needed.
- Gauge: If you’re using a thicker yarn, adjust your hook size accordingly.
These textured baby pants are a wonderful addition to any little one’s wardrobe, providing both comfort and charming style. Enjoy the process of creating this lovely handmade piece! Don’t forget to share your finished projects – I love seeing your beautiful work! Happy crocheting!