by
by 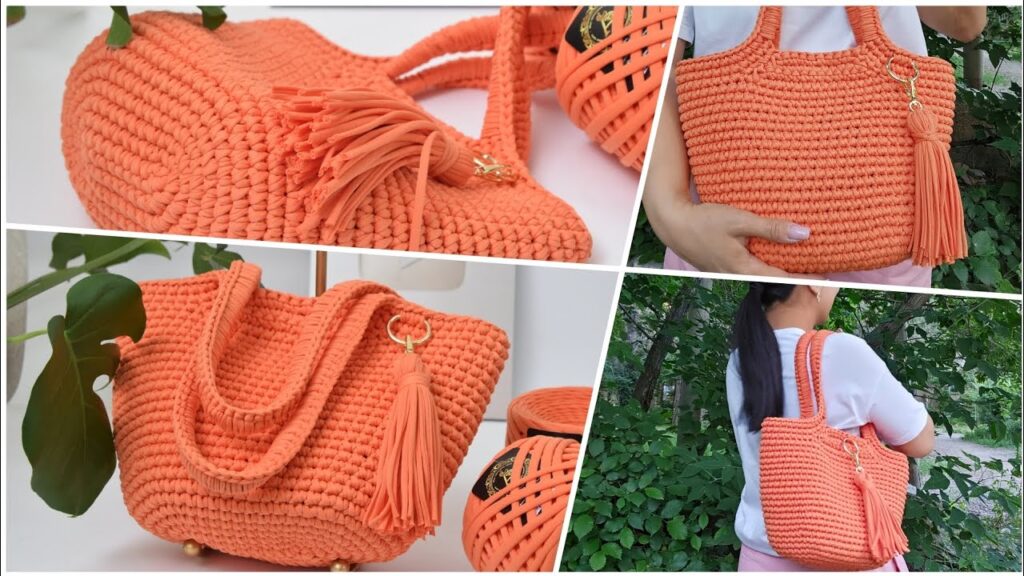
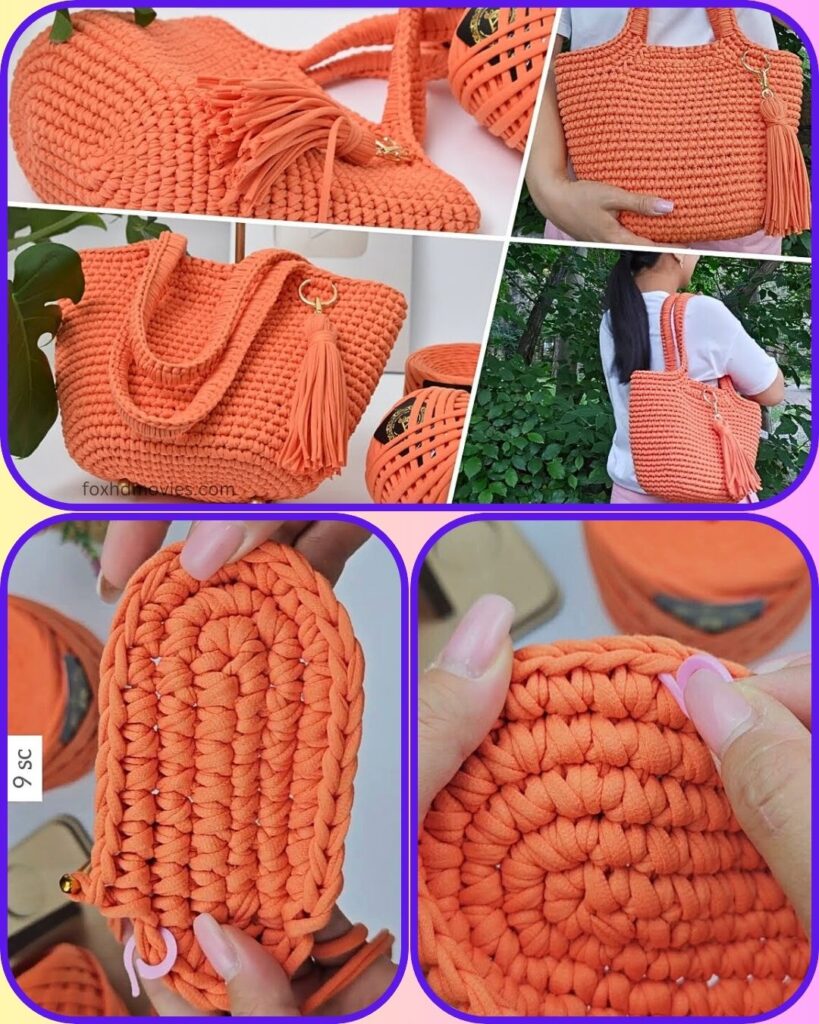
Looking for your next fabulous crochet project? This vibrant orange tote bag, with its beautifully structured design and playful tassel, is sure to inspire! It’s the perfect accessory for a sunny day out, a trip to the market, or simply adding a pop of color to your outfit. While I can’t give you the exact pattern for this specific bag, I can guide you through the key elements and techniques to create something similar and equally stunning.
What Makes This Bag Special?
- Sturdy Construction: This bag clearly uses a material that gives it excellent shape and rigidity, likely t-shirt yarn or a similar chunky, robust fiber.
- Dense Stitching: The tight, even stitches (probably single crochet or half double crochet) contribute to its strength and neat appearance.
- Integrated Handles: The handles appear to be crocheted directly into the bag, providing durability and a seamless look.
- Charming Tassel: A simple, coordinating tassel adds a fun and fashionable accent.
- Metal Hardware: The D-ring and the tassel’s attachment point add a touch of sophistication. Some similar bags also incorporate metal feet on the bottom for added protection and stability.
Essential Supplies You’ll Likely Need:
- T-Shirt Yarn or Macrame Cord: This is crucial for achieving the bag’s structure and durability. Choose a color that makes you happy! (The example uses a beautiful coral/orange.)
- Large Crochet Hook: A hook size appropriate for your chosen yarn (e.g., 6mm, 7mm, 8mm, or even larger, depending on the yarn).
- Scissors
- Yarn Needle: For weaving in ends.
- Optional but Recommended:
- Bag Base/Shaper: Some crafters use a pre-made rigid base (often faux leather or plastic canvas) for the bottom of the bag to ensure it holds its shape perfectly.
- Metal D-ring or O-ring: For attaching the tassel.
- Metal Swivel Clasp: For the tassel if you want it detachable.
- Bag Feet: Small metal feet can be added to the bottom for protection.

Key Techniques to Master:
- Creating a Sturdy Base:
- Crocheted Base: You’ll start by crocheting an oval base (working in rows and then around the perimeter, or increasing in the round) to the desired size of your bag’s bottom. For extra stiffness, you can insert a piece of plastic canvas or a pre-made bag base after crocheting the bottom or as you go.
- Stitch Choice: Single crochet (SC) is often preferred for bags due to its dense fabric, but half double crochet (HDC) can also work.
- Building the Sides:
- Once your base is done, you’ll typically work into the back loop only (BLO) or into the third loop (for HDC) for the first round of the sides to create a defined edge.
- Continue working rounds of your chosen stitch, making sure your tension is consistent and tight to ensure the bag stands up well. Do not increase stitches once you start the sides, unless the pattern specifically calls for shaping.
- Crafting the Handles:
- Integrated Handles: The handles in the image appear to be formed by leaving unworked sections (chain spaces) for the handle opening and then continuing to crochet over those chains in subsequent rounds. This creates very strong, seamless handles.
- Strap Reinforcement: You can also add a line of slip stitches or even a small amount of fabric stiffener inside the handles for extra durability.
- Making the Tassel:
- Tassels are incredibly easy to make! You’ll need a piece of cardboard or a book the size of your desired tassel length. Wrap your yarn around it multiple times, then secure the top with another piece of yarn, cut the bottom loops, and create a hanger.
- Attach your tassel to a D-ring or directly to the bag’s handle.
Pattern Outline: Sturdy Crochet Tote Bag (Inspired by Image)
Skill Level: Intermediate (Assumes familiarity with basic crochet stitches, working in the round, and creating even tension)
Finished Size: (Pattern would specify dimensions like approx. X” wide x Y” tall x Z” deep)
Materials:
- Yarn:
- T-shirt Yarn, Macrame Cord, or other sturdy chunky yarn. (Pattern would specify exact yardage/weight)
- Example: ~400-500 grams of T-shirt yarn
- Crochet Hook:
- Size suitable for your yarn (e.g., 6mm, 7mm, 8mm, 9mm). (Pattern would specify exact size)
- Example: 8.0 mm (L) crochet hook
- Tapestry Needle: For weaving in ends.
- Scissors
- Stitch Markers (Highly recommended!)
- Optional Accessories:
- Bag bottom shaper (plastic canvas or pre-made faux leather bottom)
- Metal D-ring or O-ring for tassel attachment
- Swivel clasp for tassel
- Bag feet
Gauge: (Pattern would specify stitches and rows per inch/cm, e.g., 8 SC and 7 rows = 4″ x 4″)
- VERY IMPORTANT for bag shaping and size! Make a gauge swatch.
Abbreviations (US Terms):
- CH = Chain
- SL ST = Slip Stitch
- SC = Single Crochet
- HDC = Half Double Crochet
- ST(S) = Stitch(es)
- INC = Increase (2 SC in same ST)
- BLO = Back Loop Only
- FO = Fasten Off

The Pattern Sections Would Then Follow This Structure:
I. Bag Bottom (Oval Shape)
- Starting Chain: CH X stitches.
- Row 1: Work SC (or HDC) in the 2nd CH from hook and across to the last CH. Work 3 SC in the last CH (this turns the corner). Continue working SC along the other side of the starting CH. Work 2 SC in the last ST (this completes the oval). Join with SL ST to first SC. CH 1.
- Round 2, 3, etc.: These rounds would contain specific increase instructions (e.g., INC, SC, INC, SC, etc.) at the ends of the oval to gradually widen the base. Each pattern for an oval base will have a unique increase sequence to keep it flat. Continue until the desired base dimensions are reached.
- Final Base Round: Join with SL ST. Do NOT CH 1.
II. Bag Body/Sides
- Round 1 (Defining the Edge): CH 1. Work SC (or HDC) in BLO (Back Loop Only) of each ST around. Join with SL ST to first SC. CH 1.
- This BLO round creates a crisp edge between the bottom and the sides.
- Round 2 onwards: Work SC (or HDC) in both loops of each ST around. Join with SL ST. CH 1.
- Continue working these rounds without any increases until the bag reaches the desired height before the handles. (Pattern would specify number of rounds or target height).
III. Creating the Handles
- Handle Placement Round:
- Work SC (or HDC) for X stitches.
- CH Y stitches (this creates the opening for the handle).
- Skip Y stitches on the bag body.
- Work SC (or HDC) for Z stitches (across the front/back).
- CH Y stitches (second handle opening).
- Skip Y stitches on the bag body.
- Work SC (or HDC) for remaining stitches to end of round. Join with SL ST. CH 1.
- Handle Reinforcement Rounds:
- Work SC (or HDC) in each ST around, including working into the CH stitches of the handle opening.
- Continue for 1-3 more rounds as desired to build up the thickness and strength of the handles.
- Join with SL ST. FO.
IV. Finishing Touches
Weave in all ends securely using your tapestry needle. Tassel:
- Instructions on how to make a tassel of desired size using remaining yarn.
- Instructions on how to attach the tassel to a D-ring or directly to the bag handle.
Optional: If using a rigid bag bottom shaper, insert it now. If using bag feet, attach them according to package instructions.