by
by 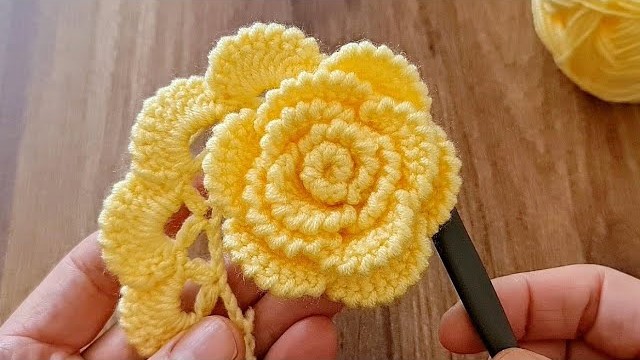
let’s get those crochet hooks ready for some roses! This pattern will guide you through creating a lovely, easy-to-crochet rose. We’ll work in a spiral to give it that natural, swirling look.
Materials:
- Worsted weight yarn in your desired rose color (and green for the leaves, if you like)
- Crochet hook appropriate for your yarn weight (usually a US G/6 or H/8 (4.0-5.0 mm))
- Yarn needle for weaving in ends
- Scissors
Abbreviations (US Crochet Terms):
- ch: chain
- sl st: slip stitch
- sc: single crochet
- hdc: half double crochet
- dc: double crochet
- tr: treble crochet
- st(s): stitch(es)
- sp: space 1
- sk: skip
- rep: repeat

Flower Pattern:
Starting Chain:
Ch 35 (or any odd number for a slightly different look).
Row 1:
- In the second ch from the hook, sc.
- Hdc in the next ch, dc in the next ch, tr in the next ch, dc in the next ch, hdc in the next ch, sc in the next ch. Repeat from * to the last ch.
- You should end with a sc in the last ch.

Creating the Rose:
Now comes the fun part – shaping the rose!
- Starting from the end where you finished Row 1, gently begin to roll the crocheted strip.
- Keep the bottom edge (the initial chain edge) relatively straight as you roll.
- As you roll, you’ll notice the longer stitches (treble and double crochet) will naturally fan out, creating the petals of the rose.
- Continue rolling until you reach the beginning of the strip. Adjust the tightness of your roll to achieve the desired fullness of your rose.
- Once you’re happy with the shape, use your yarn needle and the tail of your starting chain to securely stitch the bottom of the rolled rose together. Make sure to catch all the layers to prevent it from unraveling. You can weave through the base multiple times to secure it well.
- Weave in any remaining yarn ends.

Optional Leaves (Make 2):
- Ch 7.
- In the second ch from the hook, sl st.
- Sc in the next ch.
- Hdc in the next 2 chs.
- Sc in the next ch.
- Sl st in the last ch.
- Ch 1, turn.
- Sl st in the first st, sc in the next st, hdc in the next st, sc in the next st, sl st in the last st.
- Fasten off, leaving a long tail for attaching.
Attaching the Leaves:
- Use your yarn needle and the long tails of the leaves to sew them to the base of your rose. Position them where they look natural.
Video tutorial
Tips and Variations:
- Yarn Weight and Hook Size: Adjusting your yarn weight and hook size will change the size of your rose. Thinner yarn and a smaller hook will create a smaller, more delicate rose, while thicker yarn and a larger hook will result in a larger, more prominent flower.
- Color Changes: You can introduce a different color for the center of the rose by switching yarn after a few repeats in Row 1.
- Tightness: The tightness of your rolling will affect the look of your rose. A tighter roll will create a more compact center, while a looser roll will give it a more open bloom. Experiment to find your preferred style!
- Adding a Stem: You can crochet a simple chain or an i-cord in green yarn and attach it to the base of the rose for a stem.