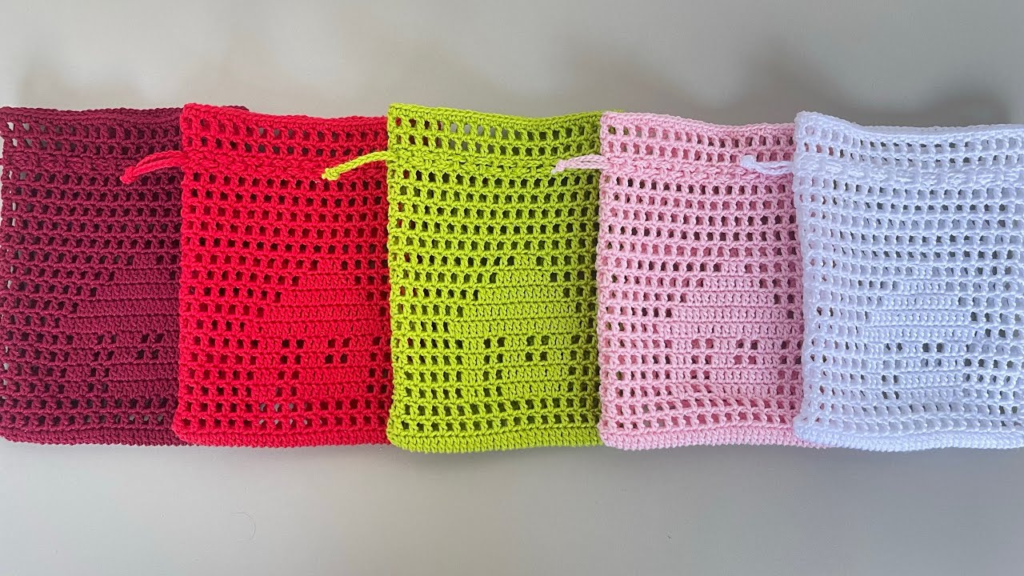
Here’s a pattern for a quick and easy crochet gift bag:
Introduction
Handmade gifts have a unique charm that cannot be matched by store-bought items. The time, effort, and love put into crafting a personalized gift make it extra special for the recipient. One delightful gift idea that brings warmth and personal touch to any present is a crochet gift bag. Not only is it eco-friendly and reusable, but it also adds a touch of creativity to your gift-giving experience. In this comprehensive guide, we’ll take you through the step-by-step process of creating your crochet gift bag. Whether you are a seasoned crochet enthusiast or a beginner, this project is sure to delight you and your loved ones.
Skill Level: Intermediate
Materials:
- Worsted weight yarn in your desired color
- Crochet hook (size G/6 – 4.25mm)
- Yarn needle
- Scissors
- Ribbon or cord for drawstring (optional)
Finished Size: Approximately 8 inches (20 cm) wide and 10 inches (25 cm) tall.
- Gather Your Materials
The first step in any crochet project is to gather all the necessary materials. For your crochet gift bag, you’ll need:
a. Crochet Yarn: Choose a yarn of your preference, such as cotton, wool, or acrylic, in the color(s) that suit your taste and the occasion. Keep in mind the size of the bag you want to create and the weight of the yarn.
b. Crochet Hook: Select a crochet hook that matches the yarn weight. Refer to the yarn label for the recommended hook size or use a hook size that you are comfortable with.
c. Scissors: A good pair of scissors will be essential for cutting the yarn.
d. Tapestry Needle: A large-eye tapestry needle will help you weave in the loose ends and finish your project neatly.
- Choose a Pattern
Before diving into your crochet gift bag, select a pattern that aligns with your skill level and the style you wish to achieve. There are numerous patterns available online or in crochet books, ranging from simple single-color bags to intricate designs with various stitches. Some popular patterns include the classic Granny Square bag, the timeless Chevron stitch bag, or the modern Moss Stitch bag.
For beginners, a basic single crochet stitch bag may be a great starting point. As you gain confidence and expertise, you can venture into more complex patterns.
Pattern:
Note: This pattern uses US crochet terminology.
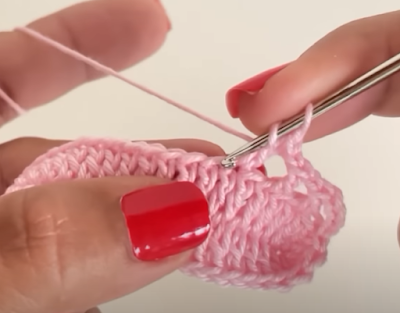
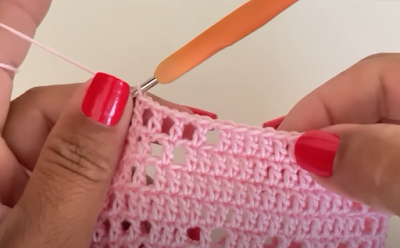
Step 1: Starting Chain Chain 21.
Step 2: First Row Single crochet in the second chain from the hook. Single crochet in each chain across. (20 stitches)
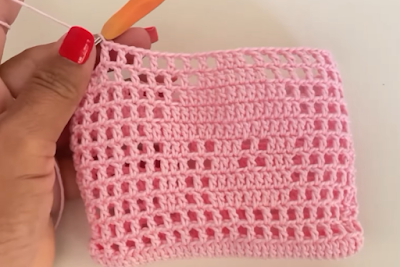
Step 3: Repeat Rows Chain 1 and turn your work. Single crochet in each stitch across. Repeat this row until your work measures approximately 10 inches (25 cm) tall or desired height.
Step 4: Fold and Sides Fold the crocheted piece in half, aligning the short edges. Starting from the bottom corner, whip stitch or slip stitch the sides together to create a seam. Fasten off and weave in any loose ends.
Step 5: Drawstring Casing (optional) If you would like to add a drawstring to your gift bag, create a casing along the top edge. Attach your yarn to one corner of the bag and single crochet evenly around the top, making sure to work through both layers. Join with a slip stitch to the first single crochet.
Step 6: Drawstring Cut a piece of ribbon or cord to your desired length. Thread it through the casing using a yarn needle. Tie the ends together securely.
Step 7: Finishing Touches Trim any excess yarn, and weave in any remaining loose ends. Your quick and easy crochet gift bag is now ready to use!
- Start Crocheting
Once you’ve chosen your pattern, it’s time to start crocheting your gift bag. Follow these general steps to begin:
a. Make a Slip Knot: To begin, create a slip knot by forming a loop with the yarn and pulling the working end through it. Tighten the loop around the hook.
b. Chain Stitch: Create a foundation chain by chaining the desired number of stitches. This chain will determine the width of your bag.
c. Single Crochet: Work your first row of single crochet stitches into the foundation chain. Insert your hook into the second chain from the hook, yarn over, pull through the loop, and yarn over again to complete the single crochet. Continue until the end of the row.
d. Turning Chain: Turn your work and create a turning chain. The turning chain acts as the first stitch of the next row.
e. Continue Crocheting: Follow the pattern instructions for subsequent rows, repeating the necessary stitches until your bag reaches the desired height.
- Adding Patterns and Designs
If you’ve chosen a pattern that includes intricate designs or color changes, this is the stage where your creativity will shine. You may want to incorporate stripes, flowers, or geometric patterns to add a touch of uniqueness to your crochet gift bag. Plan the placement of these patterns beforehand to ensure a balanced and visually appealing design.
- Finishing Touches
Once you’ve completed the main body of your crochet gift bag, it’s time to add finishing touches:
a. Handle or Strap: Decide on the type of handle or strap you want for your bag. You can crochet a simple strap and attach it securely to the sides, or you may prefer adding sturdy wooden or metal handles for a more sophisticated look.
b. Lining (Optional): To prevent small items from slipping through the stitches, you can add a fabric lining to your gift bag. Cut the fabric to the size of your bag and sew it neatly inside.
c. Embellishments: If you desire, you can add buttons, beads, tassels, or other decorative elements to give your crochet gift bag a personal touch.
- Blocking
To enhance the overall appearance of your gift bag and ensure it retains its shape, consider blocking the finished piece. Blocking involves wetting the bag, shaping it to the desired dimensions, and allowing it to dry flat. This process helps to even out tension and makes the stitches more defined.
Conclusion
Creating a crochet gift bag is a delightful and rewarding endeavor. As you pour your heart into the project, you’ll not only craft a beautiful and practical gift but also develop your crochet skills along the way. Remember that each gift bag you make is a labor of love, and the recipient will undoubtedly appreciate the thought and effort you put into it.
Through this guide, we hope you have gained valuable insights into the process of creating a crochet gift bag. From selecting the materials and pattern to adding your unique touch, the possibilities are endless. So, pick up your crochet hook, unleash your creativity, and start making memorable gifts that will be cherished for years to come. Happy crafting!
Feel free to customize this pattern by experimenting with different yarn colors, adding embellishments, or adjusting the size to fit your needs. Enjoy creating beautiful gift bags for your loved ones!